Happy 10th Wedding Anniversary

By | February 3, 2016

Hi there

Hope the ‘back to school’ is going well for those of you with kids ๐Ÿ™‚  My husband is going back to school on Tuesday – he is starting a 20 week Certificate in Cookery and today we went shopping for all his equipment and uniform.  I am so looking forward to see what he creates and I believe they are allowed to bring their creations home.  We already have a line of ‘guinea pigs’ waiting to trial his creations ๐Ÿ™‚

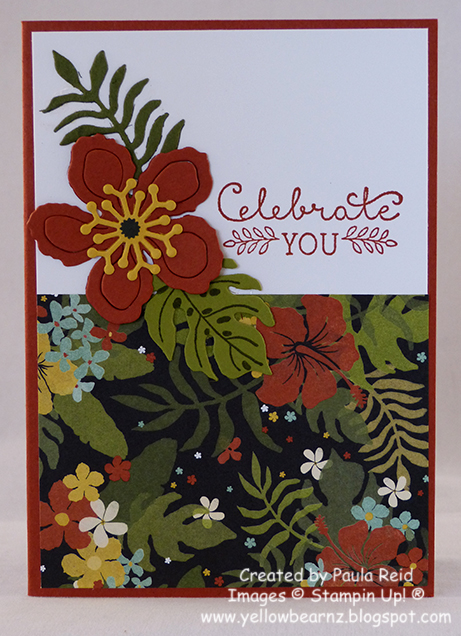
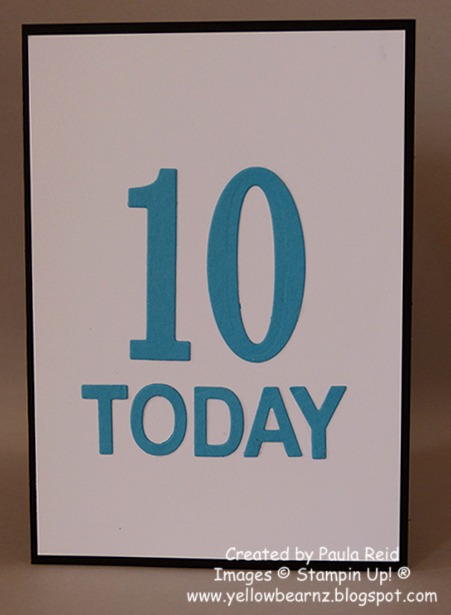
Today’s card is for our friends who are celebrating their 10th wedding anniversary :).  I’m so glad that in the new catalogue there is a stamp set that is just perfect for such occasions as I am in need of creating 5 wedding anniversary cards this month!

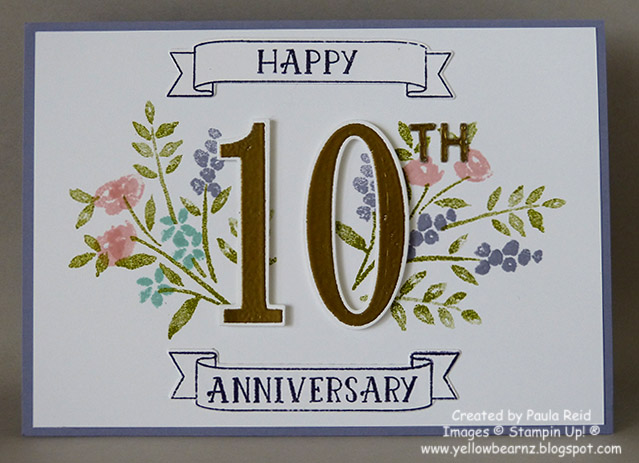
The ’10’ is stamped with VersaMark then heat embossed with gold.  I cut the ‘th’ out of gold foil but it was the wrong gold.  Another way of getting around this is to ink a scrap piece of Whisper White with VersaMark then heat embossed it in gold.  You then have a sheet of gold embossed paper ready to cut out your ‘th’ to coordinate with the numbers ๐Ÿ™‚

Supplies:
Stamp Set – Number of Years
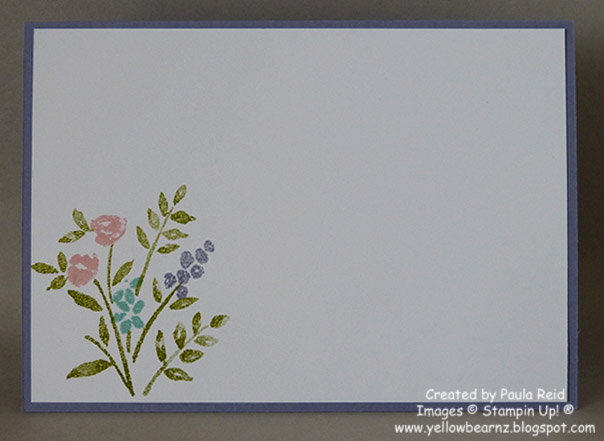
Card Stock – Wisteria Wonder, Whisper White
Ink – Old Olive, Wisteria Wonder, Pool Party, Blushing Bride, Elegant Eggplant, VersaMark
Other – Large Numbers Framelits, Little Numbers, Gold Embossing Powder, Dimensionals

I hope you’ve had a lovely day and dinner out to celebrate this wonderful milestone – congratulations.

Up, up and away with Balloon Celebration

By | February 2, 2016

Hi there

One of my fellow team mates celebrated her birthday the other day and this is the card I sent her – it even arrived on the right day (thanks NZ Post).


I’ve been stepping out of my comfort zone lately and been using more colours from the Subtles range and I must say they are warming on me. ย Normally I gravitate to the Brights so be prepared to see more Subtles used in my upcoming projects. ย Do you have a colour family that you shy away from?

Don’t you just love this sentiment? ย I think it’s really cool and you can change what you are drinking – tea, coffee, hot chocolate and Champagne – to suit the occasion.

Supplies:
Stamp Set – Balloon Celebration
Card Stock – Blushing Bride, Whisper White
Ink – Pink Pirouette, Blushing Bride, Wisteria Wonder, Elegant Eggplant, Momento Black
Other – Balloon Bouquet Punch

Creative Inkers Occasions and Sale-A-Bration Blog Hop 2016

By | February 1, 2016

Hi there

Welcome to the Creative Inkers Occasions and Sale-A-Bration Catalogue Blog Hop for 2016.  You may have arrived from Jacque’s blog or just joined my page.

My project today is the Enjoy the Little Things Project Kit on page 33 of the Occasions Catalogue.  I’ve been a bit slow off the mark in buying kits so this is my first one and I LOVED it.  I had so much fun creating the 13 different projects that are interchangeable to be displayed on the easel which is also included in the kit.

This one is my favourite design.


I made the kit up as per the instructions which were really easy to follow.  I did make one addition and that is to the ‘Be Brave’ display – I added a piece of Bermuda Bay behind the piece of fabric.  All the pieces are die cut so you just have to ‘push’ them out of the sheet.  One thing I did do which I think helped was sort all the pieces before I started into 13 different little plastic bags – this way I knew I had the correct pieces for each display.

The kit includes the chalkboard easel, all the die cut pieces and embellishments to create these beautiful displays.  You will need to supply the stamp set “Enjoy the Little Things”, the following ink pads – Crushed Curry, Delightful Dijon, Mint Macaron, Mossy Meadow, Soft Suede, Tangelo Twist, Watermelon Wonder and Basic Black Archival and adhesive.

I used a mixture of adhesives – Fast Fuse for adhering the fabric on ‘Be Brave’, Crystal Effects for adhering the wooden embellishments, Fine Tip Glue Pen for the fine letters and sequins.

Purchase the kit and gather some friends together – I will supply the extra supplies to complete the project or if you have the inks purchase the kit, stamp set and an ‘H’ clear block and you will be eligible to choose a FREE product from the Sale-A-Bration catalogue and make it on your own.

I hope my project has inspired you to purchase this kit – it looks great sitting on a breakfast bar.  Please leave me a comment as I love to hear from you.  My ‘comments’ link is at the bottom of my post just below the photo of Yellowbear.

It’s now time to hop on over to see what creation Jan has in store for us.


Blog Participants

Rebecca Palmer

Love a Challenge? – #GDP020

By | January 31, 2016

Hi there

It’s been a while since I joined in a challenge and this weeks challenge over at Global Design Project is a good one.

I knew exactly what to do once I saw the challenge – CASE-ing Connie’s Card.  The challenge was to use her card as inspiration to create something ourselves.

I’ve gone with the stripped theme:

It’s a great way to showcase all five designs of washi tape from the It’s My Party Designer Washi Tape from the new Occasions Catalogue.  The candles have a coordinating punch which makes it easy to punch out rather than having to manually cut.

I mentioned yesterday that this particular stamp is a favourite at the moment – I really like the font and it’s also part of the It’s My Party Suite – Party Wishes.  The sentiment on the cake is also rather cool.  The recipient of this card will have to wait a couple of weeks till she can have her cake ๐Ÿ™‚

Supplies:
Stamp Set – Party Wishes
Card Stock – Melon Mambo, Whisper White
Ink – Melon Mambo, Mint Macaron
Other – Party Punch Pack, It’s My Party Washi Tape, Dimensionals

Dinosaur Request

By | January 30, 2016

Hi there

One of the guys I used to work with is celebrating his birthday today.  He asked for a special card – not a theme I would have thought of to make for him :).  I don’t have any dinosaur stamps so when this is the case I reply on good old punch art.  Thanks to Pinterest there were plenty of ideas.

None of the ideas I saw had what punches they’d used so I took a guess.  The Cajun Craze body is a wide oval, the head and legs are large ovals (cut in half and trimmed a bit for the legs), Boho Blossoms (retired) for the end of the tail and spikes (Hello Honey).  The tail is hand drawn.  I ran all these pieces through the Big Shot with the Decorative Dots Embossing Folder before I put it together.  I saw the trees on one card and thought they’d be good to fill in the background.  The trunk is from the Modern Label Punch and leaves use the large oval again.  I folded the leaves in half then cut just up to the centre fold, unfolded and sponged with Old Olive.  My ‘grass’ on the bottom is the Mossy Meadow washi tape from the Botanical Gardens Designer Washi Tape.

My sentiment comes from the Party Wishes set and is a favourite for me at the moment – so if you have a birthday in the next couple of months you may find this stamp on your card ๐Ÿ™‚

On Thursday we looked after our neighbours two boys (3 and 5) and they each made one of these cards – they thought it was pretty cool.  They had bought their Dinosaur Zoom book up for me to read them so we were able to identify our dinosaur as a Stegosaurus ๐Ÿ™‚

Quick Tip – Punching Balloons with the Balloon Bouquet Punch

By | January 29, 2016

Hi there

Yesterday I showed you some cards using the Balloon Bouquet Punch and promised a tip on how to use the punch.

As you can see from the photo below the punch has the big and small balloon but they’re not the same orientation – herein lies the problem.

 To make sure your stamped image is the same orientation and easy to line up with the punch just follow these instructions and you’ll never get stuck.

When stamping the small balloon make sure it is stamped at the top of your piece of card stock and in the same direction as the photo below.  If you’re stamping the big balloon make sure it is stamped at the bottom of your piece of card stock.  I prefer to use a strip of card stock rather than a small piece as it gives you something to hold while lining up the image with the punch.

 Turn your punch over so you can see the cut outs of the balloons.  You will notice the small balloon is upside down – turn your piece of card stock so that the small balloon is facing downwards and feed into the punch.  Align the stamped image with the cut out and punch.  If you had stamped your small balloon at the bottom of the card stock and fed it in it would have been upside down and wouldn’t have matched the cut out. (I found this out the hard way!)

To cut out the big balloon feed the piece of card stock into the punch and align with the cut out and punch.
From now on you’ll have perfectly punched balloons ๐Ÿ™‚

Celebrating with Balloons – Stack of Cards

By | January 28, 2016

Hi there

Here’s the last set of my Stack of Cards.  This set uses the Balloon Celebration and Balloon Builders stamp sets.


It’s great that there is a coordinating punch for these balloons – I’m not that keen on hand cutting this amount of balloons.  When you purchase the Balloon Celebration and Balloon Bouquet Punch it comes as a bundle which means you save 15%.  The punch also coordinates with two of the balloons from the Balloon Builders set.


Now I learnt a trick for punching out the balloons – check back tomorrow and I’ll show you the trick ๐Ÿ™‚

The balloons used on this card are from the Balloon Builders set and coordinate with the Balloon Bouquet Punch.  My background was created by applying ink to an ‘E’ clear block then ‘stamping’ the block onto the card stock.

Supplies:
Stamp Set – Balloon Celebration, Balloon Builders
Card Stock – Calypso Coral, So Saffron, Wild Wasabi, Wisteria Wonder, Pink Pirouette, Pool Party, Soft Sky, Pear Pizzazz, Whisper White
Ink – Calypso Coral, Wisteria Wonder, Elegant Eggplant, Pink Pirouette, Blushing Bride, Pool Party, Pear Pizzazz, Momento Black
Other – Balloon Bouquet Punch, Washi Label Punch, Dimensionals, E Clear Block

Don’t forget to check back tomorrow to see my tip on punching out the balloons.

I’m Going Global

By | January 27, 2016

Hi there

Another hot and sticky day today but I did manage to get some crafting done and some birthday cards are now in the post ๐Ÿ™‚

Here are the next batch of cards using products from the Going Global Suite – unfortunately it’s not me ‘going global’.

 The first two designs have the word “world’ in them so I used the world map for the inside.  The third design talks of adventure/travel so I used the compass for the inside.


The squares are 1″ and can be cut with our 1″ punch – nice and easy.  The Very Vanilla mat is 3 1/4″ x 3 1/4″ and the Basic Black mat is 3 1/2″ x 3 1/2″.

I CASED the design of this card from a swap I received from one of my team mates – thanks for the use of your design Laurie ๐Ÿ™‚

Supplies:
Stamp Set – Going Global
Card Stock – Mossy Meadow, Sahara Sand, Delightful Dijon, Very Vanilla, Basic Black
Ink – Momento Black, Mossy Meadow
DSP – Going Places Paper Stack
Other – 1″ Square Punch, Large Oval Punch, Scallop Oval Punch, Triple Banner Punch, Banner Punch, Sweetheart Punch, Dimensionals

Check back tomorrow for the last batch of cards ๐Ÿ™‚

It’s My Party – Stack of Cards

By | January 26, 2016

Hi there

It’s been another hot day here in Auckland – I saw a temperature sign say 29 which is getting up there (although not as hot as Aussie).

We’re now onto the It’s My Party cards from Saturday – I love the bright colours in this product suite.

I love the saying on the inside of the card ๐Ÿ™‚

So that we didn’t have to keep cleaning the stamps I had prestamped and punched out the Melon Mambo and Crushed Curry balloons so that the ladies only had to stamp and punch the Mint Macaron balloon.

 
Did you notice the punched out candle for the ‘i’ of Birthday?  This stamp set and  coordinating punches come as a bundle which means you save 15% .  The punch pack consists of the balloon, cupcake and candle.

Supplies:
Stamp Set – Party Wishes
Card Stock – Melon Mambo, Crushed Curry, Mint Macaron, Basic Black, Whisper White
Ink – Melon Mambo, Crushed Curry, Mint Macaron, Momento Black
DSP – It’s My Party
Other – Party Punch Pack, Basic Black Marker,Dimensionals

Check back tomorrow when we are ‘Going Global’

Botanical Blooms Stack of Cards

By | January 25, 2016

Hi there

Just got home from a lovely walk from St Heliers to Mission Bay and back again – it was such a beautiful evening and great to see so many people out enjoying our wonderful city.

As promised here’s a closer look at the Botanical Blooms cards from yesterday.

 
Each kit contained the 3 pieces of DSP (all the same size), 3 pieces of Whisper White card stock and two of the flowers, stamen and four leaves.

They then had to cut out one flower and stamen and two leaves using the Botanical Builder Framelits.  The flower and one of the leaves can be a bit tricky to remove from the Framelit but with the help of the new Big Shot Die Brush they found it a breeze.

Once they had all the pieces it was just a matter of mixing and matching the pieces to create their cards.  The sentiments are from the new Suite Sayings set.

Supplies:
Stamp – Botanical Blooms, Suite Sayings
Card Stock – Cajun Craze, Mint Macaron, Old Olive, Mossy Meadow, Hello Honey, Whisper White
Ink – Cajun Craze, Old Olive, Mossy Meadow, Momento Black
DSP – Botanical Gardens DSP
Other – Botanical Builder Framelits Die, Big Shot Die Brush

Check back tomorrow night for It’s My Party

ESAD Occasions Catalogue Blog Hop

By | January 24, 2016

Hi there

Welcome to the ESAD Occasions Catalogue Blog Hop for 2016.  You may have arrived from Rachael’s blog or just joined my page.
So what is ESAD?  ESAD stands for “Extra Special Australasian Demonstrators” and it is an on-line group just for Australian and New Zealand Stampin’ Up! demonstrators.

We love what we do & love to share with our customers, friends, and wonderful blog visitors. We also share what we love in our ESAD Demonstrator community, through swaps, challenges, sharing knowledge, ideas & friendship, and we’re always there to help and support each other.

So if you’re a Stampin’ Up! demonstrator located in Australia or New Zealand, then please feel free to leave me a comment with your email address and I’ll contact you with information on how to join our wonderful group.
Yesterday I held an event for some of my ladies and here are the 12 cards we made using four new suites from the Occasions Catalogue.  Leave me a comment and let me know which one is your favourite.
First up we used the Botanical Gardens Suite and created these three cards:
Next up was the It’s My Party Suite:
After a break for afternoon tea we headed into the Going Global Suite (thanks to one of my fellow demos for this layout – it worked a treat):
And finally no birthday is complete without some balloons.  The top left and bottom cards use the Balloon Celebration set and the top right uses the Balloon Builders set.  Both these stamp sets coordinate with the Balloon Bouquet Punch
Check back tomorrow through Thursday to see each suite in full with full details of what was used to create these cards.
I hope you’ve enjoyed your visit to my blog – now it’s time to hop on over to Pauline’s blog.  Thanks for your visit and don’t forget to leave me a comment as to which suite or card is your favourite.

If you get lost here is a list of participants:

Flower Shop Fancy Fold

By | January 22, 2016

Hi there

I’ve had a couple of busy days prepping for an event tomorrow – I can’t show you the projects until 8:30pm on Sunday night (first Blog Hop of the year).

Here’s a birthday card I made last year for our neighbours birthday and forgot to post it on here.

Supplies:
Stamp Set – Flower Shop, Endless Birthday Wishes
Card Stock – Sahara Sand, Early Espresso, Blackberry Bliss, Very Vanilla
Ink – Sahara Sand, Soft Suede, Blackberry Bliss
DSP – Neutrals Colour Collection
Other – Pansy Punch, Rhinestones, Dimensionals, Bakers Box Thinlits, Butterflies Thinlits, Window Sheet, Pearls, Clothespins

Happy Anniversary

By | January 19, 2016

Hi there

Today is my 14th Wedding Anniversary ๐Ÿ™‚  We spent the day doing a ‘tiki tour’ of the Kaipara South Head and enjoyed a lovely picnic on the shores of Lake Ototoa, afternoon tea in Helensville then home via the back roads.

Here is the card I made Phil – he had to wait for me to photograph it this morning before I could write in it and give to him.  It was a bit a of late finish last night although I’m not sure why as I’ve had the idea in my head for ages!

You can’t really see on the photo above but I’ve used the clear Wink of Stella Glitter Brush (new on page 24 of the Occasions Catalogue).  I did take a close up shot which is below.  Have you counted how many gold hearts there are?  That’s right – 14 – one for each year we’ve been married.  The sentiment is from the Going Global set and was perfect for this card.

Thank you darling for a lovely day and 14 fabulous years – here’s to the next (and more) 14 years.

Supplies:
Stamp Set – Balloon Builders, Going Global, Teeny Tiny Sentiments
Card Stock – Sahara Sand, Perfect Plum, Whisper White
Ink – Blushing Bride, Perfect Plum, Momento Black
Other – Banner Triple Punch, Metallics Sequin Assortment, Fine Tip Glue Pen, Clear Wink of Stella Glitter Brush, Dimensionals

Balloon Celebration

By | January 17, 2016

Hi there

We had a lovely evening out at the beach last night – it was definitely the ‘calm before the storm’.  There wasn’t much wind and it was so warm sitting on the beach.  Phil got some lovely sunset photos – so happy campers all around.

It’s a busy birthday time at the moment – here’s a card I made for a friend whose birthday it was today.  I’ve used the new Balloon Celebration set from the Occasions Catalogue which is a ‘two-step’ set and coordinates with the new Balloon Bouquet Punch.  These two products come as a bundle which mean you save 15%.

I didn’t use any of the sentiments from the set instead going with Enjoy the Little Things for the front and Perfect Pairings for the inside.  Perfect Pairings is one of the FREE stamp sets you can choose from the Sale-A-Bration catalogue when you place an order of NZ$110 or more between now and 31 March.

And yes that is another tissue box – great for your bag ๐Ÿ™‚

Supplies:
Stamp – Balloon Celebration, Enjoy the Little Things, Perfect Pairings
Card Stock – Wisteria Wonder, Pink Pirouette, Wild Wasabi, Pool Party , So Saffron, Whisper White, Elegant Eggplant
Ink – Wisteria Wonder, Pink Pirouette, Wild Wasabi, Pool Party , So Saffron, Elegant Eggplant, Momento Black
DSP – Back to Black (retired)
Other – Balloon Bouquet Punch, Rhinestones, Dimensionals

Balloons or lollies – which do you prefer?

By | January 16, 2016

Hi there

It’s a gorgeous day here in Auckland and we are about to head off to the beach for a picnic dinner – yum.

Here’s a quick post of two cards I’ve made for friends boys who are turning 10.  These cards use stamps from the new Balloon Buiders set in the Occasions Catalogue.  Instead of using them as balloons I’ve gone with a ‘sweet’ theme.  The design is the same – just different contents in the jar ๐Ÿ™‚  Can you think of any other ‘contents’ this set can be used for?

First up we have Jelly Beans – ordinary and gourmet

and then Jaffas

I had fun making these cards – hope the boys like them ๐Ÿ™‚

Supplies:
Stamp – Balloon Builders, Suite Sayings, Crazy About You
Card Stock – Basic Black, Whisper White, Tempting Turquoise, Pacific Point
Ink – Daffodil Delight, Wild Wasabi, Melon Mambo, Real Red, Pumpkin Pie, Rich Razzleberry, Tempting Turquoise, Momento Black
Other – Large Numbers Thinlits, Little Letters Thinlits, Corner Punch, Black Embossing Powder, Dimensionals, Basic Black Marker, Aqua Painter

Enjoy the rest of your day.