Sprinkles of Life – Who loves Ice Cream?

By | September 9, 2015

Hi there

Who loves ice cream and what is your favourite flavour?  Mine is Rum and Raisin from Ollies Ice Cream Parlour in Royal Oak.  With summer just around the corner there will be a few evening walks in this direction!

My ice cream below is a triple scoop – mint, strawberry and chocolate – using the Sprinkles of Life stamp set.  This set also has a co-ordinating punch which makes cutting out the ‘scoops’ easy.  The only cutting I needed to do was the ice cream cone.

Don’t forget that for every Sprinkles of Life stamp set sold Stampin’ Up! donate $3.50 to Ronald McDonald House Charities.
Supplies:
Stamp Set – Sprinkles of Life, Butterfly Basics
Card Stock – Tip Top Taupe, Mint Macaron, Pink Pirouette, Chocolate Chip, Crumb Cake, Whisper White
Ink – Tip Top Taupe, Mint Macaron, Pink Pirouette, Chocolate Chip, Crumb Cake
DSP – Cherry on Top Paper Stack
Other – Banner Triple Punch, Tree Builder Punch

All Ye Faithful – Manger style

By | September 6, 2015

Hi there

Yesterday I held a workshop with 10 lovely ladies – we had a great time crafting (and talking).  The card I taught was CASED from Chris Slogar – check out her blog.  I fell in love with this layout as soon as I saw it and just had to recreate it.  Thanks Chris for doing all the hard work 🙂

I gave the ladies the option to have ‘Mary and Joseph’ plain or they could colour them in with blender pens.

I stamped the Hardwood stamp with Crumb Cake ink on Crumb Cake card stock for the roof then cut the two beams using the new Hearth and Home Thinlit die. 
Supplies:
Stamp Set – All Ye Faithful, Hardwood
Card Stock – Very Vanilla, Cherry Cobbler, Early Espresso, Crumb Cake
Ink – Basic Black Archival, Early Espresso, Cherry Cobbler, Crumb Cake (Marina Mist, Tip Top Taupe, Hello Honey)
Other – Lucky Star Embossing Folder, Star Framelits (the smallest frame), Hearth and Home Thinlit, Banner Triple Punch, Gold Metalic Thread, Gold Glimmer Paper, Stamp-A-Ma-Jig

O Come All Ye Faitful

By | September 3, 2015

Hi there

As mentioned in yesterday’s post I had some ‘bits’ sitting on my desk and have managed to recreate yesterday’s card.

I’m not quite sure if you can see in the photo but ‘Mary and Joseph’ have been heat embossed – my favourite technique.  A Stamp-A-Ma-Jig comes in handy when stamping a sentiment.  I used my markers for inking this sentiment as they’re great when you’re only wanting part of a stamp inked.

This is a clean and simple style and will lend itself to all sort of stamps and embossing folders.  I hope this inspires you to create a card of your own in this style.

Supplies:
Stamp – All Ye Faithful
Card Stock – Wisteria Wonder, Elegant Eggplant, Very Vanilla
Ink – Elegant Eggplant, Momento Black, VersaMark
Markers – Elegant Eggplant
Other – Silver Foil, Oval Framelits, Lucky Stars Embossing Folder, Black Embossing Powder, Dimensionals, Stamp-A-Ma-Jig

2015 Holiday Catalogue has arrived

By | September 2, 2015

Hi there

It’s finally here 🙂  The new 2015 Holiday Catalogue is now available and filled with great products and project ideas.

The first stamp set to make it to my wish list was “All Ye Faithful” on page 20.  I’ll have some samples to show you on Sunday (after my workshop) but in the meantime here’s a card we made at last month’s team training.

This card features two new stamp sets – Holly Jolly Greetings (although I didn’t end up using the greetings!) and Embellished Ornaments.  Did you notice the new embossing folder – Softly Falling – which comes in the new larger size of 15.2cm x 15.2cm.  This card design can be easily recreated (as I sit here typing I’ve seen some supplies on my desk that I can use to recreate this card with another image – so watch this space).

The card base is Soft Sky (10.5cm x 29.7cm scored in half) which was run through the Softly Falling embossing folder (front only).  The next layer is Lost Lagoon (7cm x 14.8cm) then Very Vanilla (6.5cm x 14.8cm).  The image and sentiment is stamped in Blackberry Bliss.  The banner is created using the Banner Triple punch  – Lost Lagoon (3cm x 9cm) and Very Vanilla (2.5 cm x 9.3cm).

If you would like a copy of the new Holiday Catalogue please drop me an email and I’ll get one sent out to you.

CASEing the catalogue – Christmas cards

By | August 18, 2015

Hi there

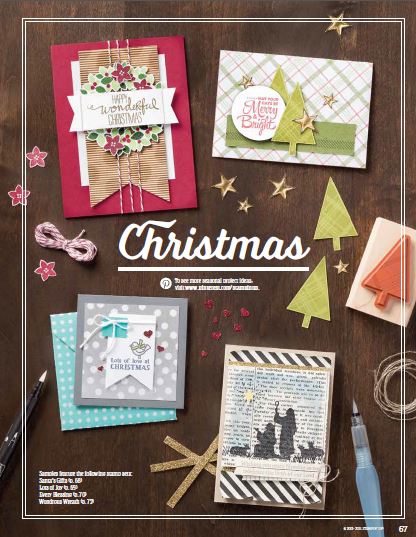
Last week I held a class for a group of ladies wanting to make a start on their Christmas cards.  Where better to look for inspiration than the catalogue.  I’m really glad that the annual catalogue has a Christmas section again with sets that have carried over from the last Holiday catalogue.

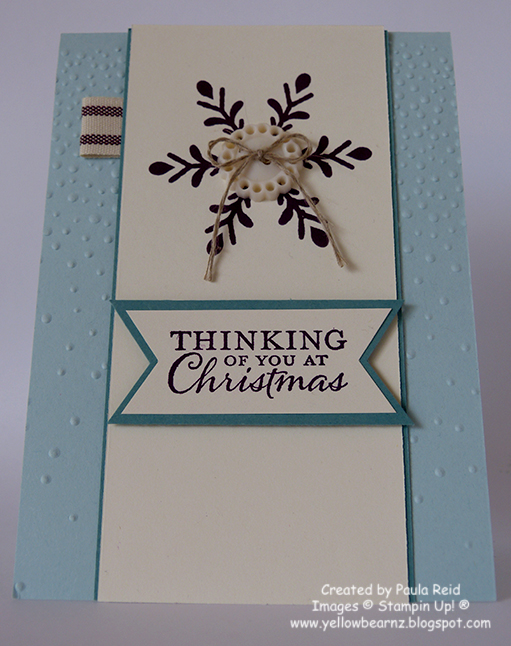
I decided to use Wondrous Wreath and Festival of Trees sets for my cards.  Here’s the card designs from the catalogue that I used for my inspiration:
I didn’t have all the supplies they had used so with a few tweaks here is what I came up with:

I changed the Corrugated Paper to Silver Vellum and the Cherry Cobbler Baker’s Twine to the Metallic Silver Baker’s Twine.  I also added the Cherry Cobbler mat to a card base to allow the Baker’s Twine to not be seen from the inside of the card.
The measurements for my card were:
Whisper White card base (A5 size)
Cherry Cobbler card stock – 14.3cm x 10cm
Whisper White square – 3 1/4″ x 3 1/2″ (inches worked better than centimetres)
Vellum cut using the largest Banner Die
Whisper White senitment banner – 6″ x 1 1/4″ (score 1 3/8″ and 1 5/8″ from each end then using the  Triple Banner Punch, punch each end)
Inks used were Cherry Cobbler, Mossy Meadow and Pear Pizzazz.  The sentiment is done with Cherry Cobbler Embossing Powder.
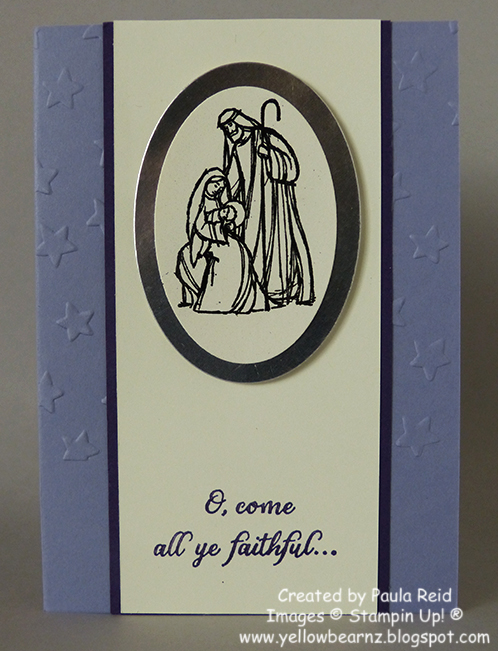
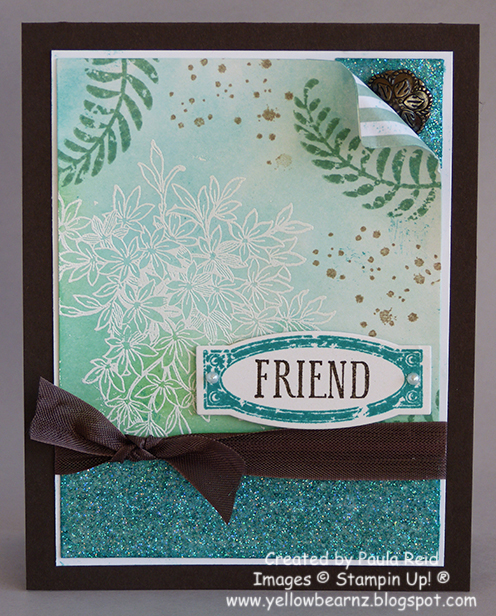
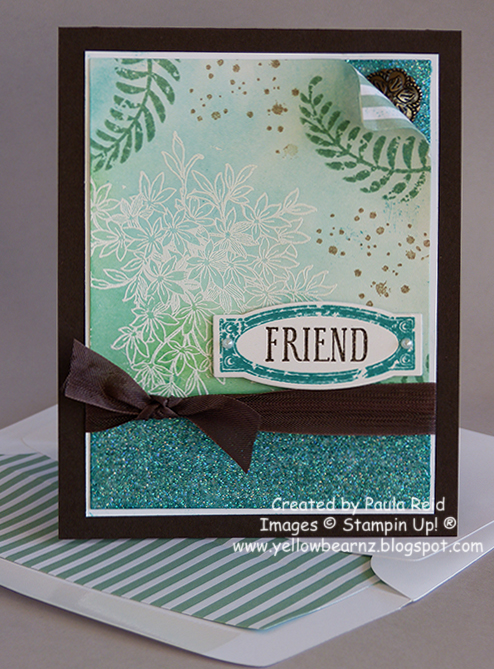
For the second card I changed the DSP to an embossed background using the Lucky Stars Embossing folder and the Festival of Trees set instead of Lots of Joy.  My sentiment is from Petite Pairs.  The great thing with CASEing is that it gives you an idea and you just use the supplies you have or you can CASE it 100%.

Supplies:
Stamp Set – Festival of Trees, Petite Pairs
Card Stock – Whisper White, Pacific Point, Old Olive (13cm x 2.5cm)
Ink – Old Olive, Pacific Point
Other – Lucky Stars Embossing Folder, Itty Bitty Accents – Star Punch, Large Oval, Scallop Oval, Extra-Large Oval, Silver 1/8″ Ribbon, Silver Embossing Powder, Silver Foil, Glimmer Paper, Dimensionals, Rhinestones

Well I hope you have a go at CASEing the catalogue – it’s a great resource.

Fathers Day Cards – August Card Class

By | August 15, 2015

Hi there

It’s been a great indoors day today – I finally managed to create a card for our team swaps next weekend using products from the upcoming Holiday Catalogue (due out 1 September).

With Fathers Day the first Sunday of September we decided to make our Fathers Day card this month.  Both cards have a masculine theme that can also be used for birthdays with a quick change of sentiment.

The first one uses DSP rather than stamps – I didn’t have anything that was really suitable so used the new Envelope Paper (Pg 149 AC).

I got the template from Cambria Turnbow’s blog – it’s really easy to follow – thanks Cambria.  Instead of adding a tie I used the 1/8″ mini brads as buttons.
Supplies:
Stamp – Crazy About You
Card Stock – Basic Black, Whisper White, Bermuda Bay
Ink – Momento Black
Other – Watermelon Wonder Envelope Paper, 1/8″ Mini Brads, Arrows Embossing Folder
For our second card the ladies had to make a choice 🙂  There were three options to choose from using our Decorative Masks (Pg 157 AC).  I’ve used two from the Happy Patterns set and one from the Hearts & Stars set.  With a change of colour and sentiment this layout could be used for any occasion.

The measurements for this card are:
Card base – 14.8cm x 10.5cm
Layer One (Whisper White) – 12.8cm x 8.5cm
Layer Two (Coloured card of your choice) – 12.3cm x 8cm
Layer Three (Whisper White) – 11.8cm x 7.5cm

Supplies:
Stamp set – Crazy About You
Other – Decorative Masks, Hello You Thinlits, Silver Foil, Washi Label Punch, Dimensionals

Card One – Ink – Soft Sky, Pool Party, Lost Lagoon, Island Indigo.  Card Stock – Island Indigo
Card Two – Ink – Night of Navy, Cajun Craze, Smoky Slate.  Card Stock – Night of Navy, Cajun Craze
Card Three – Ink – Soft Suede, Cherry Cobbler, Pumpkin Pie.  Card Stock – Island Indigo, Pumpkin Pie

Celebrate Today Ballons – CASEing cards

By | August 9, 2015

Hi there

Thought I’d get a post in now before we head to our neighbours for fish and chips 🙂

For last months Extravaganza I needed to make some cards for my display board so I had a look through our bi-monthly demonstrator magazine – Impressions – for some ideas.  My mojo was running a bit flat by this time!  CASEing (Copy And Share Everything) is great – why reinvent the wheel when somebody has already done it for you.  I changed the colours a bit on this but otherwise it’s a CASE.

This card was super easy to put together – photopolymer stamps are great when you have a two step set.  It’s really easy to align your second stamp.  The other great thing is matching framelits – love this.
Supplies:
Stamp set – Celebrate Today
Card Stock – Crushed Curry, Whisper White
Ink – Pool Party, Island Indigo, Wild Wasabi, Garden Green, Crushed Curry, Daffodil Delight
Other – Balloon Framelits, Dimensionals

I’ll be back later in the week some more CASEd cards 🙂

Butterfly Basics Sympathy Card

By | August 6, 2015

Hi there

It’s never easy creating a sympathy card but I found this design by Margaret – it’s so lovely the only thing I changed was the colour combo.

Here’s a tip I found out (the hard way) over the weekend.  For any die that is horizontal feed it through the Big Shot vertically as in the picture on the right.  This way the pressure of the rollers is evenly distributed as it runs through :).  The picture on the left was feed through horizontally and didn’t cut the whole image out.

Supplies:
Stamp Set – Butterfly Basics, Thoughts and Prayers
Card Stock – Marina Mist, Very Vanilla
Ink/Markers – Marina Mist, Always Artichoke, Early Espresso
Other – Butterflies Thinlits, Basic Pearls

Awesomely Artistic Brick Wall

By | August 2, 2015

Hi there

I hope you’ve had a good weekend – ours was very productive.  A couple of months ago Mercury Energy had a promotion where you could choose a date and you wouldn’t be charged power for the whole day:)  So we booked in the 1st of August and made the most of it – 5 loads of washing (some needing use of the dryer), some cooking (banana muffins, savoury scones and mini quiches) and a roast chicken dinner – thank you Mercury :).  And to top it off I’ve had some craft time and made 5 cards!

Last weekend we had our Creative Inkers Extravaganza and I needed some cards for my display board.  Over the next week I’ll share with you some of the cards I made to fill my board.

One of my favourite sets at the moment is Awesomely Artistic (pg 125 AC) – which was the set I used for my Extravaganza project here.  I started this card by stamping the images in the corner and colouring them in with ink and blender pens.  It looked a bit blank but I wasn’t sure I wanted more stamping so went with a new embossing folder – brick wall – for some texture and added the heat embossed dragonfly which I ‘fussy’ cut.  I really love how this card has turned out.

Supplies:
Stamp set – Awesomely Artisitic
Card Stock – Rich Razzleberry, Whisper White
Ink – Momento Black, Rich Razzleberry, Old Olive, Daffodil Delight
Other – Brick Wall Embossing Folder, Gold Embossing Powder, Basic Pearls, Project Life Cards & Labels Framelits, Dimensionals, Blender Pens

Extravaganza Projects Continued

By | July 29, 2015

Hi there

Here are the other four projects that the ladies created on Saturday.  First we have two 3D projects – a birthday surprise box

and a gorgeous ‘Tiffany’ bag

Our last two projects are cards – a corner flip card

and a cool card featuring our new corrugated paper

I hope you have enjoyed seeing our creations.  Our next Extravaganza will be held on the 7th November so mark the date now.

Creative Inkers Winter Extravaganza Projects

By | July 28, 2015

Hi there

On Saturday we had our winter Extravaganza event with 100 ladies – it was a fun day.  Each lady made five projects during the afternoon.  This is the project that I taught with Jacque and Kath using my new favourite set – Awesomely Artistic.

It’s got a number of techniques in here – first is the background.  We stamped Pool Party, Bermuda Bay and Cucumber Crush direct to a clear block, spritzed some water on the ink then stamped it onto a piece of spritzed Shimmery White.  It does get a bit messy but gives a cool effect.  The second technique is colouring the glimmer paper.  We had done this ahead of time but is done by mixing rubbing alcohol, water and reinker together in a spritz bottle then spraying the glimmer paper.  We used Dazzling Diamonds.  The final technique is heat embossing – my favourite technique.

I do love how the envelope liner just finishes it off.
Supplies:
Stamp – Awesomely Artistic
Card Stock/Paper – Early Espresso, Shimmery White, Whisper White, Envelope Paper, Dazzling Diamonds Glimmer Paper
Ink – Pool Party, Bermuda Bay, Cucumber Crush, Mint Macaron, Crumb Cake, Early Espresso, VersaMark
Other – Early Espresso Seam Binding, Antique Brads, Project Life Cards and Labels Framelits, White Embossing Powder, Heat Tool, Spritzer, Basic Pearls, Dimensionals

I’ll be back tomorrow with the other four projects.

Six-Sided Sampler – July Card Class

By | July 20, 2015

Hi there

I hoped you enjoyed yesterday’s card.  When a new catalogue comes out we often end up forgetting stamp sets that have ‘carried over’ from the previous catalogue so I decided to use a ‘carry over’ stamp for my second card.  I haven’t used Six-Sided Sampler as much as I thought I would so chose that – then the next question was ‘ what shall I do with it?’.  Well Stampin’ Up! took care of that.  I turned to page 104-105 of the catalogue and used their sample as my base.  I changed the style of card, made a few tweaks here and there and voila my card was created 🙂

My sentiment is from a ‘carry over’ set as well – another one that hasn’t seen much ink but after getting it out has so many great greetings.  I was really pleased with how this came together – an extra score in the standard card base and a new card is created.  I love this colour combo of neutrals.
Supplies:
Stamp – Six Sided Sampler, Petite Pairs
Card Stock – Sahara Sand, Early Espresso, Soft Sky, Whisper White
Ink – Sahara Sand, Tip Top Taupe, Crumb Cake, Pool Party, Soft Sky
Other – Bold Butterfly Framelits, Rhinestone, Hexagon Punch

Watercolor Wings – July Card Class

By | July 19, 2015

Hi there

I hope you’ve had a good weekend – I’ve had a very productive and social weekend :).  Out for dinner Friday, breakfast with a friend Saturday morning, afternoon tea with my SIL (highly recommend a visit to Olaf’s in Mt Eden) and out for dinner again tonight!  In amongst all this social butterflying (not sure if that’s a word or not) I’ve done all my prep for next weekends Creative Inkers Extravaganza and made three cards this afternoon – phew.  You’ll have to wait a bit to see these creations but in the meantime here’s the first card I taught at this months card class.

I wasn’t going to buy ‘Watercolor Wings’ when I saw the new catalogue – “I don’t need another ‘butterfly’ set” but after seeing some creations on Pinterest I ‘needed’ to buy it :).  This is the first card I’ve made with it – based on a card I saw by Julie Davison.

It’s classed as a ‘two-step’ stamp but it’s actually a ‘three-step’ stamp.  The butterfly is made up of three stamps – the first is stamped in Pink Pirouette, then Melon Mambo and finally Rich Razzleberry.
This stamp comes as a bundle with the new Bold Butterfly Framelits but it also matches the Butterflies Thinlits Dies (Page 172 of the AC).  I’ve used both dies for this card.  We stamped two full images and cut one as a solid butterfly and the other with the ‘lacy’ die.

I’m sure you’ll be seeing more colour combos over the coming months.

Supplies:
Stamp – Watercolor Wings, Butterfly Basics
Card Stock – Rich Razzleberry, Pink Pirouette, Whisper White
Ink – Pink Pirouette, Melon Mambo, Rich Razzleberry
Other – Paper Doily, Whisper White Organza Ribbon, Bold Butterfly Framelits, Butterflies Thinlits

Build a Birthday Cake

By | July 16, 2015

Hi there

I’ve had something on every night this week which has meant no time to blog.

This is a card I made last month using the new set Build A Birthday and the new Triple Banner Punch – LOVE this punch.

I’ve managed to use all the new In Colors on this image :).  I nice finish to the inside is just a thin strip of DSP to match the paper on the front.

Supplies:
Stamp Set – Build a Birthday
Card Stock – Watermelon Wonder, Whisper White
Ink – Watermelon Wonder, Cucumber Crush, Mint Macaron, Tip Top Taupe, Delightful Dijon
DSP – Cherry on Top Paper Stack
Other – Oval Framelits, Banner Triple Punch, Rhinestones, Dimensionals

Well I’m out again tomorrow night so hopefully I can fit a ‘blog’ post in on Saturday and show you the cards we made at this months card class.

Catch you later

CASED cards from Impressions Magazine

By | July 7, 2015

Hi there

Well the rain is really starting to fall here in Auckland – I think I might head to bed early tonight.  Nothing like being tucked up in a warm bed with the rain falling on the roof.

Last week I received my Impressions magazine in the post.  This is a magazine that Stampin’ Up! demos receive every two months and it’s full of ideas and techniques for us to try.  On the front cover were two cards that used the new Banner Triple Punch – I love this punch – so I thought I’d have a go at CASEing them and here’s what I came up with.

Original card

My take on it:

Supplies:
Stamp Set – One Big Meaning
Card Stock – Watermelon Wonder, Whisper White
Ink – Watermelon Wonder
DSP – Cherry on Top Paper Stack
Other – 2015-2017 In Color Blossom Accents, Whisper White Baker Twine, Rhinestone, Banner Triple Punch
The second card uses the punched ‘triangles’ – so don’t throw them away – they’re great to uses as accents or even a background
Original card

My version

Supplies:
Stamp Set – Perfect Pennants
Card Stock – Night of Navy, Whisper White, Vellum Card Stock, Gold Foil Sheets
Ink – Night of Navy
Other – 2″ and 2 1/2″ Circle Punch, Banner Triple Punch, Gold Metallic Baker’s Twine, Dimensionals

Well I hope you’ve enjoyed my take on these two cards