Washi Tape Christmas

By | November 3, 2013

Hi there

With only 7 1/2 weeks till Christmas it’s time to get cracking on creating Christmas cards and projects.  Here’s another card I created recently that uses the Season of Style Washi Tape.

I based my card on one I’d seen on Jerri St John’s blog.  I like to have a mat around some of my images and this framelit doesn’t have one a size up so I created my own by using the same principle as I do for my Decorative Label Punch.

Supplies:
Stamp – Tag It, Gorgeous Grunge, Oh, Goodie!
Card Stock – Cherry Cobbler, Old Olive, Whisper White
Ink – Cherry Cobbler
Other – Season of Style Washi Tape, Chalk Talk Framelits, Bitty Banner Framelits, Cherry Cobbler Bakers Twine

Well I don’t think it will be an early night here – there are too many fireworks going off!

Envelope Punch Board is here

By | October 29, 2013

Hi there

For those of you in NZ I hope you enjoyed your long weekend.  It was great to have an extra day off work and enjoy the sunshine.  I managed to get out into the garden for a bit and have some crafting time.  I will try and post my creations soon now that I have my camera back (it went on a short trip to China with my brother!).

Here’s a card I made a couple of weeks ago.  I don’t know about you but I often forget to use the previous years In Colours so I thought I’d get them out to create this project.  I’ve used all five colours – Raspberry Ripple, Primrose Petals, Summer Starfruit, Garden Green and Midnight Muse and a set that I haven’t used much – Papillon Potpourri.

I also used the new Trimmer Rotary Blades to create the scalloped border edge on the mat – don’t you love new toys?  Now speaking of new toys – Stampin’ Up! have just released another great tool – the Envelope Punch Board.
B1_EnvelopePunch_demo_aug1513_NA
  • It creates totally customisable envelopes in up to 66 different sizes (not to mention a million different colour and pattern options depending on the paper you want to use). Even tried and true envelope sizes will only take you moments to create! 
  • It’s super easy to use; it will go over as a huge wow when you demonstrate it at your events and your customers see it in action. It looks intimidating at first glance, but when they see that all you have to do is measure for the first punch and from there you just turn and score they’ll go crazy (in a good way). 
  • It’s small and lightweight; this makes it easy for you to take it to your events and show it. It’s also a great selling point when you show your customers how it’s super portable and easy to store. It’s small and light enough that they could use it while watching a football match, at a park, at a friend’s for craft night—anywhere. 
  • It even has a clever scoring tool as well as a punch that lets you create rounded corners on your envelopes. 
  • It’s easy to keep it all together; the stylus storage compartment and two punches are designed into the tool so you don’t have a bunch of little pieces to keep track of (even the instructions are printed right on the tool so you won’t lose them!).
  • The price is terrific–especially for a tool that does so much!
  • It will be in next year’s annual catalogue, so it’s here to stay.
I’ve had a play with it over the weekend and it’s so much more than just an envelope board.  I’ve made a box using a 12 x 12 sheet of DSP and a chocolate holder – there are so many other uses for it so watch this space.

Check back soon to see my projects using the new Envelope Punch Board.

Christmas Mosaic Madness

By | October 23, 2013

Hi there

This will be a quick post as I still have heaps to do before heading to bed.

This card is a CASE from Deena Boos.  I love it how people come up with so many different uses for our stamp sets, punches and framelits – thank you for sharing your creativity with us.  I taught this card at a workshop a couple of months ago and have finally got round to posting it.

Supplies:
Stamp – Mosaic Madness, Embellished Events
Card Stock – Gumball Green, Real Red, Whisper White
Ink – Gumball Green, Real Red, Smoky Slate
Marker – Smoky Slate
Other – Mosaic Punch, Bitty Banners Framelits, Rhinestone, Modern Mosaic Embossing Folder

Don’t forget to contact me regarding our current promotions which you can check out here.

25% of 25 stamp sets and the new Thinlits Card die is here

By | October 22, 2013

Hi there

This post is all about announcements – back tomorrow with a project 🙂

First announcement – 25% off 25 stamp sets (available from today until Monday 28 October)

Check out my website here for a list of stamp sets and prices or email me for a flyer.  If you’re interested in purchasing any of these stamps please contact me ASAP.

Second announcement – Thinlits Card Dies (available from today)
My last two posts have given you a sneak preview of the new thinlits which come in two styles – Circle and Label.  Not only do you get the card die but heaps of accessory dies – 9 accessories with the Circle and 8 with the Label.

Wishing You meets Circle Thinlits

By | October 21, 2013

Hi there

Here’s another card made using the Circle Thinlits die.  This time the card is a portrait orientation and you can still get two out of an A4 sheet of card stock.  This one is based on the instructions that come with the die but adapted to be the extended version which allows more writing space.  I am yet to make a card following the instructions!  I’m having too much fun creating variations.

 
The card stock measures 13.8cm x 21cm (5 3/8″ x 8 1/4″).  Feed it through the die as per the extended card  instructions then score at 6cm (2 3/4″) from the edge to create the flap.  The final card will measure the same width as our standard cards but be a bit shorter.  For my main image I stamped it first in Old Olive, added clear embossing powder then cut it out with the scallop circle framelit that is part of this set.  I then restamped the image in Cherry Cobbler on a scrap of Whisper White, added clear embossing powder then ‘fussy’ cut the top and bottom present and adhered them on top of the Old Olive image. 
Supplies:
Stamp – Wishing You
Card Stock – Cherry Cobbler, Whisper White
Ink/Markers – Old Olive, Cherry Cobbler
DSP – Season of Style Paper Stack
Other – Circle Thinlits Die, Rhinestone, Clear Embossing Powder

Check back tomorrow for full details on the Circle and Label Thinlits, the envelope punch board plus another exciting announcement.

See you then

Color Throwdown Challenge 264

By | October 20, 2013

Hi there

Bear with me as this may be a longer post than normal.

We have had the most glorious weekend here in Auckland – the sun has been shining and it really feels like Summer is around the corner although they are now forecasting rain this coming week!  There is one way to tell it’s getting warmer around our house in that our garden gnome has arrived back – now this garden gnome is not your normal gnome – it’s our neighbours cat!  In the afternoon she can be found lying on the pebbles enjoying the warmth and shelter

 – then she rolls over to say ‘aren’t I cute’!

 Now on with the Color Throwdown challenge.  It’s ages since I entered a card in a challenge and this one was perfect.  The colours are: 
I already had a Night of Navy card base so away I went and this is what I created – a card using the new Circle Thinlits Die.

This new die will be available for sale in NZ starting this Tuesday (22nd October) – more details will be on my blog Tuesday morning.  You may have seen these on some of the US blogs.  There is also a Label version.  I worked out how to alter the style so that I could get two cards from our NZ A4 card stock which is narrower than the US card stock – and I succeeded 🙂  For this one I cut the card stock lengthwise (10.5cm x 29.7cm) then fed it through the die to create an extended base.  I scored my right flap at 10.5cm from the edge.  The finished card ends up the same as our standard card base.
Here’s another one using the same measurements:
As you can see I’m really enjoying this new die.  Check back tomorrow for another card using this die but in a different orientation.

More Wishing You

By | October 19, 2013

Hi there

Hope you’ve had a great day enjoying the beautiful weather.  We’ve just had our first BBQ of the season – yummy marinated pork fillet.  Roll on Summer 🙂

Last Wednesday I had a class with a wonderful group of ladies.  We has so many laughs while making our cards – it was a very enjoyable evening – thank you ladies and I look forward to our next get-together.

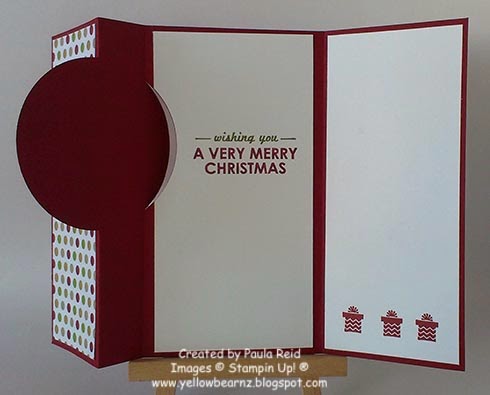
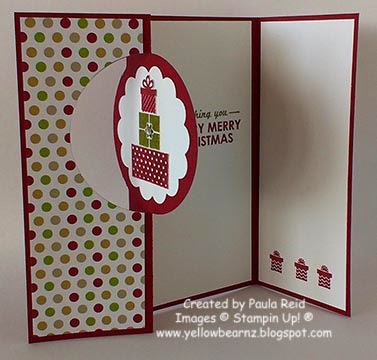
Here are the two cards we made using ‘Wishing You’ and Season of Style Paper Stack from the current Holiday Catalogue.

This one also uses the Season of Style Washi Tape – I’m enjoying using Washi Tape (keep an eye out for some more cards coming using Washi Tape).  I forgot to take a photo of the inside! (it had the rest of the sentiment stamped inside).
Supplies:
Stamp – Wishing You
Card Stock – Cherry Cobbler, Whisper White
DSP – Season of Style DSP Paper Stack
Ink – Cherry Cobbler and Old Olive Markers
Other – Season of Style Washi Tape, Wide Oval Punch, Decorative Label Punch (my favourite), Corner Punch, Cherry Cobbler Bakers Twine, Dimensionals

Here are two versions of the second card we made – different coloured card bases, inks and using different patterned paper.


Do you like the paper bow?  For this I followed the video tutorial from the talented Tanya Bell.

Supplies:
Stamp – Wishing You
Card Stock – Cherry Cobbler, Old Olive, Whisper White
Ink – Cherry Cobbler, Old Olive
DSP – Season of Style DSP Paper Stack
Other – Rhinestone, 1/2″ Circle Punch, Paper Clip (non SU)

If’ you’d like to get a head start on your Christmas cards contact me to arrange a class with your friends.

Wishing You …

By | October 13, 2013

Hi there

Yesterday we had team training which is always lots of fun.  It’s a great time to reconnect with fellow demonstrators and learn some good tips to help us help you.  One of the things we also do is a make and take project.  Yesterday’s one was using Merry Little Christmas Simply Created Card Kit.  This kit contains enough ‘bits’ to create 8 cards – you can also get this as a bundle which includes the stamp set ‘Merry Little Christmas’.  We used the set ‘Wishing You’.  After making the card I think I may just have to buy one of these kits myself – I love the colour combo.

Here’s what we made:

And here’s the inside

Supplies:
Stamp – Wishing You
Card Stock – Coastal Cabana, Whisper White
Markers – Real Red, Coastal Cabana, Old Olive, Midnight Muse

Check back soon for some more projects using this great stamp set.

Happy Birthday

By | October 12, 2013

Hi there

Well we’ve had a mix of weather today – sun, rain and wind. I had to drive over the Auckland Harbour Bridge today and boy was it windy.

A couple of weeks ago a friend of mine had a birthday and here’s the card and gift I made for her.

I am loving making these little boxes – they look really cool and are a great size for holding Whittakers Chocolate mini slabs.  I think I need to buy shares with the amount of chocolate I buy!  The flower on the belly band is made from 4 Scallop Circles.  I used the same DSP as the box and card front – the way you fold the cut outs you get to see a mix of the pattern.

 Supplies:
Stamp – Oh, Hello, Sketched Birthday
Card Stock – Lucky Limeade, Pretty in Pink (both retired), Calypso Coral, Whisper White
Ink – Island Indigo, Calypso Coral
DSP – Tea for Two (retired)
Other – 5/8″ Flower Trim (retired), Paper Doilies, Pretty in Pink Brad (retired), Daubers, Ovals Collection Framelits, Bitty Banners Framelits

Summer Silhouettes CASE

By | October 8, 2013

Hi there

Last weekend we had a lovely time in Whitianga staying with my cousin and his wife.  It’s certainly nice to get away for the weekend – and even better when it’s a three day weekend 🙂

I taught this card at a recent workshop.  My hostess had bought the stamp set a month earlier so I thought I’d use it to help inspire her (and me) with this set.  I fell in love with this set when it came out but haven’t used it as much as I’d like – we are too spoilt for choice with all the sets Stampin’ Up! offer.

This is a straight CASE from Monica Gale’s post other than I changed her Baja Breeze to Pool Party.  This is a great two step stamp set and leaves plenty of room for creativity with the flowers.

To create the ‘wave’ on the Crumb Cake I used the new Small Scallop Rotary Cutting Blade – love this new tool.

Supplies:
Stamp – Summer Silhouette, Teeny Tiny Sentiments
Card Stock – Rich Razzleberry, Crumb Cake, Whisper White
DSP – Polka Dot Parade
Ink – Old Olive, Rich Razzleberry, Pool Party
Other – Small Scallop Rotary Cutting Blade, Soft Suede Taffeta Ribbon, Stamp-A-Ma-Jig, Ticket Duo Punch

If you would like to hold a workshop / party for friends drop me a line or give me a call.

October Stampin’ Up! Promotions

By | October 3, 2013

Hi there

There are a number of promotions happening this month so I thought I’d do them in one hit.

First up is this months ‘Best of’ stamp sets.  This month it’s a birthday theme.

The next promotion is ‘Party more and get more’.  As part of the 25 year celebration Stampin’ Up! are giving you an extra $25 to spend on hostess gifts when your workshop order is $450 or more.  That means if your total workshop order is $450 you get the normal $70 + an additional $25 which equals $95 of FREE product!  So if you’d like to hold a workshop / party during October give me a call or email me.

The last promotion is a special offer only available for two weeks from 7th – 21st October.

 Have you thought about joining Stampin’ Up! as a demonstrator?  Well now’s the time whether it’s as a hobby demo, part time or full time.

For your $25 you will receive the following:

  • You get to choose $26.95 worth of Stampin’ Up! product (it must be more than $25 but not more than $26.95
  • Business pack which includes:
    • A box of annual catalogues
    • A package of the current seasonal catalogues
    • Getting Started DVD
    • Starter Kit Business Brick
    • Customer postcards
I would love to have you join me in this wonderful company.  If you’re interested in joining during this special offer time please contact me and I can discuss things further with you.
Have a great evening and rest of your week.

Birthday Balloons

By | October 1, 2013

Hi there

It’s nice having that extra hour of daylight at the end of the day – but getting up in the dark again is taking a bit of getting used to.

After making the balloons for my nephews card I thought I’d make another ‘balloon’ card.  I’ve CASED this one from a very talented demo Patty Bennett.  This one has lots of new products I wanted to try.  I’ve used the ‘negative’ from the new Chevron Punch which is available from the current Holiday Catalogue.

Supplies:
Stamp – Label Something
Card Stock – Naturals White, Daffodil Delight, Pacific Point
DSP – Birthday Basics
Other – Chevron Punch, Small Oval Punch, Owl Builder Punch, Artisan Label Punch, White Bakers  Twine, White Stampin’ Chalk Marker, Dimensionals

Have a great evening.

Starburst Thanks

By | September 30, 2013

Hi there

Last weekend we relocated our office to a new building.  We had been sub-leasing from another company and I wanted to say thank you to a couple of ladies from the firm for their help and support since I started my new job.  I found that I still had two designs of a retired DSP so made this cute box which uses a sheet of 12 x 12 DSP.  With the other sheet I made a card using the Starburst technique that is rather popular at present and a matching envelope.  I’ve filled the box with Whittakers Mini Chocolate Slabs – I think they’ll enjoy this.

Supplies:
Stamp – Four You
Card Stock – Cajun Craze, Very Vanilla
Ink – Cajun Craze
DSP – Comfort Cafe (retired)
Other – Soft Suede Taffeta Ribbon, Early Espresso Grosgrain (retired), Scallop Circle Punch, Cajun Craze Brads (retired), Simply Scored Tool and Diagonal Plate

Happy Birthday Matty J

By | September 29, 2013

Hi there

Today is my nephews 19th birthday – hope you have a great day Matt.  He is currently doing a 6 month OE in the UK and we managed to have a quick Skype chat with him today.  He is really enjoying his time away and at the moment is working voluntarily on an organic farm in Cornwall.  He heads back to Cambridge tomorrow where waiting for him is this card (and a parcel of chocolate!).  We have also contributed towards a ticket for him to go to a musical – not sure which one he is going to see.

I wanted a fun card and when I saw this on Dawn Olchefske’s blog I knew I had to make it.  She also has a video on how to make the inside.

I don’t know about you but I’m loving Bermuda Bay.  So keep an eye out for some more projects still to come using it.  I used the new Small Scallop Rotary Cutting Blade for the trim on the front – I love this new tool 🙂

Supplies:
Stamp – Tag It
Card Stock – Bermuda Bay, Gumball Green, Raspberry Ripple, Summer Starfruit, Whisper White
Markers – Bermuda Bay, Gumball Green, Raspberry Ripple, Summer Starfruit
Other – Small Oval Punch, Owl Builder Punch, Chalk Talk Framelits, White Bakers Twine, Small Scallop Rotary Cutting Blade, Dimensionals

Have a great week