Take Two

By | March 13, 2013

Hi there

Well I’ve had a great day today.  Each year at work we have an International Food Day where staff get into teams and bring along their ethnic food.  ‘Team Kiwi’ went for something a bit different today – we did a leg of lamb cooked on the BBQ – it was SO nice.  I think everyone enjoyed it as there were no leftovers.  We had food from India, China, Korea, Philippines, Sri Lanka, North America, Pacific Islands (hope I haven’t missed anyone off the list).  The only down side was were we all so full it was hard to keep awake this afternoon!

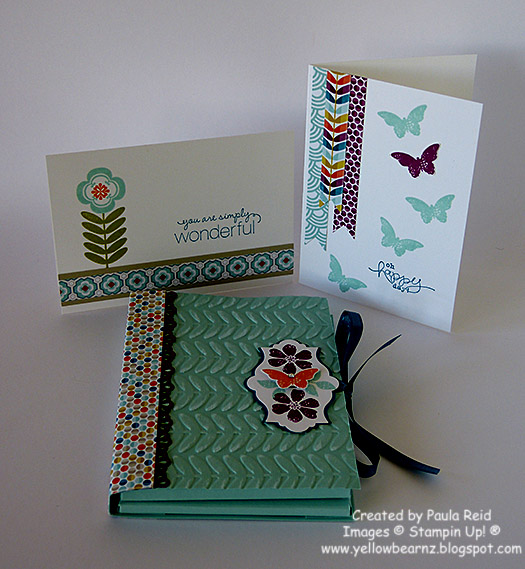
Now on with the cards.  A couple of weeks ago Narelle and I taught this card we’d seen on Pintrest (not sure who the original creator was).  I really liked this and decided to put my own spin on it.  I don’t own the Alphabet die so looked through my stamps to see what else would work and came up with the below two designs.  They worked perfectly for the class I took last night as it gave the ladies two options to choose from.  I also gave them a choice of colours of Bakers Twine.

On the original card we had used a circle underneath the button but I decided to use the 7/8″ scallop circle to keep with the scalloped edge of the doily and the trim at the bottom.  I always like to have a card that can be used for multiple purposes just by changing the sentiment. I’m sure you’re going to see some more of these – I may try changing the embossing folder.
 I think I like the ‘Love’ one – which one do you prefer?
Supplies:
Stamp – You are Loved, Fabulous Phrases (Mafe for You)
Card Stock – Crumb Cake, Red Glimmer Paper, Whisper White
Ink – Real Red, Early Espresso, Crumb Cake
Punches – 7/8″ Scallop Circle, Large Oval, Decorative Label, Ticket Duo Builder
Other – Woodgrain Embossing Folder, Bakers Twine, Bitty Buttons, Paper Doily, Tasteful Trim Die, Sponge, Glue Dots, Dimensionals, Sticky Strip

Try Stampin on Tuesday # 109

By | March 13, 2013

Hi there

Well our summer weather just keeps on coming.  Unfortunately we do need the rain as everything is turning brown.

It’s that time of the week again for another sketch challenge for Try Stampin on Tuesday.

I’ve used this sketch to create a baby card for one of the guys at work who recently became a dad – very exciting.

Supplies:
Stamp – Baby Prints, Embellished Events
Card Stock – Midnight Muse, Bashful Blue, Whisper White
Ink – Midnight Muse, Bashful Blue
Other – Cloudy Day Embossing Folder, Window Collection Framelits, 2 1/2″ Circle Punch, Word Window and Modern Label Punches, Bashful Blue Brads, Midnight Muse Satin Ribbon, Clear Embossing Powder, Heat Gun

Happy Birthday Julia

By | March 9, 2013

Hi there

Today is my friend and fellow demo’s birthday – hope you are having a wonderful day Julia.

Here is the card I gave her.

This was a CASE  from Mary Fish although I changed the colours and the punches as I didn’t have the ones she’d used.  That’s the great thing with card making – you see an idea and then adapt it to what you have.  I’ve used the Postage Punch (love this punch) and the 1″ Square Punch.  My most used item is the Colour Coach.  And yes that’s how I got my colours for this card.  I knew I wanted to use the Satin Ribbon as it makes beautiful bows so went to the CC and chose Raspberry Ripple’s Sweet Set combination.  Perfect Plum is probably one of my least used colours (along with River Rock) but it looks really good with Raspberry Ripple and Crumb Cake.  Every girl needs a little ‘bling’ so I’ve finished off the flowers with a Rhinestone.
I will be sad when Bloomin Marvelous finishes on the 22nd March.  If you’d like to get this set for free just place an order with me for $120 or more and it’s yours.  Orders need to be with me by Thursday 21 March.
Supplies:
Stamp – Bloomin Marvelous
Card Stock – Crumb Cake, Raspberry Ripple, Perfect Plum, Whisper White
Ink – Crumb Cake, Raspberry Ripple, Perfect Plum
Other – Raspberry Ripple Satin Ribbon, Postage Punch, 1″ Square Punch, Dimensionals, Rhinestones

I hope you are enjoying this fabulous weather.  Catch you back soon.

NZSU Week 8 Challenge an TSOT # 108

By | March 6, 2013

Hi there

I’m loving the weather at the moment – cool at night and warm during the day – long may it last!

Over at the NZSU blog Callena has set us a challenge to use our favourite colour combination from the Colour Coach using the Creative Combination selection.  I found it hard deciding which combo to use as I have a number of favourites.  I finally went with Rose Red, Not Quite Navy and River Rock.  If I have time in the next few days I may create another one.

I’ve used the sketch from this week’s Try Stampin on Tuesday challenge – do pop over and check it out.

I used my Tasteful Trim die for the scallop down the side.  It wasn’t wide enough to add the ribbon so I cut it in two and then rejoined it with the ribbon.

Supplies:
Stamp – Bloomin Marvelous, Made for You
Card Stock – Not Quite Navy, Rose Red and Whisper White
DSP – River Rock
Ink – Not Quite Navy, Rose Red and River Rock
Other – Tasteful Trim Die, Rose Red Grosgrain Ribbon (retired), Rose Red Brads, Dimensionals

Well I’d better finish getting ready for work.  Have a great day

Thinking of You

By | March 4, 2013

Hi there

Hope your week is off to a good start!

Today one of my fellow crafters Lisa is having a birthday – Happy Birthday Lisa and I hope you have a great day.  Here’s the card I made for her:

I am loving this new two-tone ribbon and wanted to include a bow somewhere on my card!  There are so many things I like in the new Seasonal Catalogue – one being the Honeycomb Embossing Folder. This stamp is also from the Seasonal Catalogue and has now been officially ‘inked up’.  If you don’t have a copy of this new catalogue then send me an email and I’ll post one out to you.

Supplies:
Stamp – Just Thinking
Card Stock – Naturals White, Rose Red
Ink – Rose Red
Other – Two-Tone Pink Pirouette/Rose Red Ribbon, Honeycomb Embossing Folder, Window Frames Collection Framelits, Rhinestone, Dimensionals

Well my lunchtime is over and it’s back to work.
Catch you later.

Auckland Extravaganza

By | March 3, 2013

Hi there

Yesterday we had our teams Extravaganza event.  We had heaps of fun and the ladies made 5 different projects.  My friend Narelle and I taught this card to the ladies – we had fun teaching it and I think they enjoyed making it.

Here are all the projects that were taught:

I made the following little treat boxes (cased from Dawn Olchefske) for my customers.  I had to alter the pattern a bit so that it would fit our A4 card stock and also fit my chocolates!  I managed to get four out of an A4 sheet of card stock.  The theme for our Extravaganza was Sale-A-Bration and the new Seasonal Catalogue.  I used four SAB products to create my treats – Sycamore Street paper and ribbon, Pretty Petites and the matching Petite Curly Label Punch.

Well I’m off to bed as last week most nights were about midnight – which is unusual for me.  This may have had something to do with the prepping for Extravaganza and the fact that my husband was away on business all week.  I seem to put off going to bed on time when he’s away!

Have a great week.

Try Stampin on Tuesday #107

By | February 26, 2013

Hi there

I hope your week is going well.  Can you believe it we’re nearly at the end of February – where is 2013 going!!

I’ve used today’s sketch for a baby card.  Some friends from Church just become grandparents for the first time and I wanted to let them know how excited I was for them.  What better way than to give a handmade card!

In my last order I got some of this new Two-Tone Ribbon – the photo doesn’t do it justice.  When I got my new catalogue it was only on my ‘maybe’ list but when I received a card from my good friend Julia it changed lists to the ‘next order’ one!  It is so beautiful and makes lovely bows.  I have some other girl baby cards to make so you’ll be seeing more of this ribbon soon.

Supplies:
Stamp – Baby Prints
Card Stock – Naturals White, Rose Red
Ink – Rose Red
Other – Two-Tone Ribbon (Pink Pirouette/Rose Red), Rose Red Grosgrain Ribbon (retired), Daubers, Dimensionals

Well I’m off to bed – catch you back here soon.

Seasonal Showcase

By | February 24, 2013

Hi there

We have had another stunning weekend here in Auckland although I don’t think the garden is that happy with  all this heat.

Yesterday I had a workshop with a lovely bunch of ladies.  The hostess was celebrating a birthday so got some of her friends together for some crafting fun.  It was a great time and they all do so well.  I had met the hostess at the first workshop I held back in June last year.  I had no idea who she was inviting but it turned out I knew two of the ladies from my past!  One from my teenage years who I hadn’t seen in decades and one lady who knew my parents.  You just never know who you’re going to meet through crafting 🙂  It was great catching up.

Well on with the card I taught:

I used the same layout as my SAB swaps but this time used products from the Seasonal catalogue along with Midnight Muse.  This is such a versatile layout and made so much easier with the help of the 1″ square punch!  I’ve teamed the Polka Dot and Stripes Embossing Folders to match the DSP.  The Colour Coach came in handy yet again to help choose the right coordinating blue.
Supplies:
Stamp – Collage Curios, Ciao Baby
Card Stock – Midnight Muse, Bashful Blue, Naturals White
Ink – Midnight Muse, Bashful Blue
DSP – 2012-2014 In Colour Designer Series Paper Stack (Midnight Muse)
Other – Stripes, Polka Dot, Honeycomb Embossing Folders, 1″ Square Punch, Petite Curly Label Punch, Midnight Muse Satin Ribbon

Have a great week

Collage Curios 3 x 3

By | February 22, 2013

Hi there

I’m loving the new Collage Curios stamp set and have just finished making 20 3″ x 3″ cards for one of the ladies I used to work with.  She needed some ‘thank you’ cards so while in the ‘production’ mode I made myself a set of four birthday cards in the same style (will blog them later).  Here are the ‘thank you’ cards.

I used this years In Colours and made five of each colour.  These are great to have on hand so were quick and easy to make.  The butterfly is from the Papillon Potpourri set and matches perfectly with the new Bitty Butterfly punch.  The greeting comes from my most used set – Made for You.

Supplies:
Stamp – Collage Curios, Papillon Potpourri, Made for You
Card Stock – Whisper White, Summer Starfruit, Gumball Green, Primrose Petals, Midnight Muse
Ink – Summer Starfruit, Gumball Green, Primrose Petals, Midnight Muse, Raspberry Ripple
Punches – Postage Stamp and 1″ Circle, Bitty Butterfly

Try Stampin on Tueday #106

By | February 20, 2013

Hi there

My original thought for this weeks sketch was for a birthday card but once I’d sorted out my colours and accessories I changed my mind 🙂  This is a real mix of old and new products (and even one retired because it just worked).

Here’s the sketch

and here’s my take

This is the first time I’ve used the Designer Builder Brads – they are so cool.  You can create your own brad by either using paper (as I have) or a stamped image.  Here’s a closer look.
I hand cut one of the Pool Party flowers from the Floral District paper and stuck it to the brad then added the epoxy bubble.  My flower was bigger than the bubble but I think it adds to it.  Before adding the brad to my card I cut a 1″ circle out of Island Indigo card stock so that is would stand out more against the Core’dinations Pool Party card stock.
I didn’t have any current So Saffron ribbon but managed to fine a piece of retired ribbon.  It was wider than I’d wanted so I just layered it under the card stock to show the width I wanted then adhered a bow on top with Glue Dots.
Supplies:
Stamp – Lacy and Lovely
Card Stock – Island Indigo, So Saffron, Naturals White, Pool Party Core’dinations
Ink – Island Indigo
DSP – Floral District
Other – Designer Builder Brads, 1″ Circle Punch, So Saffron Grosgrain Ribbon (retired), Tasteful Trim Die

Don’t forget to check out Try Stampin on Tuesday and join in the fun.

Team Swaps – Seasonal Catalogue

By | February 18, 2013

Hi there

On Saturday our team had it’s regular training session.  These are always so much fun – lots of catching up, laughing, eating and business help 🙂  Most sessions we do swaps and this time our swaps used products from the new Seasonal Catalogue.  Swaps are a great way of getting different ideas for using the new products.  There were 18 of us swapping so now I have 18 new ideas using products from the Seasonal Catalogue.  Here is the card I made.

This time I decided to go with a 3″ x 3″ card with a twist.  I had seen this style over on Mary Fish’s blog and thought it would be cool to recreate using the Sunshine and Sprinkles DSP.  It is kind of like a gate fold with the top piece fitting under the embellishment to keep shut.  Here is a photo of it opened which also shows off the cute whale paper.
The front picture is cut from another sheet of paper in the same pack using the 1 3/8″ circle punch.  I did two colour combinations using Pacific Point ink with the whale holding either a yellow or green umbrella or Melon Mambo ink with the whale holding pink umbrellas.
Supplies:
Stamp – Ciao Baby
Card Stock – Whisper White
Ink – Pacific Point (or Melon Mambo)
DSP – Sunshine and Sprinkles
Other – 1 1/4″ and 1 3/8″ Circle Punch, 7/8″ Scallop Circle Punch, Cloudy Day Embossing Folder, Dimesionals

ColourQ #176

By | February 17, 2013

Hi there

I hope your weekend is going well.  I’ve managed to sneak in some crafting time today and make some cards.  The first card is for this week’s ColourQ challenge – it’s been a while since I participated in one of their challenges.  This colour combo is one I probably wouldn’t have chosen myself but that’s often what a colour challenge is all about – stepping outside our comfort zone.  I must admit I’m rather pleased with the final card.

Today’s colours are Raspberry Ripple, Primrose Petals, Calypso Coral, Lucky Limeade and White.  I needed a birthday card for a special birthday and went with the cool design of Triple Time Stamping.  This set is a great one to use for this technique.  After stamping the images I felt it needed the sentiment stamped straight onto the smallest layer so to make sure it went on straight! I used my Stamp-A-Jig.  And here is the inside:

Supplies:
Stamp – Lacy & Lovely, Made for You, On Your Birthday (retired)
Card Stock – Lucky Limeade, Whisper White
Ink – Raspberry Ripple, Primrose Petals, Calypso Coral, Lucky Limeade
Other – Calypso Coral Ruffled Ribbon, Dimensionals, Stamp-A-Jig

I’ll be back on Wednesday with the other card I made (for this week’s Try Stampin on Tuesday).

Catch you back soon

Get Well card

By | February 15, 2013

Hi there

The other week at Crafters Anonymous Julia taught us this really cool card to give somebody when they are sick.  The first card is the one I made on the night using products from the new Seasonal Catalogue and some of the FREE Sale-A-Bration products.  Isn’t it cute?

 The front just looks like an ordinary card front BUT when they open it – inside is a ’tissue box’.  I thought it was so cool that I taught it at my recent workshop.  This one uses three new items from the Seasonal Catalogue – Honeycomb Embossing Folder, Ovals Framelts and the Print Poetry DSP Stack (I am LOVING this paper).  I manually cut the hexagons out of the paper and card stock.  First of all I ran the paper/card stock through the Big Shot a couple of times – it almost cuts right through the paper and then I cut the hexagon so that it fits inside the hexagon on the main sheet.

The word stamps are from Word Play and  Thoughts and Prayers.  My ladies really enjoyed this project – I can see this being recreated a few times this coming winter!  Thanks Julia for sharing this project with us.

Well the weekend is almost upon us – I hope you have a great weekend.

Happy Anniversary Mum and Dad

By | February 14, 2013

Hi there

Today my parents are celebrating their 54th wedding anniversary.  Back when they got married Valentine’s Day wasn’t so commercial but I don’t think Dad will ever forget his wedding date with all the advertising that goes with 14th February.

Here is the card I made for him to give Mum.  The card is called a Penny Spinner card.  The spinning Heart using the Hearts Collection Framelits and a Shaker Frame filled with Glass Glitter.  It’s actually part of the project I created for Stampin Fun and Friends.  At the time of making the project I knew I would give it to Dad to give to Mum so tailered it with her in mind.

At the moment Mum & Dad are in Sydney seeing Dad’s sister who was diagnosed with cancer last year and this year they have found she has a brain tumour.  I took them out to the airport at 6:45am and while having my shower (this is where I get my best ideas!) realised that Mum wouldn’t have had time to make Dad a card as they had just got back from holiday.  I was trying to think what I had on my desk that I could use to make a quick card.  I found I had some hearts cut out of glimmer paper so attached them with bakers twine to the front, quickly stamped ‘Happy Anniversary’ and the front was done.  For the inside I used the heart embossing folder and ran that through on my insert and attached it all together – nothing flash but a card made in under 5 minutes!  Isn’t it great to be able to create something so quickly and give away to fill a need.  I am not an early morning person so was rather pleased with my creation – I didn’t have time to take a photo but was rather pleased with my early morning creation.  Mum really appreciated it.

Supplies:
Card
Stamp – You are Loved, Love Blossoms Wheel,Teeny Tiny Sentiments
Card Stock – Real Red, Whisper White, Red Glimmer Paper
Ink – Real Red
Other – Word Window and Modern Label Punch,  Hearts Collection Framelits, Shaker Frame, Champagne Glass Glitter, Acetate, Dimensionals

Box
Other – Petite Pockets Die, Hearts Collection Framelits, White Satin Ribobn, 1/8″ Real Red Taffeta Ribbon,  Acetate

Catch you back tomorrow with some more creations

Try Stampin on Tuesday #105

By | February 12, 2013

Hi there

Well I’m not sure where the week has gone – I haven’t had a chance to blog since last week’s card and I have heaps of creations to share with you.  I will try and catch up this coming week.

Today’s card incorporates two challenges – the sketch is from Try Stampin on Tuesday and I used the Crafters Anonymous February challenge of using acetate.  I’ve used acetate to create 3D projects but never made a card with it.

Here’s the front:

 and then from the inside:

After adhering my shapes to the front I then cut an extra set of shapes to stick in reverse from the inside so that you couldn’t see the adhesive from the front shapes.  I did the same process for the back of the card.  On the inside I used some DSP and then plain card stock from the back.  This also gives the card some extra strength.  I was really pleased with my first attempt and will give this style another go soon.
Supplies:
Stamp – Clockworks, Made for You
Card Stock – Night of Navy, Daffodil Delight, Basic Gray, Crumb Cake, Whisper White
DSP – Neutrals Paper Stack
Ink – Night of Navy
Other – 3/4″ Circle Punch, 2 1/2″ Circle Punch, Chevron Embossing Folder, Acetate, Dimensionals

Catch you back soon with some more creations.