Try Stampin on Tuesday #114

By | April 17, 2013

Hi there

As I posted a couple of weeks ago I’m trying to use up some of my accessories that I buy because I love them but then never get round to using!  So when I saw this weeks sketch included some brads I checked what I had and that determined my colour combo.

I’ve gone with Island Indigo and Pool Party as my main colours teaming them up with So Saffron.

I changed the circle to an oval as I wanted to use the stamp set ‘Oh, Hello” from the Seasonal Catalogue.  I love the Core’dinations Card Stock and this time used the Sanding Block for some extra texture once I’d embossed it – it almost gives it a suede feel.  The embossing folder doesn’t fit for a portrait piece of card stock so I did it in two parts and then covered the join with the Island Indigo card stock 🙂 (nobody would ever know)

I’ve remembered to take a photo of the inside of the card this time 🙂

I’m loving this flower image.  I coloured it by applying ink to the stamp using a blender pen as I don’t have the Island Indigo marker.

Supplies:
Stamp – Oh, Hello and Thoughts and Prayers
Card Stock – Island Indigo, Pool Party Core’dinations and Whisper White
Ink – So Saffron, Island Indigo, Old Olive
Other – Ovals Collections Framelits, So Saffron Grosgrain Ribbon (retired), Island Indigo and Pool Party Designer Printed Brads, Chevron Embossing Folder, Sanding Block, Dimensionals, Blender Pens

Have a great day

Hostess and Joining Stampin Up! Offer

By | April 16, 2013

Hi there

Just when you thought all the promotions had finished Stampin Up! have given us another great offer to share.

Host a party: 
If you host a party or place an order (or a group order with your friends) over $500, you can earn an additional $75 in FREE products!  This applies from 15th April – 30th May 2013.

Join Stampin’ Up:
Have you also wondered about being a Stampin’ Up demonstrator yourself.  Well now is a great time to do so as you will get an extra $75 for your Starter Kit and I will be here to encourage you and support you.  If you would like to find out more about what this involves, please contact me with no obligation.  I know I was a bit hesitant about it before I joined up, but I am so glad I did.  Stampin’ Up has so much to offer!  You can be a hobby demo, or offer classes and workshops as much or as little as you like.

If you would like to host a party or know more about joining my team please contact me for more details.

Happy Birthday Dominic

By | April 15, 2013

Hi there

Friends of ours youngest son turns 2 today.  He is mad on lawn mowers (and guitars) so I thought I’d make him a lawn mower themed card and something special.  I checked out good old Google and this is what I found.  A wonderful creation by Lorri Heiling so I just had to buy the tutorial!

The instructions were so easy to follow and it was a fun project to make – thanks Lorri.
Here’s a close up them:

Now the birthday boy also has a new baby sister and each of the children in this special family receive a personalised cross-stitched towel when they’re born.  I really love this towel and it was nice to do a girl one after three boys!

Keep warm and dry as the autumn/winter weather has arrived.

Try Stampin on Tuesday #113

By | April 10, 2013

Hi there

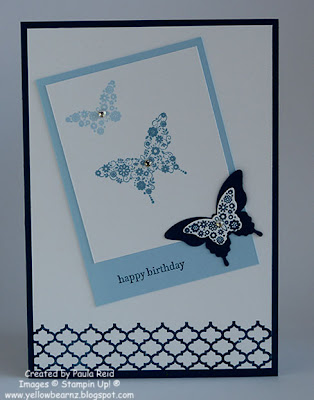
This week’s card was one I did for my girlfriend’s birthday last month.  This is one of my favourite colour combinations – Midnight Muse, Marina Mist and Bashful Blue and combines with a new favourite set of mine – Papillon Potpourri.  When I first saw this set I wasn’t that taken with it but now that there is another punch to match it I love the possibilities it now gives.

To me this is a clean and simple sketch which I love and it came together nice and easy.  I also carried the stamp along the bottom to the inside of the card.  I added a bit of ‘bling’ to each butterfly for a bit of depth to the card.

Supplies:
Stamp – Papillon Potpourri, Summer Silhouttes and Teeny Tiny Sentiments
Card Stock – Whisper White, Midnight Muse, Bashful Blue
Ink – Midnight Muse, Marina Mist and Bashful Blue
Other – Elegant Butterfly, Bitty Butterfly, Rhinestones

Masculine Team Swap Card

By | April 7, 2013

Hi there

Yesterday we had our team training at Jacque’s where we did a masculine card swap, learnt more about MDS and did a Make N Take using the new promotional set of ‘Sent with Love’.

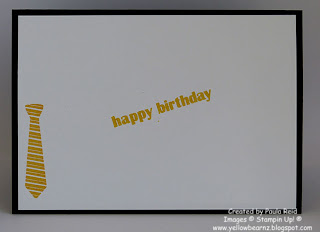
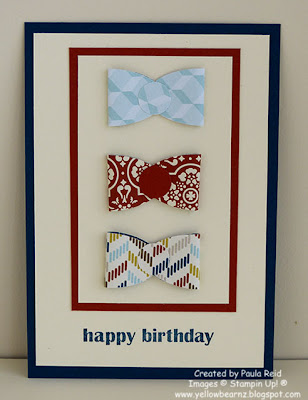
I decided to make a card that didn’t use a stamp set and could be easily recreated.  I had seen a card that made a bow out of DSP which I altered as I had to make 21 of these and this is what I came up with:

We don’t seem to have many masculine papers but I managed to find some that were suitable for a bow tie from the Comfort Cafe range – what do you think?  I used two of my favourite masculine colours – Cajun Craze and Not Quite Navy.  I’m really sad that Not Quite Navy is retiring as I find it such a versatile colour. Check here for an update on the new colour range.
Supplies:
Stamp – Best Dad Ever
Card Stock – Cajun Craze, Not Quite Navy, Very Vanilla
Ink – Cajun Craze, Not Quite Navy
DSP – Comfort Cafe
Other – 1/2″ Circle Punch, Large Oval Punch, Glue Dots

Triple Time Stamping and The Open Sea

By | April 6, 2013

Hi there

Last month one of our Directors who worked in the business resigned after 34 years.  He didn’t want to use the word ‘retirement’ 🙂

I wanted to make a special leaving card for the staff to sign as he is a very special man.  I will miss our little chats in my office where we put the world to rights.  We have decided to book coffee catch ups so we don’t loose touch.

I don’t have many masculine stamp sets so borrowed The Open Sea from my good friend Julia.  This is what I created:

Rather than a card I made this little album which had blank pages inside.  This was good as I was able to add more pages as we ran out of writing space.  I used the Triple Time Stamping technique for the front.  The measurements are:
Whisper White – 14cm x 14cm, 10cm x 10cm and 6cm x 6cm
Cherry Cobbler – 10.5cm x10.5cm
Night of Navy – 6.5cm x 6.5cm
As Bob is a sailor in his spare time I also wanted to add some sort of knot.  This is my first attempt at a Sailors Knot – I think it turned out really well.
I had originally stamped ‘Happy Retirement’ on the front from the Teeny Tiny Sentiments set but when I found out he wanted it called resignation I went on-line and got the RBG colours for Cherry Cobbler and created my own sentiment and stuck it on top of the stamped version.
Supplies:
Stamp – The Open Sea
Card Stock – Night of Navy, Cherry Cobbler, Whisper White
Ink – Night of Navy, Cherry Cobbler, Early Espresso and Crumb Cake
Other – Cherry Cobbler Bakers Twine, Word Window Punch and Modern Label Punch

Check back tomorrow for my masculine team swap card.

Don’t forget to put your clocks BACK an hour tonight and check the battery in your smoke alarms.

Colour Refresh

By | April 4, 2013

Hi there

Here’s some news hot off the press – Stampin Up! have just announced they are making some changes to the colour palette.

From today all retiring/discontinued colour products (ink, paper, ribbon, accessories etc) will be available only while stocks last.  That means that some products will not be available throughout the retired list period. So get your orders in early to make sure you won’t be disappointed.  You can order via my online shop or contact me directly.
Stampin Up! have also announced  that Watercolour Pencils and Crayons will be discontinued due to unforseen problems with their supplies.  The following items are only available while stocks last.  So again if you want to purchase any of the below contact me ASAP
  • 101879: Watercolor Pencils
  • 119802: Subtles Collection Watercolor Wonder Crayons
  • 119803: Regals Collection Watercolor Wonder Crayons
  • 119804: Brights Collection Watercolor Wonder Crayons
  • 119805: Neutrals Collection Watercolor Wonder Crayons

Petite Curly Label Punch

By | April 4, 2013

Hi there

If you missed out on getting the Petite Curly Label Punch during Sale-A-Bration – don’t panic – it’s now been added to our product line and will be available until 30 June 2013.

Here are a couple of samples where I have used this punch

Check back later for another project using the Triple Time Stampin technique.

My First MDS Layout

By | April 3, 2013

Hi there

Thought I’d do a quick post to show my first MDS layout I created last night.  I’ve used one of the scrapbook templates and just dropped my photos in.  I did alter the orientation of one of the boxes to accommodate my photo which was easy to do.  I wanted this to be a fun page so have chosen photos of Yellowbear and Bluebear tripping around the US.  What do you think?

Well I’d better get back to work – lunchtime is over.

Category: MDS

Try Stampin on Tuesday #112

By | April 3, 2013

Hi there

Well this time in 7 weeks and I’ll be getting ready to board a plane to my first Stampin Up! Convention.  I’m really looking forward to this event.  One of our team has already started a countdown for the number of sleeps!

As soon as I saw this weeks sketch I knew I wanted to use the Triple Time Stampin technique.  I’ve done a few cards using this technique but not in this layout.  So here goes:

My measurements are for the Whisper White:
Layer 1 – 10cm x 14.3cm
Layer 2 – 7cm x 7cm
Layer 3 – 4.5cm x 7cm

and for the mat (done in Island Indigo)
Layer 2 – 7.5cm x 7.5cm
Layer 3 – 5cm x 7.5cm

I tried a few options for the final layer and settled on the same flower punched out with the co-ordinating punch.  I also punched one out of Island Indigo and matted it at each end of the petals.

And here’s the inside of the card:

Supplies:
Stamp – Mixed Bunch, Embellished Events and On Your Birthday (retired)
Card Stock – Island Indigo and Whisper White
Ink – Island Indigo, Rich Razzleberry
Other – Word Punch, Modern Label Punch, Blossom Punch, Island Indigo Designer Printed Brads, Dimensionals

Have a great day.

Online Shopping, MDS and a new promotional offer

By | April 1, 2013

Hi there

Well it’s all happening at Stampin Up! – in the last few days we have got Online Ordering, MDS (My Digital Studio) and now another promotion running until 15 June.  So bear with me as this post may be long.

Online ordering means you can now shop whenever you want :).  To start your shopping experience just click on the ‘Shop Here’ button or my website button – both are situated on the left hand side of my blog (check out for the pictures below).

 
This will take you to my Stampin Up! website and then click on the ‘Shop Now’ button and then it will open up the ordering page.  This is where the fun begins as you start to fill your basket with crafting goodies.

Payment is made via your credit card and the goods are delivered to your door.  If you want to pay via cash or directly into my bank account just continue to email me with your orders.
The second addition to Stampin Up! is that we now have MDS (My Digital Studio).  Check out the link to find out more.  MDS is a digital software programme that you can use for scrapbooking, creating digital cards, photobooks, calendars and more.  I’m planning on also using it to design card layouts.  Once I have the perfect layout I can then create them with card stock – that way I won’t waste any products.  Stampin Up! are offering a 30 day FREE trial so if you want to try it before you buy it check out my website – see below
The final announcement is that from 1 April to 15 June we have a special promotion called “Sent with Love’.
This promotion includes Designer Paper and a clear stamp set.  You can buy them individually or as a bundle (20% off the retail value) which also includes Calypso Coral Bakers Twine.  You can order this via my Online Ordering or direct with me.

Well I think that’s it from me at the moment.  I hope you’ve had a relaxing Easter weekend.  I have been busy crafting but can’t show you any of it for a couple of weeks.  One of the projects I have completed (20 masculine cards the same!) is for our team swap next Saturday.  We all struggle with these types of cards so I’m looking forward to seeing what everyone else has created.  I’ve also made my Try Stampin on Tuesday cards for the next couple of weeks so check back on Wednesday for this weeks card.

If you have any questions about any of the above (I know it’s a lot to take in) just drop me an email or give me a call.

Until then – happy crafting.

Try Stampin on Tuesday # 111

By | March 28, 2013

Hi there

Sorry for the lateness of this post.  It’s been a busy few days.

 For this weeks sketch I decided to turn just the card base 90 degrees so that it would fit the image I wanted to use.

I’m not sure if you’re like me – I buy accessories (brads, buttons, rhinestones, pearls etc) then never get round to using them.  So over the next couple of weeks my mission is to use some of these on my cards.  This weeks card has brads and the lovely Dahlias.  Doing well so far 🙂  I’m also trying to remember to take photos of the inside of my cards.
Supplies:
Stamp – Embellished Events, Bring on the Cake
Card Stock – Island Indigo, Lucky Limeade, Whisper White
DSP – Summer Smooches
Ink – Lucky Limeade
Other – In Colour Dahlias, Island Indigo Brads and Ruffled Ribbon, Designer Frames Embossing Folder

Happy Birthday Mum

By | March 21, 2013

Hi there

Yesterday was my Mum’s 76th birthday.  We celebrated the special occasion with a family BBQ at our place.  It was a lovely evening and we were able to sit outside and enjoy the warm weather.

Here is the card I made for her:

I think Pool Party is one of my favourite colours – it seems to go with everything.  Here I’ve teamed it up with Rose Red another of my favourite colours.  I already had the image stamped so thought I’d start with that as my base.  It was stamped a bit too close to the edge of the paper to use the Labels Framelits so I had to try a few until I found one that fit the image nicely.  I love how we now have matching Paper Piercing templates for the Framelits – it just adds something to the card.  I like to mat my sentiments so worked out a way to mat the Ticket Punch myself – one of the joins is hidden behind the ribbon.  Mum really liked her card and BBQ dinner.
Supplies:
Stamp – Bordering on Romance, Made for You
Card Stock – Rose Red, Pool Party, Pool Party Core’dinations, Watercolour Paper
Other – Windows Collection Framelits, Ticket Punch, Rose Red Grosgrain Ribbon, Crayons, Aqua Painters, Festive Paper Piercing Pack, Vine Street Embossing Folder, Stampin Sanding System
Can you believe it’s Friday tomorrow – yeah another weekend is almost here.  Don’t forget tomorrow is the last day to order and get FREE Sale-A-Bration products.

Try Stampin on Tuesday #110

By | March 20, 2013

Hi there

Another week has gone sailing by and it’s time again to showcase this weeks card for Try Stampin on Tuesday.

One of the ladies I work with is due to have her first baby in a couple of weeks.  This is the card I made for her recent baby shower.

The only stamping on this card is the greeting.  I managed to cut out an oval (using the new Ovals Collection Framelits) of the Sunshine and Sprinkles DSP that included the whale – isn’t it cute.  I’ve then picked some of the colours from the paper to mat the DSP.  I didn’t have any Melon Mambo ribbon so went with a double bow of Basic Black and Daffodil Delight Taffeta Ribbon.

In my latest order I got the Happy Whale Die and couldn’t wait to use it on the inside of the card.  I used a marker to draw the eye.

Supplies:
Stamp – Teeny Tiny Sentiments
Card Stock – Basic Grey, Melon Mambo, Whisper White, Marina Mist
DSP – Sprinkles and Sunshine
Other – Basic Black and Daffodil Delight Taffeta Ribbon, Happy Whale Clearlits Die, Small Oval and Large Oval Punch, Ovals Collections Framelits

SAB Calendar

By | March 19, 2013

Hi there

I forgot to post this project yesterday.  One of the ladies in our wider team was able to source these mini calendars for us.  This was a quick and easy project to make.

The base is 12″ x 4″ scored at 1/2″, 1 1/2″, 2 1/2″ and 7 1/4″.  Fold this in a mountain, valley, mountain, mountain formation.  Apply Sticky Strip to the 1/2″ tab and adhere together as per the my second photo below.  I’ve used the Sycamore Street DSP cut to 4 1/2″ x 3 3/4″ and Island Indigo card stock behind the calendar cut to 2 3/4″ x 3 3/4″.  The strips across the bottom are 1″ x 3 3/4″ and 3/4″ x 3 3/4″.

I’ve used the Itty Bitty Shapes Punches to punch out some DSP to fit inside the stamp from Madison Avenue – don’t you just love how our stamps and punches all go together.

Check back tomorrow for this weeks entry for Try Stampin on Tuesday – and this time I will remember to post it!