October Promotions

By | October 1, 2017

We have two new promotions on offer this month – Celebrate World Card Making Day and Designer Series Paper Sale.  Contact me if you would like to purchase any of these products.  I will be placing an order on Wednesday night so let me know before 8pm on Wednesday 4th October.


Birthday Party Projects For A 10 Year Old – Part One

By | October 1, 2017

Hi there

We seem to have had all seasons in one day today.  Hopefully tomorrow will be more settled as we have to fly to Wellington for my uncle’s funeral – he was one month off turning 90 and had been tramping with friends two days before dying.  He was a wonderful big brother to my Mum and will be missed by all.

A couple of weeks ago I had the opportunity to teach a group of girls 4 projects at a 10 year olds birthday party.  It was heaps of fun and I really enjoyed my time with these lovely young ladies.

The first project they made was this Jotta pad with a mini gel pen.

We used the Watercolour Pencils to colour in the image from Beautiful You.  They each chose different colour schemes and had pens to match the ladies dress .  My sample uses the Pacific Point for her dress and the water, Daffodil Delight for her hat and Early Espresso for her hair.  For her skin I did a combination of Calypso Coral and Early Espresso.

The second project we made was a corner bookmark.

This project uses three different die sets – the scalloped edge is created with the Seasonal Layers Thinlits, the mats and DSP are cut using dies from the Layering Square Framelits.  I wanted something that would be flat to go in the centre so had a quick thumb through the catalogue to see what I could use.  This cool cut out is from the Support Ribbon Framelits set – add one of our new flat Rhinestones and the project is complete.  The paper squares are from the Fresh Florals Designer Series Paper Stack.  I gave the girls 5 squares (one of each of the new In Colours) and they could choose to use 4 or all five on their project.

And here’s how it sits on the page

Check back tomorrow for the remaining two projects.  I’ll also do another post shortly sharing two new promotions we have on offer this month so check back in about an hour for those.


Holiday Catalogue Workshop

By | September 26, 2017

Hi there

After being sick for two weeks and having no extra energy I’m finally back in business 🙂  Roll on the warmer weather and we can say ‘goodbye’ to winter illnesses.

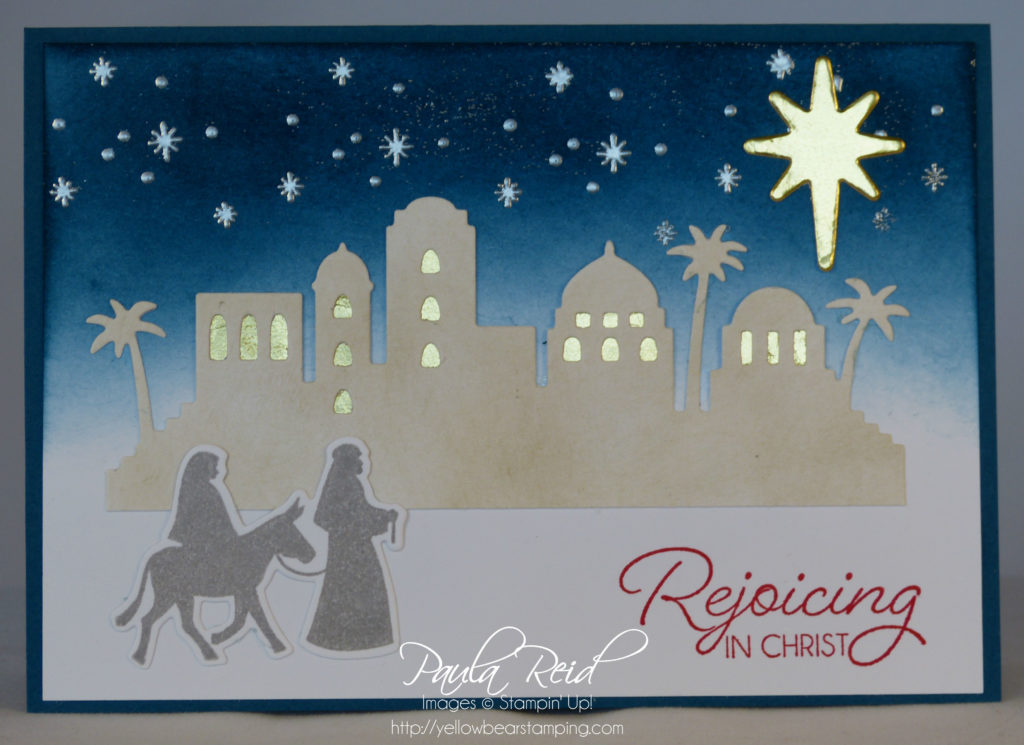
The other weekend I held a workshop with a wonderful group of ladies.  I taught two cards using products from the Holiday Catalogue – first up we used the Night in Bethlehem bundle which includes a stamp set (Night in Bethlehem) and dies (Bethlehem Edgelits Dies).

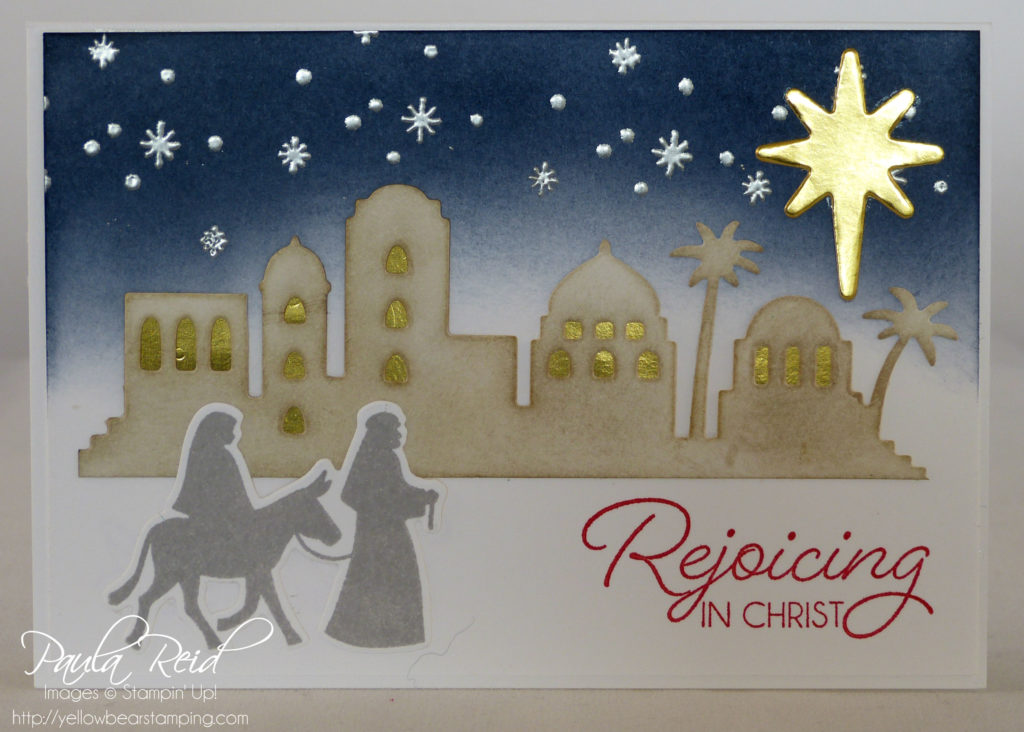
Rather than stamping straight onto the Note Card I had precut some card fronts (3 3/8″ x 4 7/8″).  The sentiment is stamped in Real Red then we sponged the sky in Night of Navy, stamped the ‘stars’ in VersaMark and added Silver Embossing Powder.  The ‘bright’ star is cut out of Gold Foil with one of the dies.

When I made my first sample I cut out the ‘houses’ then sponged them with Soft Suede which was a bit hard as I didn’t want to rip the trees.  So I decided to sponge my strip of Whisper White before I cut it out – way easier :).  Once cut I added bits of Gold Foil to create the lights in the windows – a good way to use up you off-cuts of foil.  Mary and Joseph are stamped in Smoky Slate then cut out with the coordinating die.  The card front is then adhered straight onto the Note Card.

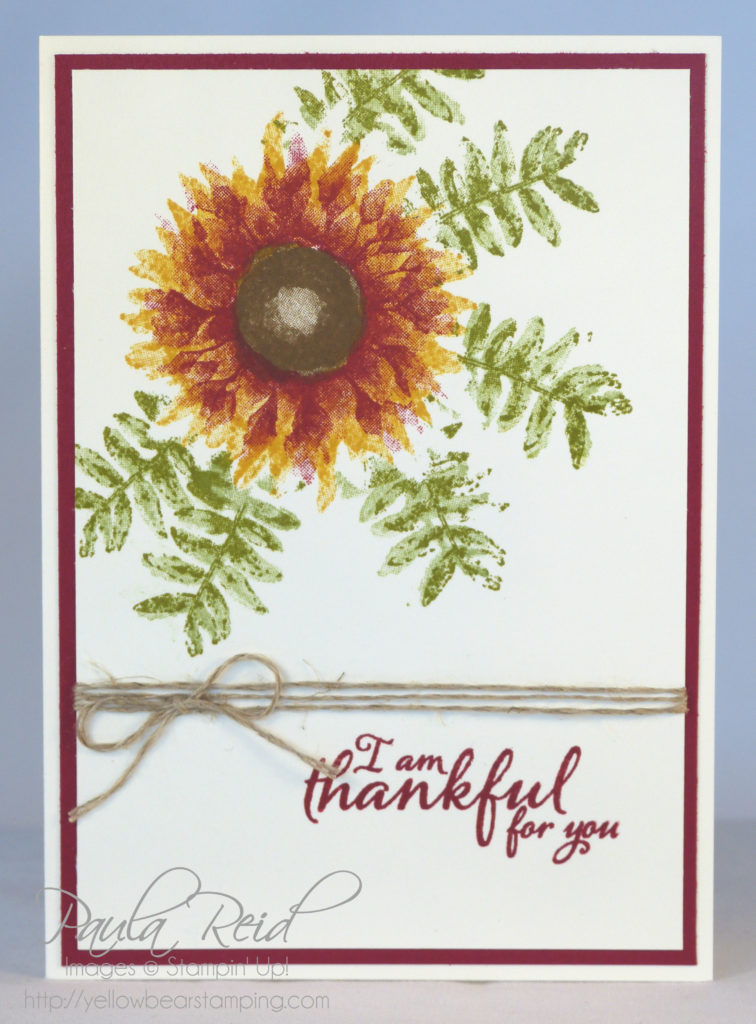
The second project uses the lovely new stamp set Painted Harvest.

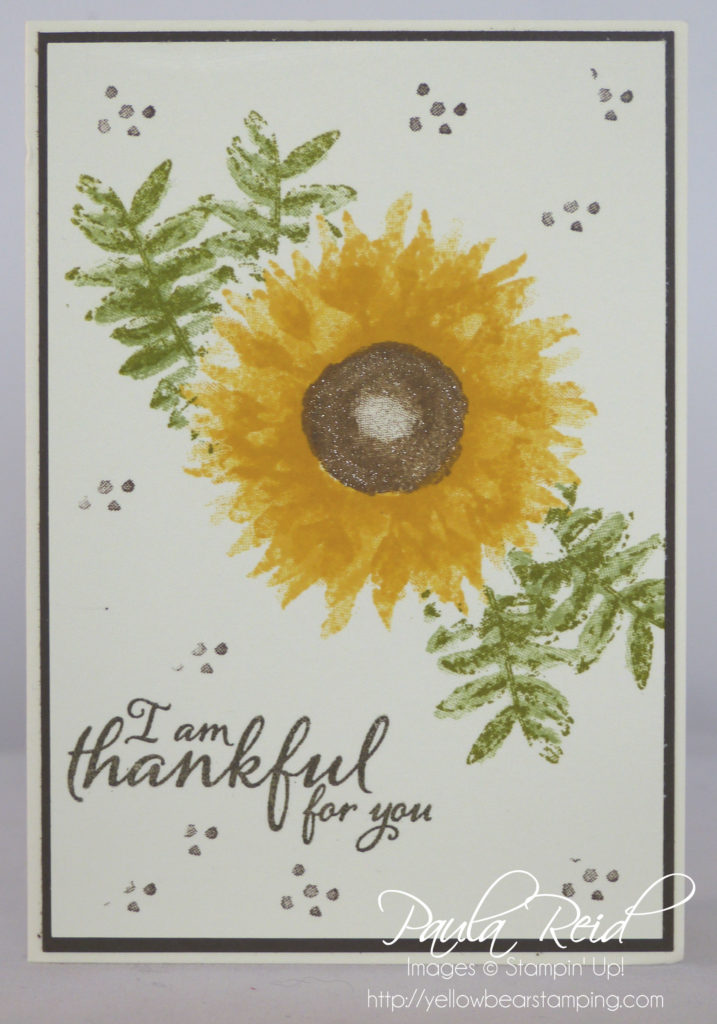
Like the first card the stamping is done on a separate piece of card stock (3 1/4″ x 4 3/4″) then adhered to a piece of Early Espresso (3 3/8″ x 4 7/8″) which is finally adhered to the Very Vanilla Note Card.

This stamp is a ‘two step’ set.  The flower and the leaves are both two steps although we stamped the flower images a couple of extra times for more depth.  The first layer of the flower is stamped in Daffodil Delight then the second stamp is stamped in Crushed Curry.  The centre of the flower is stamped in Soft Suede – the specks you can see are from a hint of Clear Wink of Stella.

To stamp the leaves we created a mask (Stamp the flower image on a Post It note and cut out.  Place on top of the original stamped image then stamp the leaves).  This allows your second image – the leaves – to look as though they have been stamped first and are behind the flower image.

The leaves are stamped in Pear Pizzazz first then Old Olive.  The sentiment and small ‘dots’ are stamped in Early Espresso.

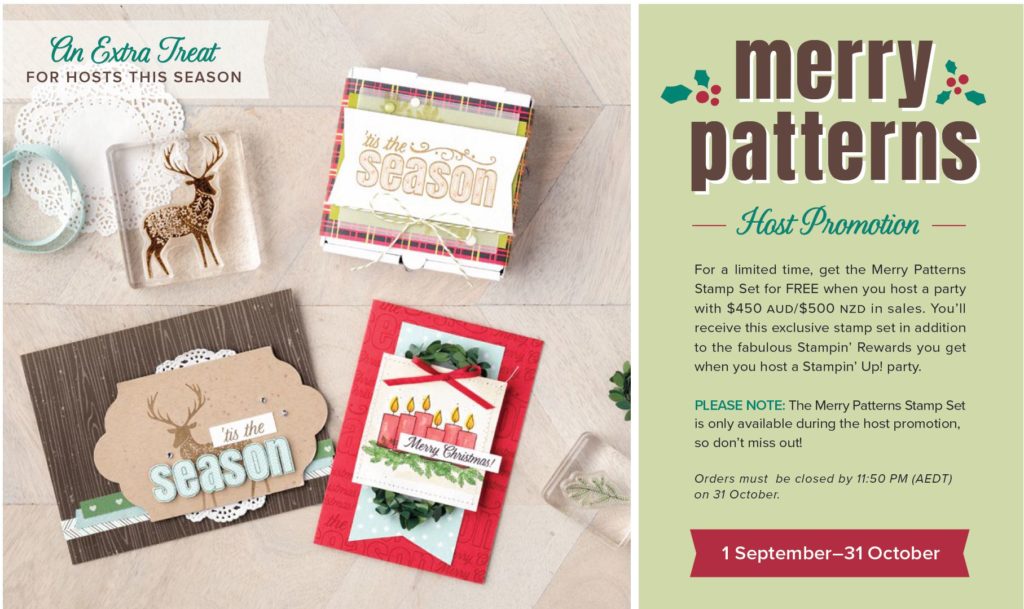
I hope you are enjoying the new Holiday Catalogue.  If you would like to host a workshop with your friends please contact me – don’t forget there is a promotion until the end of October for hosts.   Check out this post for more details.


Minions Happy Birthday

By | September 6, 2017

Hi there

Punch art is a fun way to create a card when you can’t find a stamp to match a particular theme or character.  One of the ladies at work celebrated her birthday today and ages ago mentioned she loved Minons.  So I put that thought in my memory bank and pulled it out on Sunday to create a special card for her.

I managed to find a couple of tutorials on how to create a Minion – my Owl Punch came in handy.

I’ve gone with Pacific Point and Daffodil Delight for my card and used Balloon Celebration for the sentiment and balloon strings.

I was really pleased with the card and she loved it 🙂

Holiday Catalogue Team Swap – Part Three

By | September 5, 2017

Hi there

I hope you’ve enjoyed seeing an alternative way to use the Memories & More Card Pack.  To see more card packs check out pages 192 – 193 of the Annual Catalogue.

Holiday Team Swap - Snowflake Sentiment-MaM card pack - 3

For the cards that were printed in Black I decided to add Real Red as the accessory colour.  The Real Red ribbon is found on page 29 of the Holiday Catalogue.  It’s a nice solid thin ribbon – 1/8″ wide.

Holiday Team Swap - Snowflake Sentiment-MaM card pack - 4

The card pack and the DSP that I’ve used on these cards are part of the Merry Little Christmas Suite which is displayed on pages 10 to 14 of the Holiday Catalogue.  Check out all the wonderful components that make up this suit.

Yellow Bear Signature

Holiday Catalogue Team Swap – Part Two

By | September 4, 2017

Hi there

Following on from yesterday’s post here’s the next installment of the swaps I made using the Merry Little Christmas Memories & More Card Pack.

Holiday Team Swap - Snowflake Sentiment-MaM card pack - 2

The colours used on the card pack are Basic Black, Cherry Cobbler, Lemon Lime Twist, Old Olive, White and Kraft.  I wouldn’t normally choose Basic Black to use for a Christmas card but I think it’s rather stunning and goes well with Cherry Cobbler and Old Olive.  I didn’t have any Old Olive ribbon so I’ve used the Lemon Lime Twist ribbon and some of the sentiments are stamped in Lemon Lime Twist before heat embossing them with clear embossing powder.

These smaller cards from the pack make it quick and easy to create a batch of Christmas cards.

It’s a bit hard to see in the photo but I added some Clear Wink of Stella to the ‘star’ images on the DSP.

Don’t forget the special promotion we have on offer for September and October – I would love to come and share with you some Christmas and/or Holiday projects.Merry Patterns - Host Promotion

Check back again tomorrow for installment #3

Yellow Bear Signature

Holiday Catalogue Team Swap – Part One

By | September 3, 2017

Hi there

Last month we had a team training day where those that wanted to could participate in the Team Swap.  A swap is where you make 20 of the same card and then swap with 19 others so that you get a variety of cards.  It then means we can show you a mix of products from a new catalogue.

For my swap I used the Merry Little Christmas Memories & More Card Pack to create full sized cards.  I made a variety of samples so I’ll share a few with you now and then the rest over the next few days so be sure to check back tomorrow for installment #2.

The card pack comes with 72 double-sided cards – 52 that are 7.6cm x 10.2cm (2 each of 26 designs) and 20 that are 10.2cm x 15.2cm (2 each of 10 designs), 1 cardstock sticker sheet, 1 acetate sticker sheet and 4 acetate card overlays.  All of this for just $21.25NZD.  You can make a heap of Christmas cards with these.

Holiday Team Swap - Snowflake Sentiment-MaM card pack - 1

The card base and mat are either Cherry Cobbler or Old Olive and the bows are all Lemon Lime Twist Finely Woven Ribbon.  The sentiment is from a new set called Snowflake Sentiments on page 35.  As we don’t sell Embossing Powder in every colour I created my own coloured Embossing Powder.  To achieve this ink your stamp with VersaMark then stamp it again in your chosen colour – Cherry Cobbler or Real Red – then stamp on your project.  Apply Clear Embossing Powder and heat.  One tip – if you are repeating this on multiple cards as I was you will need to clean your stamp after you have stamped otherwise your VersaMark will get very dirty.

The DSP is from the Merry Little Christmas DSP.  The colours used in this pack are Basic Black, Old Olive and Whisper White.

Check back tomorrow for the next batch of cards.

Yellow Bear Signature


Five for All – Happy Birthday

By | September 2, 2017

Hi there

I finally got round to purchasing the stamp set ‘Five for All’ on page 75 of the Annual Catalogue.

Image result for five for all stampin up

It’s got some really fun sentiments and this week I was able to use one of them on a card for a friend who celebrated a big ‘0’ birthday on Thursday.  I wanted to create a fun card and I think this sentiment is perfect.  We have been friends since we were pre-schoolers often spending the holidays staying at each others houses and playing with her many Barbie dolls :).

I’ve teamed the sentiment with another of my favourite stamp sets from the Annual Catalogue – You’ve Got Style

Five for All - Happy Bday - Sue

Now isn’t that a cool sentiment?

The image is stamped in Memento Black Ink and then coloured in using the Stampin’ Write Markers.  For some of the areas I used the fine end of the marker as sometimes the thick end of the marker is to big to use – you don’t want to be going over the lines!  Her face and hands are coloured in using the Calypso Coral Watercolour Pencil as you can get a lighter colour than the markers.

The Card base, ribbon and sentiment use Berry Burst – I’m loving this colour – it’s nice and bright.

I’ll be back tomorrow to share with you the cards I made for our recent team training using products from the new Holiday Catalogue.

Yellow Bear Signature

Holiday Catalogue has now arrived

By | September 2, 2017

Hi there

The 2017 Holdiay Catalogue has finally arrived filled with wonderful products to create Christmas and holiday projects.

Holiday-Catalogue-2017-front-page

Check out the Catalogues page to download a copy.  If you haven’t received a ‘hard copy’ and would like one please let me know and I’ll get one to you.

Stampin’ Up! have a promotion running for the next two months – Merry Patterns Host Promotion.  Hosting a Holiday catalogue event is always fun – and we’ve just sweetened the deal with our exciting Merry Patterns Host Promotion.  If you host a party with $500NZD in sales between now and 31 October as the host you will earn the FREE  Merry Patterns Stamp Set. 

Here are the details:

  • Promotion period:  1 September – 31 October 2017
  • The Merry Pattersn Stamp Set is exclusive to the host promotion and will not be available after 31 October
  • In order to qualify, the event merchandise total must reach $500NZD (before shipping and handling)
  • The Merry Patterns Stamp Set is in addition to Stampn’ Rewards
  • The Merry Patterns Stamp Set may not be exchanged for another stamp set

Here are some samples using this exclusive set

MerryPat-1 merrypat-2thumb merrypat-5thumb MerryPat-4 MerryPat-3

I would love to hold a Holiday Catalogue party with you so if you’re interested in earning this stamp set please contact me to book a time to hold a party for you and your friends.

Check back later today to see a card I made for a friend who celebrated a big ‘0’ birthday last week.

Yellow Bear Signature

Masculine Cards – August Card Class

By | August 31, 2017

Hi there

Last night I held the last of my monthly card classes so now I can share with you what they made.  Masculine cards always seem to stump us so this month I’ve made two masculine cards to add to our repertorie.

First up is a ‘Pull Tab’ card that features the new Circle Tab punch along with two great stamp sets – Lovely as a Tree and Guy Greetings.

Pull Tab Card - Front - Aug Card Class

To start with stamp the Lovely as a Tree image in Early Espresso towards the top part of the card.  To get the cutout area for the pull tab I punched out two circles using the 3/4″ circle punch just in from both edges of the card.  To cut out the area between the circle I placed the card in my paper trimmer and cut between the two circles.  To create my ‘road’ I used one of the images from Timeless Textures which I stamped in Memento Black.  Once I’d stamped it I was disappointed with the look – it was too black – so I coloured over the top with the White Watercolour Pencil which gave it a dully look and more like the colour of an asphalt road :).  The car is stamped in Memento Black then ‘fussy cut’ out.

Pull Tab Card - Open - Aug Card Class

To create the pulling mechanism I used Foam Adhesive Strips on the top and bottom of the cut out – the gap needs to be wide enough for the tab to slide through.  On a scrap bit of Very Vanilla stamp your sentiment and then adhere this directly to the card base alining the front mat in position to see the sentiment.  Dimensionals are adhered to the slider (end away from the tab) and then the cut out card is attached.  The new Circle Tab Punch came in handy to create my ‘pull tab’.

For the next card I did two colour options using scraps of cardstock from the Neutrals Family.  I don’t know about you but I end up with heaps of scraps so made this card to use some of them up.  It’s quick and simple but looks really effective.

Panel Card - Greys - Aug Card Class

I cut a piece of copy paper 10cm x 14.3cm and then adhered my strips of cardstock.  I then ran it through the Big Shot with one of our Textured Embossing Folders.  First up Smoky Slate, Basic Gray and Basic Black with the Hexagons Embossing Folder

Panel Card - Browns - Aug Card Class

and then Chocolate Chip, Early Espresso, Soft Suede, Crumb Cake and Sahara Sand with the Pinewood Planks Embossing Folder.  The Happy Birthday is cut out with the Thinlits die and adhered using the Multi Purpose Adhesive Sheet.  The card base is the Thick Very Vanilla Cardstock.

I’m going to create some more of these cards with some of the other colour families to use up my scraps.

Till next time

Yellow Bear Signature

Holiday Catalogue Sneak Peek

By | August 26, 2017

Hi there

With less than a week till the new Holiday Catalogue goes live I thought I’d share a ‘sneak peek’ of a card I made using a new stamp set.

Today my sister-in-law flew out for a 2 1/2 week study tour to Israel.  I wanted to give her a card which included a little ‘spending’ money for her trip.  Stampin’ Up! came to the party with the perfect new stamp set for me to create the card – Night in Bethlehem.

Night in Bethlehem - Allison - Front

What do you think – is this the perfect image or what? To create this card I stamped first in Crumb Cake then Sahara Sand and finally Soft Suede.  The stars are stamped in Daffodil Delight.  The card base is Soft Suede.

Night in Bethlehem - Allison - Inside

I didn’t want to spoil the front with a sentiment – and nothing seemed to suit –  so I added the sentiment on the inside.  Using Thoughtful Banners I was able to create the perfect personalised message.

Safe travels and have a wonderful time in Israel xx

Yellow Bear Signature

Perks of being a demonstrator

By | August 22, 2017

Hi there

One of the many perks of being a Stampin’ Up! demonstrator is being able to attend events.  One such event is OnStage which is held twice a year – April and November.  OnStage is an all day event where we get to see and play with new products about to be released, receive some training, be inspired by our fellow demonstrators and receive some free products – including new catalogues.  It’s a fun filled day that you don’t want to miss out on.  Back in April we had the launch of the Annual Catalogue.  Here are the ‘make and takes’ that we made using products from four new suites.

OnStage M&T - Birthday Delivery Suite

First up we have a card using products from the Birthday Delivery Bundle (pg 68-69 of the AC).  This bundle includes a stamp set, DSP and Framelits.  Some of the images on the DSP coordinate with the Framelits which means you can cut them out as we did here with ‘Mr Fox’.  Now this isn’t a set I’d buy but it’s great to have a sample to show everyone.

OnStage M&T - Color Theory Memories & More Cards

Next we have the Color Theory Suite.  For this card we used the Memories & More Card Pack which can be used for Memory Keeping and also for card making.  Check out the Memories & More section in the Annual Catalogue on pages 190-193.  These cards coordinate with the Colorful Seasons stamp set and Seasonal Layers Thinlits dies.

OnStage M&T - Daisy Delight Bundle

The Daisy Delight Bundle has been VERY popular with stampers.  Poor old Stampin’ Up! couldn’t keep up with the demand on this bundle to begin with it was that popular.   On this card we stamped the image twice then layered it and adhered one of the new Faceted Gems.

OnStage M&T - Wood Textures Suite

Last up we have the Wood Textures Suite.  I LOVE this little crate and have already made a number of these.  They’re the perfect size to hold 3″ cards or Whittakers Chocolates!  There are three main components in this suite – the stamp set (Wood Words) and Crate Framelits come as a bundle (purchase these two items as the bundle and save 10%) and then the Wood Textures DSP stack can be purchased separately.  This paper stack is great for masculine cards.  Check out some samples usign these products on page 158-159 of the AC.

I’m looking forward to our next OnStage event which is happening in November.

Yellow Bear Signature

Colour Inkspiration – CI015

By | August 13, 2017

Hi there

We’ve just had the most spectacular thunder and lightning show here in Auckland.  I don’t think I’ve heard thunder that loud before – it felt like the whole house was rumbling!

Yesterday I was a busy beaver making 20 cards for our team training swap next weekend – unfortunately you’ll have to wait a bit until I can show you them.  They use products from the upcoming Holiday Catalogue which will be out on 1st September.

This afternoon I had some time to create some cards so I used the colour combination for this fortnights Colour Inkspiration challenge of Elegant Eggplant, Bermuda Bay, Pool Party and Lemon Lime Twist.  I was originally only going to make one card but after stamping and cutting out my three cupcakes found they didn’t fit on one card front!  So my ‘one’ card become three.

CI015 - Sweet Cupcake - Elegant Eggplant

My cupcake icing has Pool Party as the base then Bermuda Bay as layer two and finally Elegant Eggplant for the final ‘frosting’.

The ‘actual’ cupcake is a ‘chocolate’ flavoured one – Crumb Cake, Soft Suede and Early Espresso.  The cupcakes are adhered with dimensionals.

CI015 - Sweet Cupcake - Lemon Lime Twist

I decided to try a multi coloured embossed wall for the background that would tie in three colours of the challenge.  I put three small amounts of embossing paste on my Silicon mat and added one drop of reinker and mixed it in.  The Elegant Eggplant came out darker than I had wanted – never mind.

CI015 - Sweet Cupcake - Bermuda Bay

For this last card I didn’t have enough of the coloured paste so just added the plain white and then used a dauber to add the colour.

Each of the cards has Fine Tip Glue added to the Elegant Eggplant part of the frosting to give it some depth.  It reminds me of the jelly in a Jelly Tip.  The candles are a ‘two step’ image.  The first stamp is stamped in full strength Lemon Lime Twist then the second stamp was ‘stamped off’ to give a lighter Lemon Lime Twist.  The ‘wish’ is adhered with multipurpose adhesive sheets – I love this product.

Yellow Bear Signature

Thinking of You cards

By | August 7, 2017

Hi there

I finally made some time to craft for myself yesterday – it was so nice.  I picked one of my new sets – Beautiful Bouquet – page 92 of the Annual Catalogue.  This set comes as a bundle and who can resist a bundle.

Do you sometimes get stumped as to what colours to use for your projects?  Well when I’m in that situation I go to a really cool site called My Create Ink.  You can pick which Stampin Up colour(s) you want and then it suggests other colours to go with your colours.   So yesterday I loaded in Daffodil Delight (got to have yellow in a bunch of flowers) and Wisteria Wonder (a colour I don’t often use) and this is what I came up with.

Beautiful Bouquet - Calypso Coral - Thinking of You

First up we have Daffodil Delight, Wisteria Wonder and Calypso Coral.  I added Old Olive and Pear Pizzazz for the greenery.  The centre of the flowers is stamped in Early Espresso and then a hint of Clear Wink of Stella is added to the stamen of the Wisteria Wonder flowers.  To give a bit of dimension to this bunch of flowers I stamped three flowers again and cut them out with the coordinating dies and adhered with a dimensional.  To keep my bunch of flowers together I wrapped Linen Thread around the cut-out and then added a bow with a glue dot.  The sentiment is from the Thoughts and Prayers stamp set.

I decided that I may as well make a second card while I had the stamp and inks out.

Beautiful Bouquet - Pool Party - Thinking of You

This time I’ve gone with another colour option that was suggested – Daffodil Delight, Wisteria Wonder and Soft Sky.  Again Old Olive and Pear Pizzazz where used for the greenery.  Instead of adding another layer of flowers for the dimension I added Basic Pearls to the centre of the three smaller flowers.  The flowers are ‘held’ together by a stamped images and a linen bow attached (again with a glue dot).  The sentiment is stamped on Whisper White then cut out with an Oval die and them behind is a Scallop Oval die – both from the Layering Ovals Framelits.  This time the sentiment is adhered with dimensionals whereas the other one was adhered directly to the card.

I like the strip of Wisteria Wonder card base showing at either side of the stamped area.

‘Thinking of You’ is a versatile sentiment that can be used for sympathy cards (the first one) or just to let somebody know they are in your thoughts.

Yellow Bear Signature

Carols of Christmas – August Promotion

By | August 3, 2017

Hi there

During the month of August you will be able to order one of our top-trending bundles from the upcoming Holiday Catalogue (available 1 September).  This bundle will help you get a head start on your Christmas cards.

Carols-of-Christmas-flyer-001 Carols-of-Christmas-flyer-002

Here are some cards that showcase this new bundle

CoC - sample 1 CoC - sample 2 Coc - sample 3 CoC - sample 4 CoC - sample 5

Check out this video to see more of the Carols of Christmas bundle

Yellow Bear Signature