Happy Birthday – work birthday cards

By | January 25, 2020

Hi there

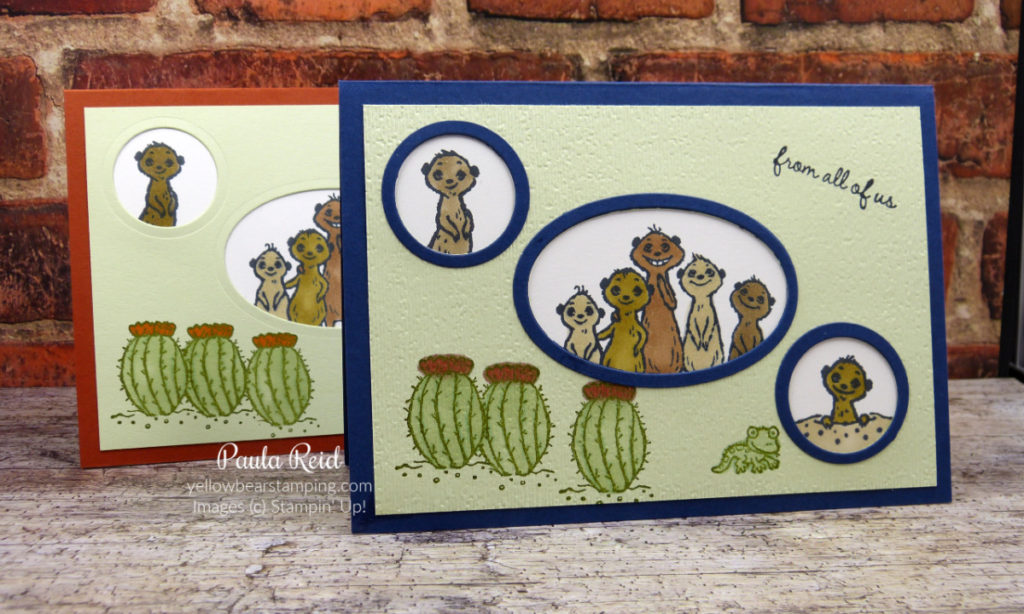
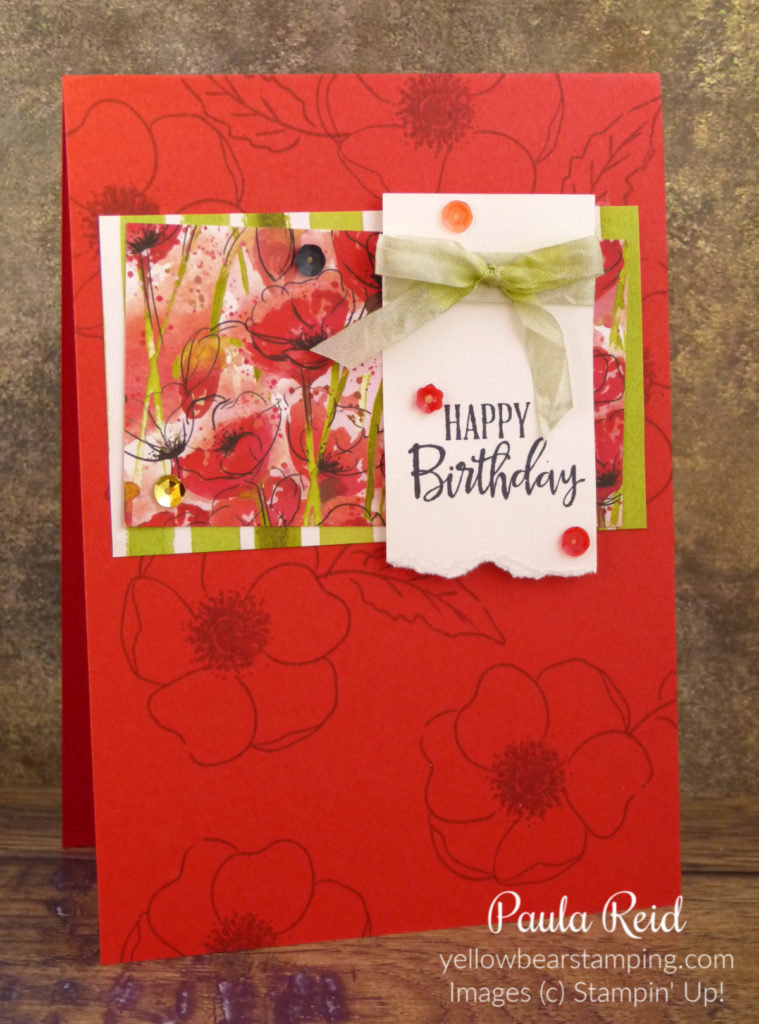
When I make cards I normally only make one of each design but I know a lot of crafters make a couple of each design while they’ve got everything out. Well for my work birthday cards I’ve decided to make two at a time – same design but different colours.

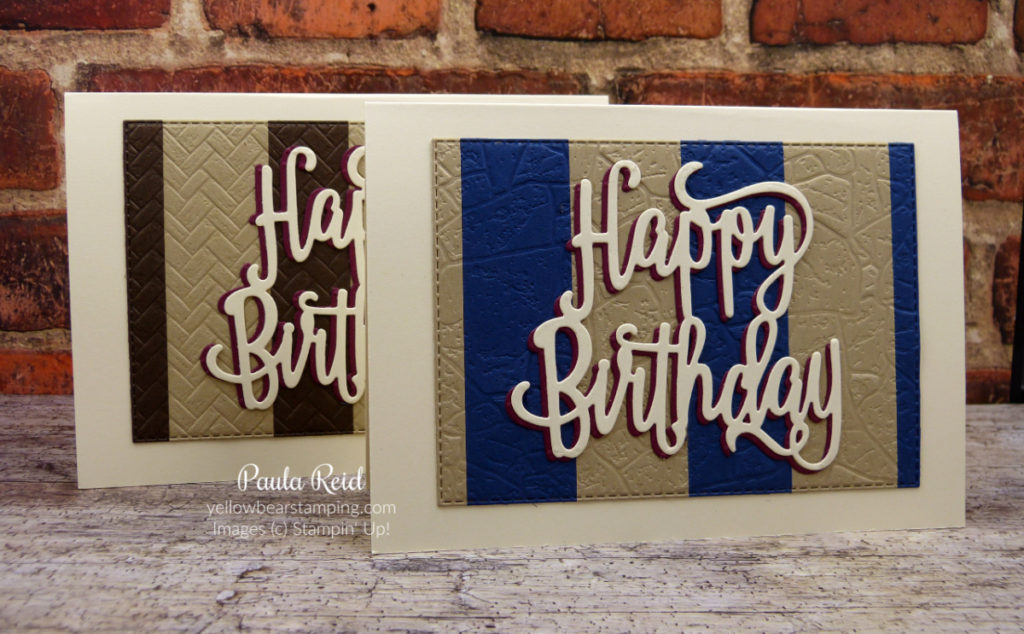
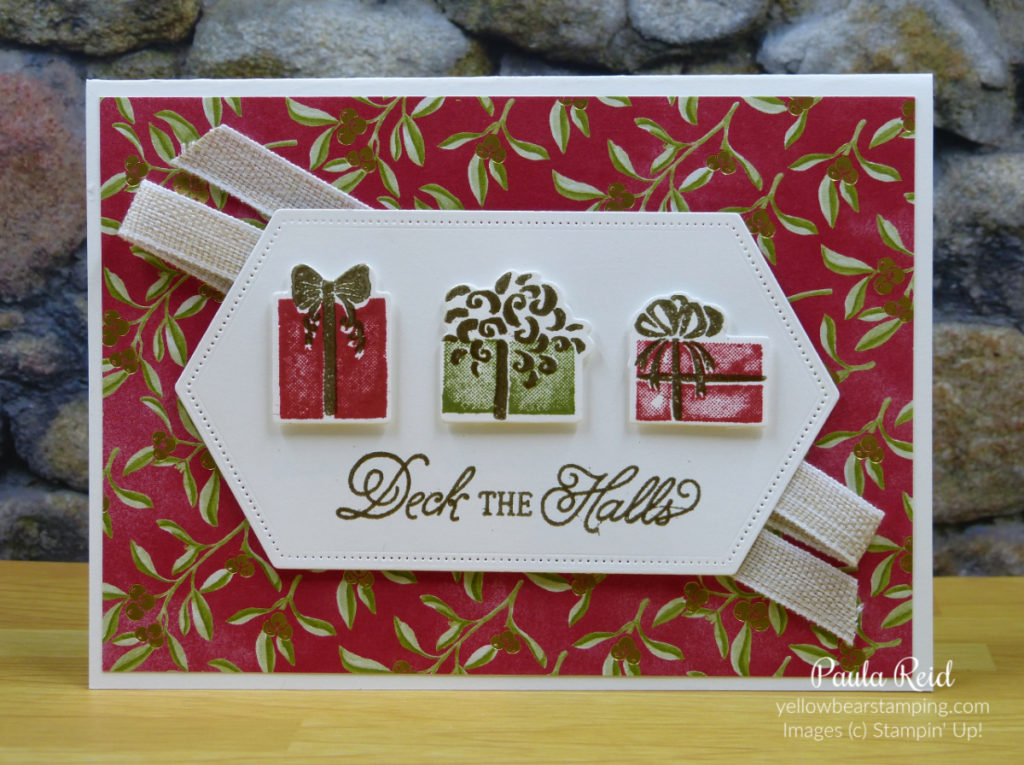
My ‘off cuts’ supply seems to have grown lately so I thought I’d use a trusty design to create these two cards. To create these cut a piece of copy paper to 10cm x 14.4 then adhered strips of cardstock – Early Espresso/Crumb Cake and Night of Navy/Crumb Cake – until the copy paper is fully covered. The strips can be different widths or all cut to the same width.

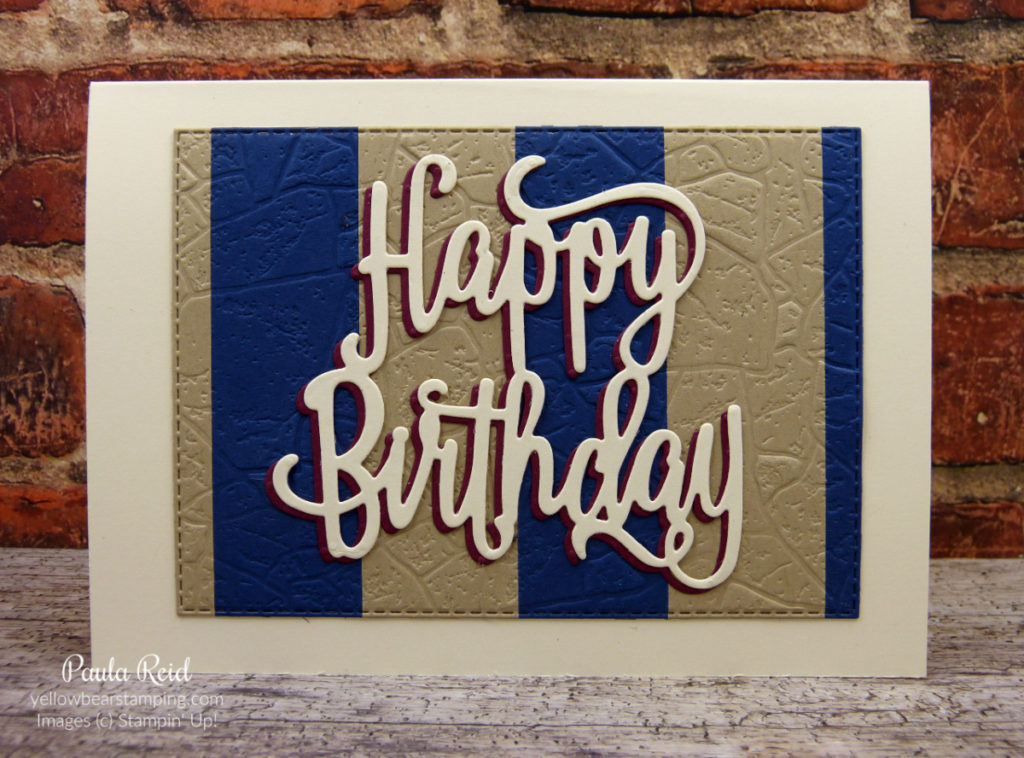
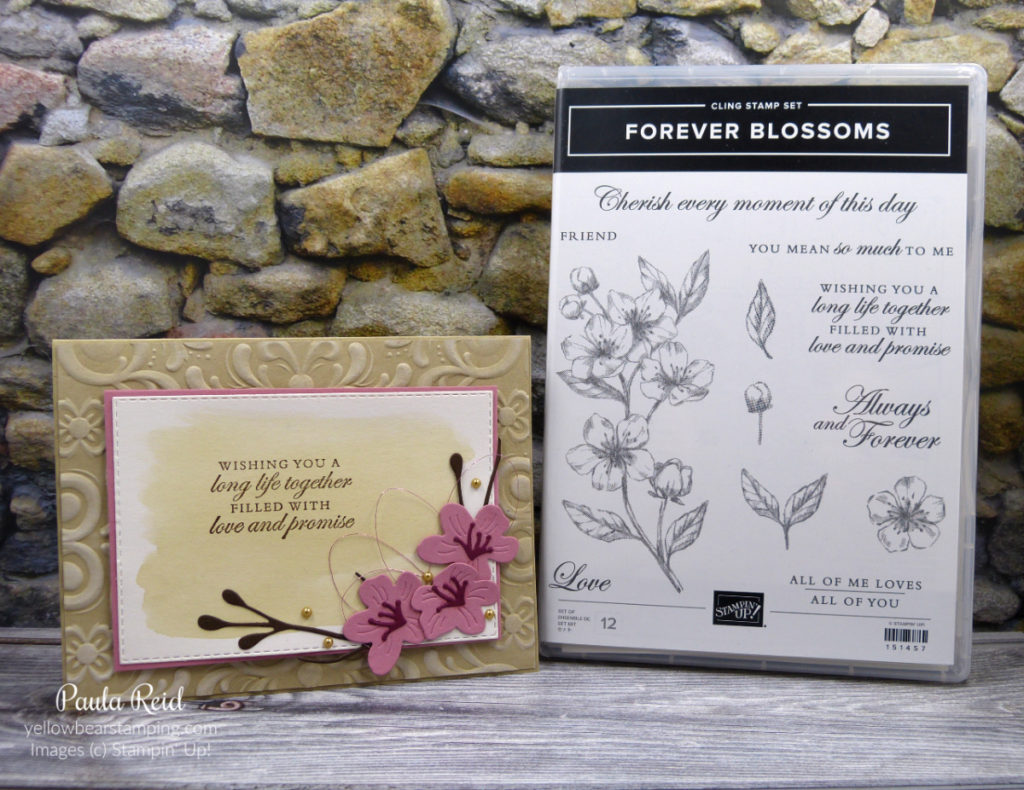
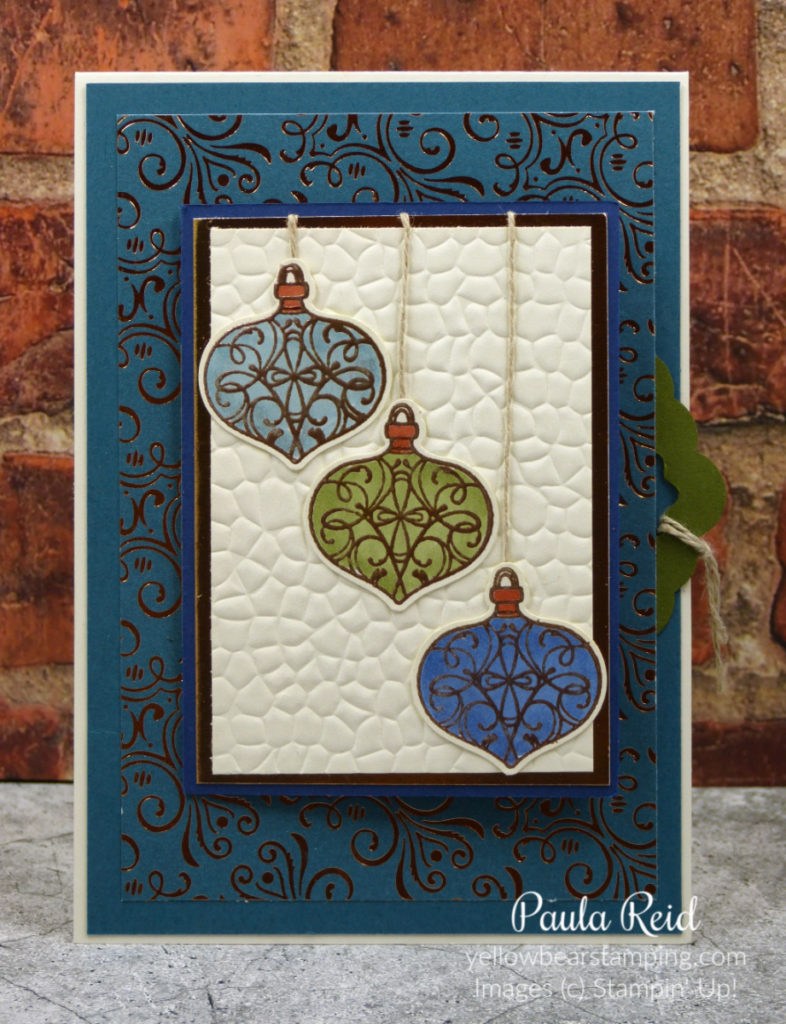
I then dry embossed the cardstock with different embossing folders. Here I’ve used the new Stone 3D Embossing Folder which is part of the Power of Hope Bundle in the Sale-A-Bration brochure. To receive this bundle FREE you need to place an order of NZD$220.00. Once it’s been embossed I die cut out a Stitched Rectangle.

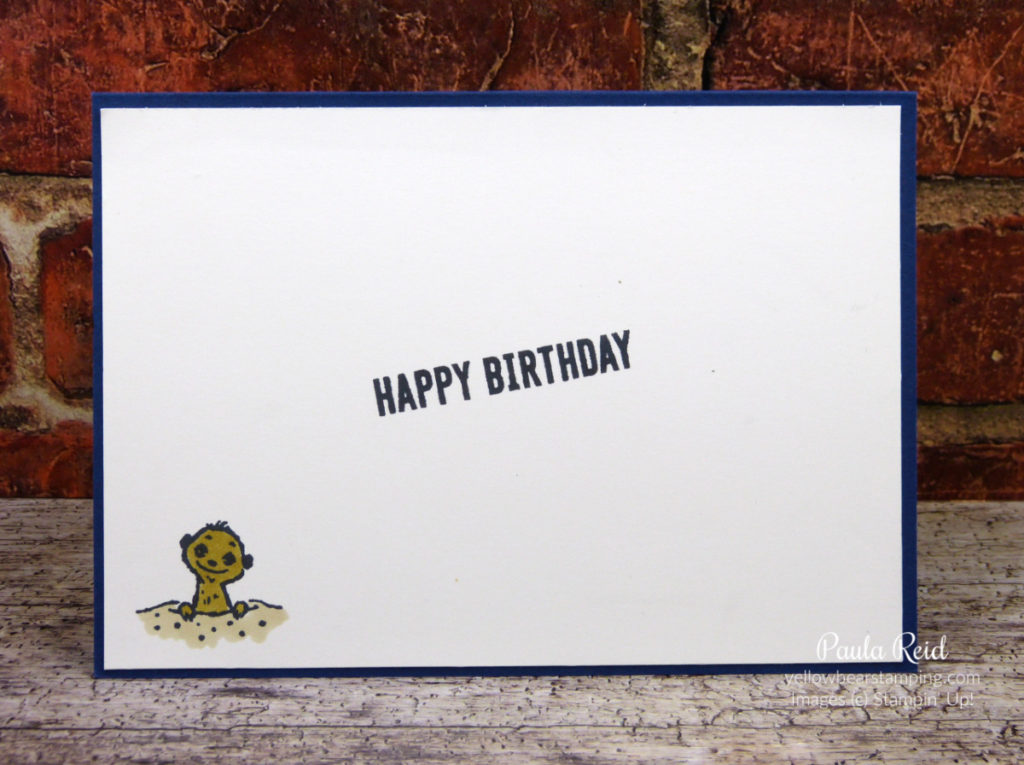
For this one I used the new Tropical Weave 3D Embossing Folder from the Tropical Oasis Suite in the new Mini Catalogue – check out page 38-40. The ‘Happy Birthday’ is a retired die – one I won’t be getting rid off. This ‘Happy Birthday’ has been die cut from Very Vanilla and Merry Merlot with the two being adhered together off centre. This helps to make the words stand out against the background mat.

So if your off cuts supply is getting a bit unruly why don’t you try this design.

Until next time …

The Gang’s All Meer – Sale-A-Bration

By | January 23, 2020

Hi there

Who doesn’t love receiving a FREE gift. From the 3rd of January until the 31st of March it’s Sale-A-Bration time and Stampin’ Up! are giving you a FREE gift with every purchase of NZD$110 and with a new Mini Catalogue just released it’s not hard to spend that amount – trust me :). One of the FREE gifts is the ‘The Gang’s All Meer’ stamp set. This is a cute line art set with 6 images and three sentiments.

The Gang’s All Meer

This year I’ve decided to make birthday cards to give out to all my work colleagues on behalf of the company (there’s over 100 staff here in NZ and overseas!). This set and the sentiment ‘from all of us’ is perfect and I’m sure it will get a lot of ‘ink time’ even after Sale-A-Bration is over. Here is the first design I made using this set in two colour combinations – Night of Navy/Soft Sea Foam and Cajun Craze/Soft Sea Foam – the recipients loved their cards.

I used the Layering Circles and Layering Ovals to create windows for the ‘gang’ to peer out of. On scrap pieces of Whisper White I stamped the images in Memento Black and coloured the images in with Stampin’ Blends. Placing the images to the card base was a bit tricky making sure they would appear in the correct spot – but we got there so all good. The cactus and the lizard have been stamped in Mossy Meadow.

After stamping the images and sentiment I dry embossed the front using the Subtle Embossing Folder. I also made a frame to go around the windows in Night of Navy. Below is the insert where I stamped one of the individual images and another sentiment.

For this card I left the front ‘as is’ with no embossing or additional framing. To colour my Meerkats I used Crumb Cake, Soft Suede and Bronze. The cactus and the lizard have been coloured in with Soft Sea Foam.

Here’s a quick video to show you how to create a ‘gang’ of Meerkats using a simple masking technique and Post-It notes.

When you’re placing an order during January to March remember to make your orders in increments of NZD$110 so that you can choose your FREE gift from the Sale-A-Bration brochure. If you need a hand with this please contact me.

Until next time …

Music from the Heart – Wedding Anniversary

By | January 19, 2020

Hi there

Today Phil and I are celebrating our 18th wedding anniversary – how good is that 🙂 – which means a special card is in order. I got my idea for the card after making my first card with this set.

The background music on this card is the theme song ‘Nocturne’ from The Secret Garden. This was the music I walked down the aisle to 🙂 I love that the ‘notes’ provided in the set allow us to create whatever music we want.

I had to concentrate while stamping the notes to make sure I got them on the right line and in the right space. Once that was done I stamped the piano image on a scrap of Whisper White and coloured it in with the dark Crumb Cake Stampin’ Blend and the dark Poppy Parade – it’s such a vibrant colour. I then set about ‘fussy cutting’ the piano out – I’m hoping we get coordinating dies in the next annual catalogue for this set.

I then had the dilemma of how to place the sentiment and piano without covering up too much of my music. I ended up creating my own sizing of Stitched Rectangle dies to accommodate the length of the sentiment and still be able to attach the piano – I was really pleased with how it ended up.

For the inside I kept it pretty simple – just the score and the small heart image from the set. The sentiment is from one of my favourite sets – Beautiful Bouquet.

Well that’s all from me – off to enjoy a fabulous day with my husband of 18 years 🙂

Until next time …

Music from the Heart – Happy Birthday

By | January 17, 2020

Hi there

As mentioned in my last post we have four stamp sets in the current 2020 Mini Catalogue that have been designed by Million Dollar sales achievers. Music from the Heart was designed by Dawn Olchefske and is the first set that I’ve had a play with. Here’s the second card I made for friends son who turned 14 the other day.

This card was actually based on one that Dawn had created as part of her ‘reveal’ of this set.

I wanted a nice bright card so have gone with Pineapple Punch for my base, matted with Basic Black and a Whisper White front. The ‘notes’ on the side have been stamped in Poppy Parade, Rich Razzleberry, Blueberry Bushel and Pineapple Punch.

The sentiment is also from this set and has been stamped on a small offcut and matted with a Basic Black Stitched Rectangle die cut. The guitar image on the left is a combination of two stamps that align perfectly to create a guitar – very cool.

Here you can see the ‘keyboard’ along the bottom of the insert. The image was stamped twice to cover the full width of the insert. This stamp works well being joined together.

Well that’s all for now – my next Music from the Heart card will be a wedding anniversary one so keep an eye out for that in the next couple of days.

Until then …

Music from the Heart – Happy Birthday (with music)

By | January 15, 2020

Hi there

When demonstrators sell a million dollars in sales they get to help design a stamp set as part of their celebrations. Well in the current 2020 Mini Catalogue there are four ‘Million Dollar’ stamp sets. You can find these stamp sets by look for the below logo next to stamp sets.

I have now purchased three of the four :). First up I’m using ‘Music from the Heart’ which was designed by Dawn Olchefske a US demo. This week I’ve been in need of two cards for 14 year old boys and this set was perfect as both are musical.

This was my first card with this set and I had fun. Mr Google came in handy and provided the music for ‘Happy Birthday’ which I was able to replicate a portion of with the different types of notes. I need to get better at my spacing but not bad for a first attempt.

The set comes with 19 stamps one of which is the ‘stave’ and fits across a standard card front. I was then able to add the ‘notes’ in hopefully the correct position so that if you played the music it would play part of the ‘Happy Birthday’ tune 🙂

The card base is Thick Whisper White with a Poppy Parade mat which has been adhered with Dimensionals. The only ink I used was Memento Black. The ‘Happy Birthday’ has been die cut from Pacific Point (a colour I don’t use often) with the Well Written dies. You can get a glimpse of the inside where I stamped the ‘keyboard’ along the bottom – this needed to be repeated as the stamp isn’t long enough. It was easy to line the images up as this is a Photopolymer set.

I have two more cards to share with you featuring this set. Check out page 57 of the Mini Catalogue to see this set. Can you find the other three sets in the catalogue.

Until next time …

Kerchief Card Kit – Sale-A-Bration FREE gift

By | January 14, 2020

Hi there

One of the FREE Sale-A-Bration gifts this year is the Kerchief Card Kit. With every NZD$110 order placed between now and 31 March 2020 you get to choose a FREE gift from the Sale-A-Bration brochure. To find out more about Sale-A-Bration check out my Promotions page.

This card kit contains everything you need to complete the eight cards – 4 of 2 designs. Here are my samples of this kit

I went with making the cards the same as the design shown but you could change the orientation of the card base and position the elements in ways to create your own designs.

For this one I turned the flowers over and coloured them in with the Petal Pink Stampin’ Blend rather than having them all in gold.

These cards were quick and easy to make and a great way to boost your card stocks ready for upcoming birthdays and events.

If you would like to make these cards just place an order of NZD$110 and choose the Kerchief Card Kit as your FREE gift. You can place an order directly with me or via my online store.

Until next time …

Forever Blossoms Make & Take

By | January 10, 2020

Hi there

Last night I photographed a whole heap of cards I’ve made recently using products from the new Mini Catalogue. First up is one Jacque Williams taught us at our latest team gathering featuring the Forever Blossoms Bundle. Now to be honest I had skipped past this bundle – but after making this card – well let’s just say I now own one more bundle :).

The Forever Blossoms bundle is part of the Parisian Blossoms Suite along with the Parisian Beauty bundle, Parisian Flourish 3D Embossing Folder, Champagne Rhinestone Basic Jewels and the Petal Pink 1/4″ Metallic-Edge ribbon.

The card base and front are Crumb Cake – the front has been dry embossed with the beautiful Parisian Flourish 3D embossing folder. After we embossed the card we ‘swiped’ the Craft ink pad across the top. The pad we used was a drier one so you may need to do a ‘test’ run to see how much ink comes off your pad.

A piece of Shimmery White has been die cut with the Stitched Rectangle dies, a Crumb Cake wash applied and once dry the sentiment has been stamped in Early Espresso. The sentiments in this set lend themselves for cards of love – wedding, anniversaries and friendship.

Here’s a close up of the gorgeous flowers which have been die cut from Rococo Rose and Merry Merlot card stock. These dies die cut and emboss at the same time – the stamen have been cut separately and adhered directly to the flowers. Did you notice the Metallic Gold Pearls? I have totally missed these embellishments but they will be in my next order – they can be found on page 176 of the annual catalogue. They go so well with this card design.

I actually remembered to photograph the inside of this card this time. There are 18 pieces in the die set that comes in this bundle and this large flower image – stamped in Rococo Rose – has a coordinating die along with 4 other images.

If you purchase this bundle you will qualify for a FREE gift from the Sale-A-Bration brochure. You can place an order via my On-line store or directly with me. Check back soon to see a project that uses some of the Sale-A-Bration gifts on offer.

Until next time …

Parisian Blossoms Suite

By | January 7, 2020

Hi there

Here’s the final sample from our OnStage event – this time featuring the Parisian Blossoms Suite on pages 14 – 17 of the Mini Catalogue. We’ve used a mix of products from this suite – Parisian Blossoms Specialty DSP, Petal Pink 1/4″ Metallic-Edge Ribbon, Champagne Rhinestone Basic Jewels and the image is stamped from the Forever Blossoms set. There are two bundles in this suite – Forever Blossoms and Parisian Beauty.

The image has been stamped on to the DSP with Memento Black and coloured in with Stampin’ Blends (Petal Pink and Old Olive). A piece of Vellum has been ‘offset’ with the DSP before being adhered to the Pool Party card base. The ‘Happy Birthday’ is from the Beautiful Bouquet set (page 84 of the AC) and has been stamped in Petal Pink then punched out using the new Label Me Fancy Punch from page 41. The ribbon and new rhinestones finish off this simple but elegant card.

I hope you’ve enjoyed seeing these quick cards made at OnStage to give you a taste of what’s in store in the new Mini Catalogue.

I’ll be back soon with more creations I’ve made with new product. If you would like to purchase any of the products used over the last four days – or any other products please contact me or place an order via my online store. Don’t forget that with every NZD$110 order you get to choose a FREE gift from the Sale-A-Bration brochure.

Until next time …

Timeless Tulips

By | January 6, 2020

Hi there

Well I survived my first day back at work for 2020 :).

At our OnStage event last year all attendees received the stamp set Timeless Tulips (page 43 of the Mini Catalogue). There are 8 images to help you build your tulips and 7 sentiment stamps that cover a range of occasions. This set also has a coordinating punch (sold as a bundle with the stamp or you can purchase the items separately).

The card base is Pear Pizzazz with a Whisper White panel measuring 9cm (3 1/2″). The leaves have been stamped in Pear Pizzazz with a couple of them punched out and added with dimensionals. The smaller flowers have been stamped directly to the panel with three larger flowers punched and added with dimensionals. The flowers were stamped in Rococo Rose – one of the 2019-2021 In Colours.

I find it easier to wrap the thread around the panel then tie a bow with a separate length of thread and add it with a glue dot – allows me to get a better looking bow.

I’ll be back tomorrow with the last sample we made from OnStage – I have plenty more projects to share – I just need to photograph them :).

Until next time …

Best Dressed Suite – 3″ Note Cards

By | January 5, 2020

Hi there

The next sample I have to share is from the Best Dressed Suite which is on page 54-56 of the new Mini Catalogue. This suite comes with DSP, a stamp set and coordinating die, ribbon, note cards and embellishments.

The note cards are 3″ x 3″ and come with a ‘wash’ of Daffodil Delight, Petal Pink and Purple Posy on the front and are blank on the inside. They have cute coordinating envelopes to match the colour wash. These samples have been stamped with images and sentiments from the Dressed to Impress stamp set.

As you can see in the photo above the envelopes are printed on the front in Daffodil Delight, Purple Posy & Petal Pink. There are 24 note cards in each pack – 8 of each colour – perfect to add a little note with a gift or send on their own. The stamp set and dies are sold as a bundle and all the images from the stamp set have a coordinating die along with a really cute die that creates a little purse. Here’s a quick video to share the products in this suite including the cute little purse – enjoy.

Well it’s back to work for me tomorrow so I’d better head off to bed – it’s been a while since the alarm went off at 6am :).

Until then …

Painted Poppies from the Peaceful Poppies Suite

By | January 4, 2020

Hi there and Happy New Year

My holiday is coming to an end – back to work on Monday – but I’ve had a lovely Christmas/New Year break and I’m now ready to get back into things. January is an exciting time in the Stampin’ Up! calendar. Not only do we have a new Mini Catalogue out but it’s also Sale-A-Bration time between now and the 31st March. If you haven’t already got your new catalogue/brochure please let me know and I can send one out to you. In the meantime check out my Catalogues page for a pdf version.

Back in November we had our demonstrator only event – OnStage – where we got to see and play with products from the Mini Catalogue and the Sale-A-Bration Brochure. The first card I want to share from that event is one that features my favourite suite from the Mini and I’m sure this suite will be a favourite of yours too. It’s the Peaceful Poppies Suite from pages 24-27. This suite consists of two bundles, DSP, Embellishments, Elements and Ribbon.

We’ve used a range of products for this card – the stamped images are from the Painted Poppies set and the sentiment is from the Peaceful Moments set. These sets coordinate beautifully together. The Peaceful Poppies DSP is another watercolour themed paper and is lovely and vibrant. Check out the video below which explains more about this suite and how the paper is designed.

There are two other elements on this card that are part of the suite – the Peaceful Poppies sequins which include five different colours and are either round or flower shaped (the one near the ‘Happy’ is a flower shape while the other two are round) and the lovely Whisper White 1/4″ (6.4mm) Crinkled Seam Binding ribbon. This ribbon is great ‘as is’ but can also be coloured using our Stampin’ Blends, ink pads and reinkers. Here I’ve coloured it using a sponge and some Old Olive ink.

As mentioned above there are two bundles within this suite – the Painted Poppies Bundle and the Peaceful Moments Bundle. The Painted Poppies Bundle consists of the Painted Poppies stamp set (which is an image only set) along with the coordinting die set Painted Labels dies. The Peaceful Moments Bundle consists of the Peaceful Moments stamp set (which is a sentiment only set) and the Poppy Moments dies. These dies can help you create poppies to coordinate with your sentiments. The sentiments in the Peaceful Moments Bundle cover all occasions. Check out the video below for more details.

Well that’s all for now. I’ll be back soon with more samples to share from the Mini Catalogue. In the meantime don’t forget to check out the Promotions and Catalogue pages for more information.

Until next time …

Most Wonderful Time Product Medley

By | December 24, 2019

Hi there

The presents have been wrapped and all that’s left to do is write in the Christmas card I’m giving to Phil. I hope you’re all done for the night.

My final Christmas card for 2019 features products from the Most Wonderful Time Product Medley on page 39 of the Holiday Catalogue. Stampin’ Up! have created a few product medley’s now – they include everything needed to create cards, 3D items, scrapbook pages and more. This one consists of a stamp set, coordinating dies, DSP, card fronts, stickers, trim and faceted stars. All you need is the adhesive.

I’ve paired the stamp set, dies and DSP with some other items from the Annual Catalogue to create this card. The parcels have been stamped on Whisper White in Real Red and Old Olive with the bows stamped in VersaMark and heat embossed in Gold. Using the coordinating dies certainly saves time in cutting them out before adhering them with dimesionals to one of the Stitched Nested Labels. Before adhering the label I placed a length of the Magnolia Lane Linen Ribbon to the card base.

Have a wonderful day tomorrow. We will be celebrating the birth of Christ with family and friends.

Until next time …

Brightly Gleaming Flip Flap Card

By | December 23, 2019

Hi there

It’s almost here – one more day of work and then I’m on holiday.

Here’s my last fancy fold card for Christmas. It’s a fold I’ve done before – it’s called a ‘Flip Flap‘ card. This card features four products from the Brightly Gleaming Suite – Christmas Gleaming stamp set, Gleaming Ornaments Punch, Hammered Metal 3D Embossing Folder, Brightly Gleaming Specialty DSP – from pages 30-32 of the Holiday Catalogue.

The front panel has been dry embossed with the Hammered Metal embossing folder – this is a great folder and you can use either side once embossed. The ornaments have been head embossed in copper (copper runs through this suite in the paper and embellishments) then coloured in with Stampin’ Blends. You could also colour in with ink and an aqua painter.

When you pull the side tag the front flap opens to reveal an inside greeting. The holly has been stamped in Mossy Meadow then coloured in and the sentiment has been stamped in Night of Navy.

The Itty Bitty Christmas stamp set is full of Christmas sentiments – now to pick which one from the 18 on offer.

Here’s another card with different paper and a side on view.

Well that’s it for now – one more Christmas card to share with you tomorrow.

Until then …

Perfectly Plaid Peekaboo Shutter Card

By | December 22, 2019

Hi there

As promised today’s post features a fancy fold card. Since learning this card design I’ve lost count of the number of times I’ve made it. It’s a great ‘fold’ for all ages and gives a real ‘wow’. So let’s get on and see what I’m talking about.

The card base is a ‘gate’ fold and held shut with a belly band. The circle of DSP has come from the inside of the card and then matted on a scallop circle cardstock to coordinate. The stamped image is from the Perfectly Plaid stamp set. One thing I learnt when stamping this image is to stamp the ‘tree’ then punch it out and then add the trunk – that way you get the trunk positioned correctly within the punched trunk. The Bakers Twine is from the Nature’s Twine pack (page 173 AC) and has been threaded through the Jingle Bell before tying the bow. I adhered this with a glue dot.

When you open the card the sentiment appears from within the ‘shutter’ pieces – how cool is that? I found it was easier to stamp the sentiment on a scrap of cardstock and then adhere it to the card base so as to make sure you had the words positioned in the right place. The trees have been stamped in Shaded Spruce with one being heat embossed in Gold. I’ve used Thick Whisper White for the card base and Cherry Cobbler for the shutter pieces and matting of the DSP. You can write your message on the two side panels or on the back of the card.

Here’s a close up of the centre panel which is adhered with dimensionals. Another trick I learnt was to adhere the bottom of the panel to the card base then attach your shutter pieces and sentiment before adhering the top of the panel.

For this card I used the Stylish Scroll Embossing Folder for the front panels and ‘stamped’ off the Shaded Spruce for a lighter coloured tree.

The inside shutter has had DSP added. Which card do you like best?

Well that’s all for tonight. I’ll be back again tomorrow night with another fancy fold using the Brightly Gleaming suite of products.

Until then …

Peaceful Boughs – Celebrate the Season

By | December 21, 2019

Hi there

Wow can you believe it 4 more sleeps till Christmas. How are you going with your Christmas shopping? I still have a few more bits and pieces to sort.

Today’s post features the Peaceful Boughs stamp set on page 15 of the Holiday Catalogue. This is a card that was taught to us at a Team Training by Jacque Williams.

The card base and front are in Crumb Cake with a layer of Very Vanilla and Pretty Peacock in between. The top layer has had a ‘window’ die cut using the Stitched Nested Labels Dies. In this window we have added a piece of Champagne Foil which has been dry embossed with the Stylish Scroll Embossing Folder (part of the Monster Bash Suite) from page 53. The base layer for the pine cone is Crumb Cake with the overlay being die cut in Soft Suede. The pine bough has been cut in Pretty Peacock. The pearls have been coloured with Poppy Parade Stampin’ Blend.

After stamping a portion of the pine bough in the corners the sentiment would have been to overpowering in the middle so I stamped it in the top corner – it’s good to try a different position for your sentiment :). The insert has been sponged with Soft Suede around the edges to soften the look.

Well that’s all for now. I’ll be back tomorrow with a ‘fancy fold’ card.

Until then …