#Elfie Window Card

By | December 16, 2019

Hi there

I’ve been a busy beaver this past week – I’ve made over 60 cards – a mix of birthday and Christmas so blogging went by the wayside. Hopefully I’ll now have time to share the remaining Christmas projects with you.

Today’s card was a CASE from a swap I received from a fellow demo – Bev Poultney. It uses the stamp set #Elfie from page 22 of the Holiday Catalogue. There are no dies with this set so get ready for some ‘fussy’ cutting of the images.

#Elfie

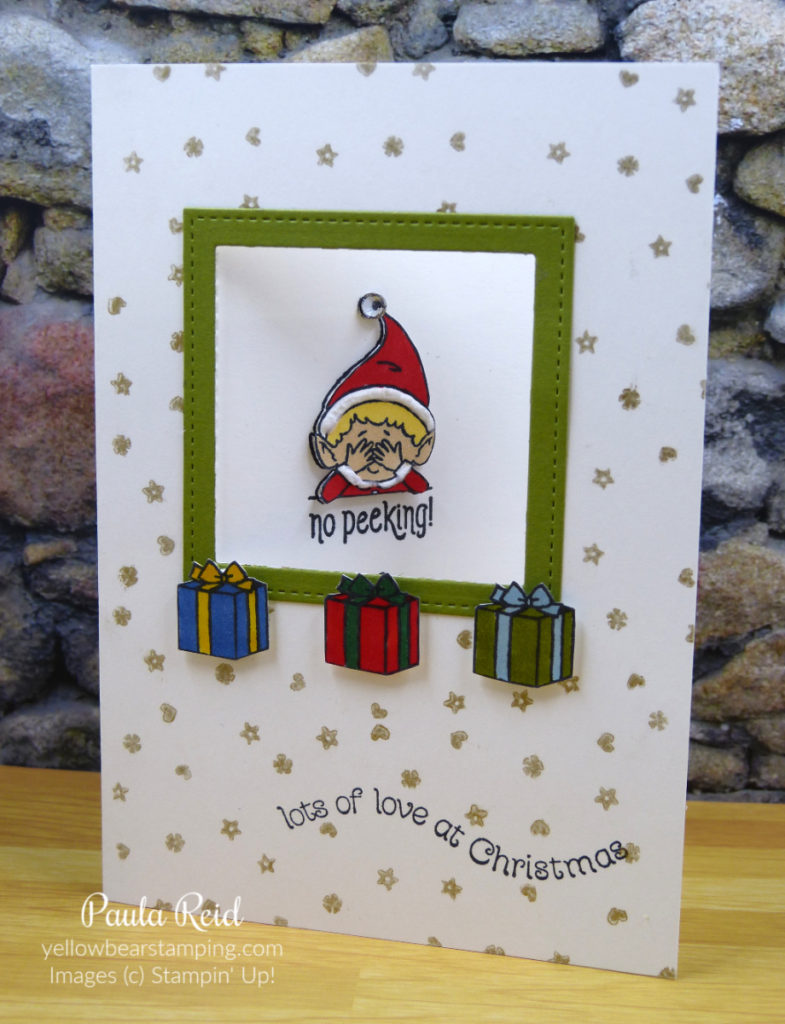
Starting with a standard card base I die cut the square ‘window’ using the Layering Square dies and then cut a coordinating size frame using the Stitched Shapes dies. The presents have been stamped on a piece of scrap, coloured in with Stampin’ Blends and adhered with Mini Dimensionals.

#Elfie

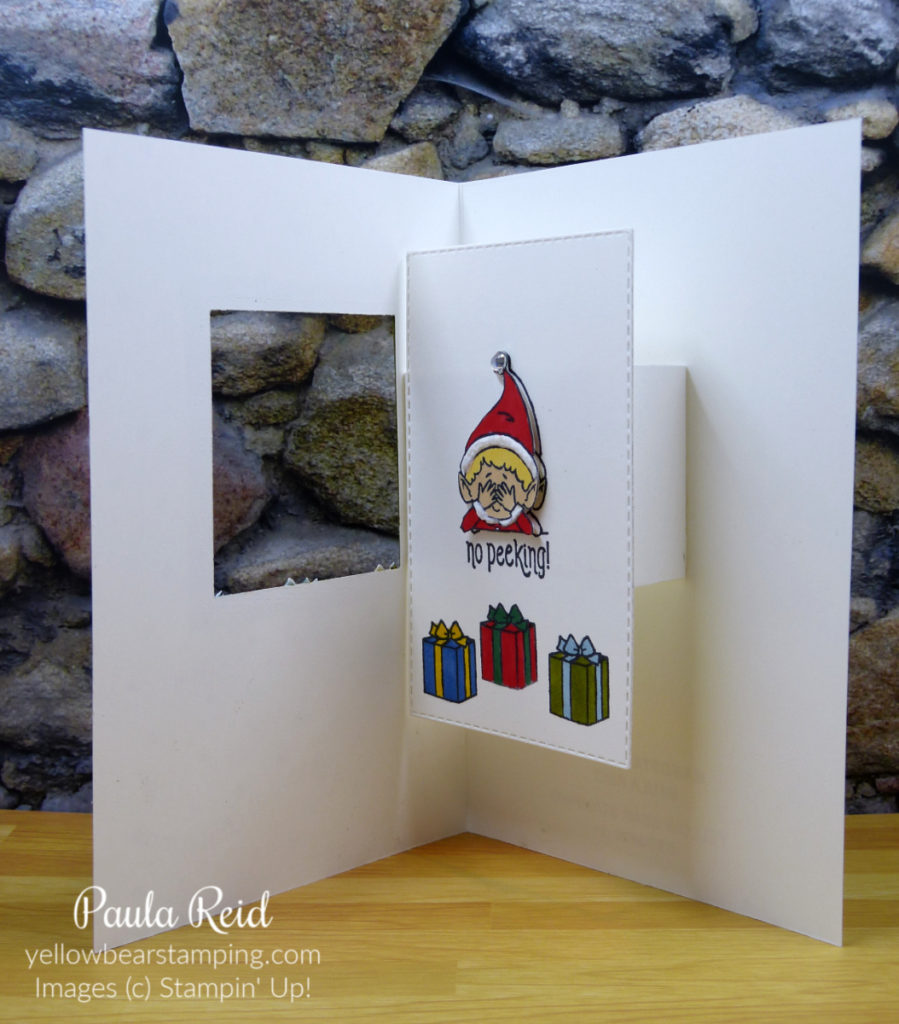
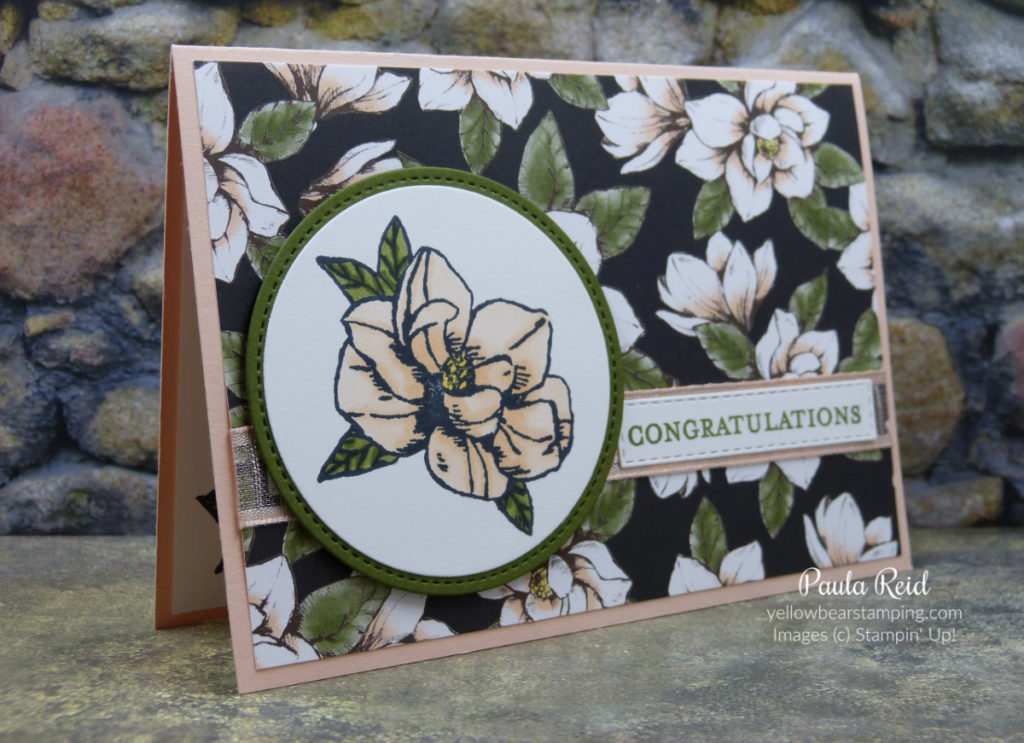
From the inside you get a better look at how this card works. I die cut a Stitched Rectangle (this die set has got to be a must for every crafter) then stamping directly onto the rectangle added the ‘no peeking’ image and the parcels in Memento ink. The parcels were then coloured in with Stampin’ Blends to coordinate with the front parcels. On a scrap of cardstock I restamped the ‘no peeking’ image, coloured it in then fussy cut the elf out. Once cut I added the Snowfall Accents Puff Paint for the trim on his hat and top. The cut out image gets adhered with dimensionals on top off the fully stamped image.

#Elfie

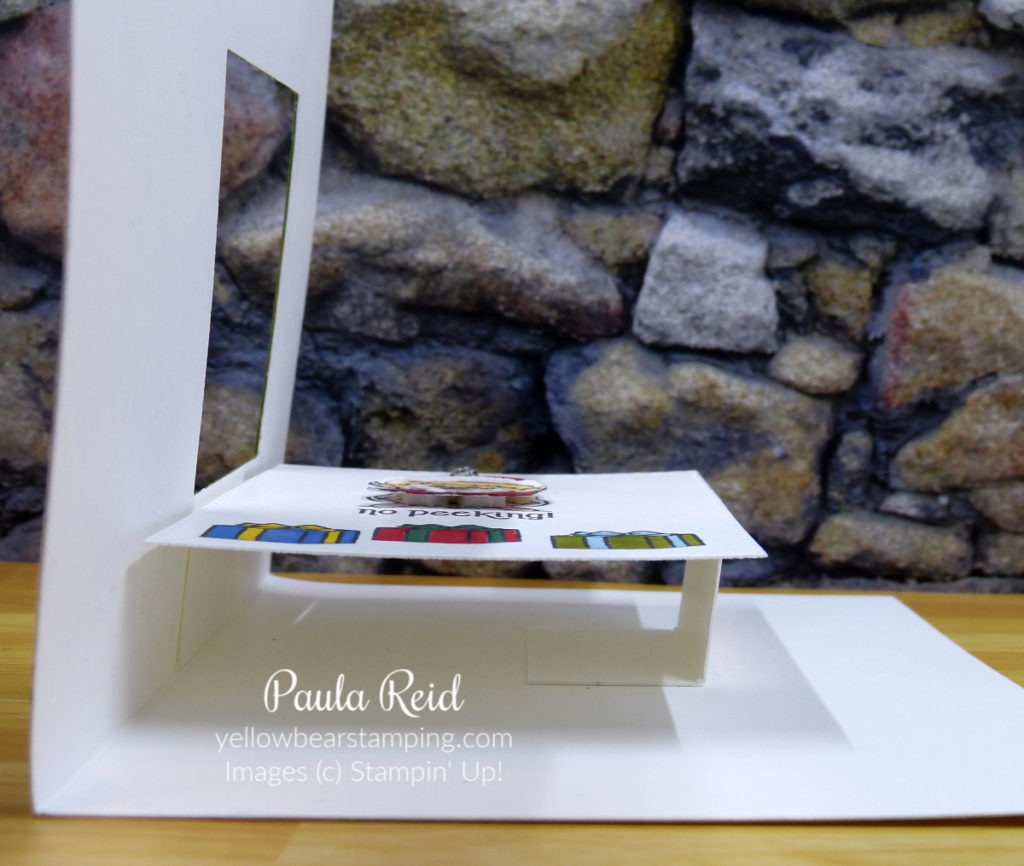
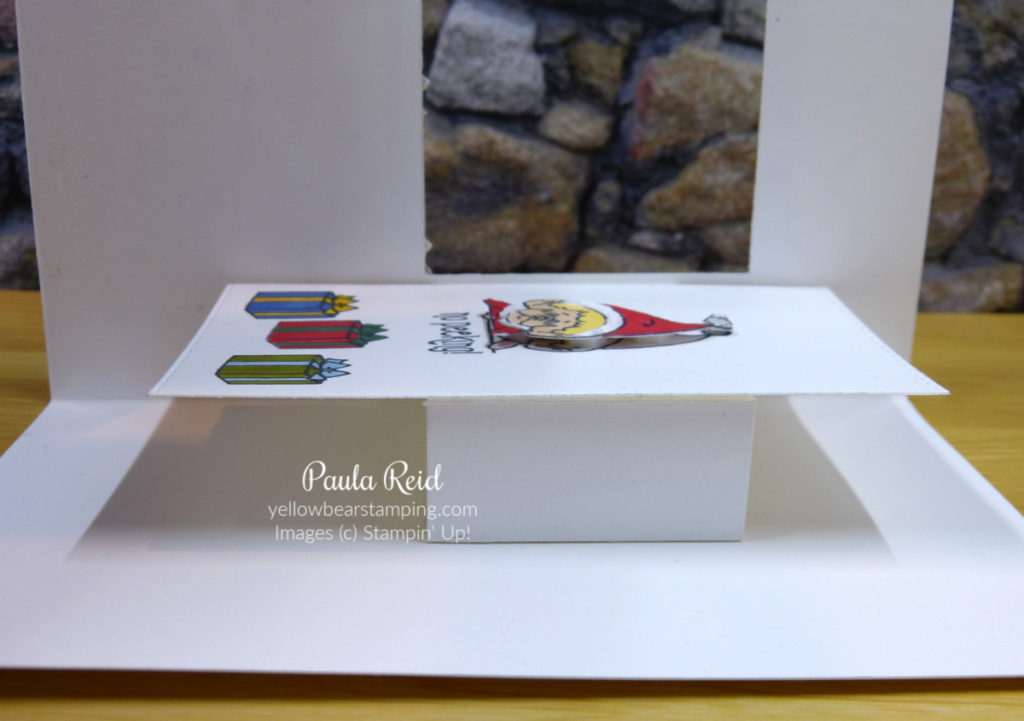
Here you can see how the stamped image is suspended to show through the ‘window’. When you close the card the image stand lies flat. Here’s another view.

#Elfie

This was such a fun card to make – thanks Bev for sharing this.

Well that’s all for now. Until next time …

Brightly Gleaming – Gate Fold Card

By | December 5, 2019

Hi there

Here’s another ‘alternative’ Christmas colour combo using the Christmas is Gleaming stamp set from the Brightly Gleaminng Suite.

This card is CASED on an earlier card I made – originally CASED from Patty Bennett. It uses products from the Brightly Gleaming Suite along with the Ice Stampin Glitter which can also be found in the 2019 Holiday Catalogue.

The ornaments have been stamped in Blackberry Bliss and Night of Navy then coloured in with the coordinating Stampin’ Blends. I adhered the stamped image to the mat before adding the glitter to the two Blackberry Bliss ornaments. I added glitter to the Night of Navy ornament before adding it to the card base with a dimensional. The ‘thread’ for the ornaments has been drawn freehand with a Stampin’ Write Marker. The strip of copper foil has been dry embossed with the Hammered Metal 3D Embossing Folder – so glad this folder is carrying over.

The sentiment and design on the centre panel are also from the Christmas is Gleaming stamp set. The Holly has been stamped with Shaded Spruce and then coloured in with the coordinating Stampin’ Blends. The berries and ornament are coloured in with Blackberry Bliss – light and dark. I love how the ribbon has the Christmas greeting on it – gives a sentiment on the front without spoiling the stamped image.

Here’s a close up of the ornaments with the Ice Stampin’ Glitter. With the Fine Tip Glue Pen I traced the design then poured the Ice Stampin’ Glitter on top then shook off the excess glitter. I like the glitter as it doesn’t go everywhere like the Dazzling Diamonds (which you find in all sorts of places days after use).

Well that’s all for now. Until next time …

Year End Closeout Sale

By | December 4, 2019
12.03.19_HEADER_YearEndCloseout_SPUK

The Year-End Closeout sale is now on – check out the items on sale here

The 2019 Holiday Carry Over List is also out now – this list let’s you know which items from the 2019 Holiday Catalogue will be carrying over come 3 January 2020. You will notice some items have an * next to them. These items are carrying over but won’t be available again until the beginning of the 2020 Holiday Catalogue.

Brightly Gleaming – Hanging Ornaments

By | December 2, 2019

Hi there

I really love the colours used in the Brightly Gleaming Suite but for today’s card I decided to go with a completely different colour scheme. Months ago I had purchased a roll of the 3/8″ Tricolour Ribbon for a project but then ended up not using it. You can’t have a roll of beautiful ribbon just sitting there so the ribbon colours became the starting point for my card.

I CASED the design for this card from a card I made back in 2014. The ornaments have been stamped in VersaMark and then heat embossed in Silver, coloured in using Gorgeous Grape and Highland Heather. I’ve alternated the ribbon stripes so that two had the Gorgeous Grape at the top and one had it at the bottom.

The silver foil strip at the bottom has been dry embossed with the Hammered Metal Embossing Folder – the impression from this folder can be used either way – so two looks from the one folder. The sentiment is from Itty Bitty Christmas has been stamped in Gorgeous Grape to coordinate with the card base.

To give the ornaments some added strength I punched out three ornaments from Gorgeous Grape and adhered them to the back of the stamped images before adding the additional Whisper White pieces to the inside of the card. These Whisper White pieces allow you extra space to write your Christmas greeting without it showing through the gaps when the card is closed. I wanted the sentiment on the inside to be hidden behind the central ornament so I placed my insert in the card (not adhering it though), closed the front and traced the outline of the ornament in pencil so I knew where to place my sentiment. Once stamped I rubbed the pencil out and adhered the insert.

The silver and purple tones look great together and give an alternative festive combination to red & green.

Well that’s all for now – until next time …

Brightly Gleaming – DSP Ornaments

By | November 26, 2019

Hi there

We are now only four weeks away from Christmas so I’d better get sharing my Christmas projects with you before it’s too late. The Brightly Gleaming Suite on pages 30-32 will feature heavily over the coming weeks – I hope you’ve fallen in love with this suite I like I have.

For this card I’ve used the Gleaming Ornaments punch and the gorgeous Brightly Gleaming DSP – I love the hint of copper throughout this suite. This was an easy card to make and there’s no stamping on the card front – the sentiment comes as part of the 1/2″ Classic Weave Ribbon.

There are a few layers of cardstock in this card so if you want to recreate it here are the measurements: standard card base – Thick Very Vanilla; Night of Navy – 9.8 x 13.8cm; Very Vanilla – 9.4 x 13.4cm; Night of Navy – 7.4 x 12.8cm; Very Vanilla – 7 x 12.4cm.

Before assembling this card I coloured the ribbon in with my Night of Navy Stampin’ Blend. The original colour of the ribbon is Very Vanilla but I’d seen somebody else use it coloured so thought I’d give it a try. It was really easy to do – I just left it for a bit to make sure it was fully dry. Next up is cutting out the ornaments. I made a pencil mark for the centre of the cardstock – punched the middle one out then used the cut out to work out the position of the other two so that they were equally spaced on either side.

I cut three pieces of Braided Linen Trim and adhered one end to the back of the Very Vanilla cut out leaving one end loose for the time being. The different pieces of DSP are adhered to the smaller piece of Night of Navy with the ‘cutout’ adhered with dimensionals. The loose end of the trim is wrapped over the top and adhered to the back. Next up I adhered the remaining Night of Navy and Very Vanilla together. Adhere the ribbon trim to the bottom then adhere the ‘ornaments’ to the matt with dimensionals (I used the mini dimensionals for this project as they are not as thick as the standard dimensionals.) Final step adhere to card base.

You may be able to see a glimpse of the inside where I stamped the holly image.

Well that’s all for now – until next time …

Online Extravaganza Sale

By | November 20, 2019
10.01.19_DHEADER_ONLINEX_SP

Get ready for three days of savings with the Stampin’ Up! Online Extravaganza! For three days only, you can get these deals:

15% off Ink pads and Cardstock in:

Neutrals Collection

Regals Collection

2018–2020 In Colors

2019–2021 In Colors (except Purple Posy)

Take Additional 5% off the original 10% discount:

8 bundles

Neutrals Classic Stampin’ Pads Assortment

Regals Classic Stampin’ Pads Assortment

2018–2020 In Colors Classic Stampin’ Pads Assortment

Head on over to my Promotions page for more details of what’s on offer. Be in quick as sale ends 22 November

Magnolia Blooms Series – Happy Birthday (part three)

By | November 12, 2019

Hi there

I hope you’ve enjoyed seeing the cards so far using the Magnolia Lane Suite.  Here are the final two cards in this series.

Magnolia Blooms - Happy Birthday

I decided to mat the DSP on a piece of Mossy Meadow rather than adhere straight onto the Petal Pink card base.  The floral looked fine against the Petal Pink card base but the Petal Pink DSP got ‘lost’ and it needed some definition.

Magnolia Blooms - Happy Birthday

I carried on the theme with the mat around the stamped image.

Magnolia Blooms - Happy Birthday

The ribbon is from the Magnolia Lane Ribbon Combo – you get a spool of this beautiful Linen ribbon plus a spool of Linen Thread in Mossy Meadow.

Magnolia Blooms - Happy Birthday

This is the last card in this series – it’s the reverse layout of the above card with it’s own personality.

Magnolia Blooms - Happy Birthday

Again I added the Mossy Meadow mat so that the Petal Pink DSP would stand out against the Petal Pink card base.  This time the image only has one layer of mat with Mossy Meadow.

Magnolia Blooms - Happy Birthday

I left the sentiment off the front of the card as I wanted to show off the beautiful paper at the bottom of the card front.  This ribbon makes the perfect bow – I love the white edge of the ribbon.

All the cards that I’ve shared in this series here and here use the same products – Magnolia Blooms stamp set, Magnolia Lane DSP, Petal Pink and Mossy Meadow card stock, Petal Pink, Mossy Meadow and So Saffron Stampin Blends, Magnolia Lane Ribbon Combo or Petal Pink Organdy Ribbon.  If you would like to purchase any of these supplies so you too can make cards like these head on over to my online store or contact me directly.

Until next time …


Magnolia Blooms Series – Happy Birthday (part two)

By | November 6, 2019

Hi there

Back again with another creation using the products from the Magnolia Lane Suite.

Magnolia Blooms - Happy Birthday

Growing up we had a beautiful pink flowering magnolia tree outside our kitchen window and now we have the white ‘Little Gem’.  I love these trees so it was great to see this suite in the current catalogue.

Magnolia Blooms - Happy Birthday

This card is similar to one of the ones I shared in my last post except this time I’ve changed the orientation from portrait to landscape and added a bow.  The Organdy Striped Ribbon works beautifully for tying a bow – it’s lovely and soft.

Magnolia Blooms - Happy Birthday

The products used for this card are – Petal Pink cardstock, Magnolia Lane DSP, Magnolia Blooms stamp set (from the Beginners Brochure), Petal Pink Organdy Striped Ribbon, Petal Pink, Mossy Meadow and So Saffron Stampin’ Blends.

I’ve got two more cards to share with you using these products so check back in a couple of days to check them out.

Until then …

Magnolia Blooms Series – Happy Birthday (part one)

By | November 3, 2019

Hi there

I have lots to share with you on this post so make sure you read right to the bottom.

First up we have a Christmas promotion running for November – it’s the Christmastime Is Here Suite – check out more details on my Promotions page.  This promotion consist of two bundles – the Christmastime Is Here Suite and the Christmas Rose Bundle.

Christmastime Is Here

And now for my project – I had fun creating five birthday cards using the Magnolia Blooms stamp set and Magnolia Lane DSP.

Magnolia Blooms - Organdy Ribbon - Mossy Meadow

The card base is Petal Pink – I’m not really a ‘pink’ girl but the more I’ve used this colour the more I like it.  Do you find that with certain colours?

Magnolia Blooms - Organdy Ribbon - Mossy Meadow

I’ve used both side of the same sheet of DSP for this card.  The pieces were cut just a bit bigger than I need, joined together then die cut with the biggest Stitched Rectangle die to create the card front.  I wrapped a length of the beautiful 5/8″ Organdy Striped ribbon over the join and adhered this to the card base.

On a piece of Whisper White I stamped the image in Memento Black and coloured it in with the Stampin’ Blends – Mossy Meadow, Petal Pink and So Saffron.  The sentiment is stamped in Mossy Meadow.  I love how the Stitched Rectangle dies all nest in with each other creating the perfect frame and border to the image.  I went with a Mossy Meadow mat as a Petal Pink mat got lost on the Petal Pink DSP.  This was added to the card base using dimensionals.

Magnolia Blooms - Inside of card

For the inside of the card I stamped the small magnolia image which has also been coloured in with the Stampin’ Blends – Mossy Meadow and Petal Pink.  I used this image on all the cards.

Next up a similar layout

Magnolia Blooms - Organdy Ribbon - Petal Pink

except this time I went with a full sheet of the DSP.  I love how the black background really makes the flowers stand out.

Magnolia Blooms - Organdy Ribbon - Petal Pink

The stamped image is the same but instead of a Mossy Meadow mat I went with the Petal Pink (this time a Mossy Meadow mat got lost on the darker DSP).

Magnolia Blooms - Organdy Ribbon - Petal Pink

You can just see the small magnolia image on the inside of the card.  The organdy ribbon is so lovely to work with so I added a length behind the image.

Earlier this year Stampin’ Up! announced the paper trimmer was being retired and that they were working on a new trimmer.  Well the new trimmer is here and available for purchase.  I’ve had my new trimmer for almost a month and I love it.  The blades are way better and cut the cardstock like butter.  If you are interested in purchasing the new trimmer you can order it via my online store or contact me directly.

Paper Trimmer

I’ll be back with more Magnolia Blooms cards.

Until then …

Magnolia Blooms Series – Congratulations Card

By | October 29, 2019

Hi there

When you create a card do you make just one of the design or multiple at the same time so you have cards ready when needed?  I’m more of a ‘one’ than a multiple girl.  Recently I needed a number of birthday cards and a ‘congratulations’ and I was running out of time.  So I decided to make all the cards using one stamp set – Magnolia Blooms – and the coordinating Magnolia Lane DSP.  This stamp set is another one from the Beginners Brochure and had both ‘Congratulations’ and ‘Happy Birthday’ sentiments.  Over the coming days I’ll be sharing with you the cards I made.

MAGNOLIA BLOOMS PHOTOPOLYMER STAMP SET

First up I made the Congratulations card for one of my team who had reached a milestone.

Magnolia Blooms - Congratulations

The Magnolia Lane Suite in the Annual Catalogue (pg 36-38) has another stamp set called Good Morning Magnolia which has a bigger image and more sentiments.

Magnolia Blooms - Congratulations

The colours used in this suite are Petal Pink, Mossy Meadow, So Saffron and Whisper White.  The image has been stamped in Memento Black then die cut using the Layering Circles dies with a Stitched Shapes Circle die cut from Mossy Meadow for the mat.  The sentiment was stamped in Mossy Meadow then die cut using my favourite die set – Rectangle Stitched dies – these are a ‘must have’.

Magnolia Blooms - Congratulations

I used my Stampin’ Blends to colour the image – Petal Pink (light and dark), So Saffron and Mossy Meadow (light and dark).  The ribbon is from the Perennial Essence Suite but as it’s Petal Pink it coordinates beautifully with this paper too.

You can just see a bit of the stamped image on the card insert – this is the small image from the set.

Well that’s all for now.  Check back soon for the birthday cards using these products.

Until then …


Celebrate with Cake and balloons

By | October 28, 2019

Hi there

Here in New Zealand we have just celebrated our Labour Day Weekend – and the weather has been great.  When I was at school Labour Weekend marked the change into summer uniform – here’s hoping that we’re done with winter and summer is here.

Today’s card uses the Celebrate with Cake stamp set which is from the Beginners Brochure that was released in June.  This set is perfect for all your birthday card needs – cake, balloon, candles, party hat, flowers and even a bird to let you know ‘you’ve got mail’.

CELEBRATE WITH CAKE PHOTOPOLYMER STAMP SET

I love the bright colours so have chosen Bermuda Bay, Melon Mambo, Daffofil Delight and Pool Party for my party celebration.

Celebrate with Cake

I stamped the cake image in Melon Mambo, the candle in Pool Party and the balloons in Daffodil Delight.  I stamped the sentiment directly onto the card in Bermuda Bay.

Celebrate with Cake

After stamping everything I felt the card was very ‘flat’ so I ran it through the embossing machine with my favourite embossing folder – Subtles.  It adds great texture to the card.  I also decided the sentiment needed to be ‘raised’ so I stamped the sentiment on a piece of scrap and ‘fussy cut’ it out and adhered it with dimensionals over the top of the stamped image.

Celebrate with Cake

I found a piece of retired Bermuda Bay Stitched Ribbon in my ribbon stash and some Glitter Enamel Dots that were the perfect colour.  The final touch was adding Shimmery Crystal Effects to the balloons.  I love this new product – I’m onto my second tube :).

If you’re looking for an ‘all purpose’ birthday stamp set  – look no further.

Until next time …


Celebrate with Cake

By | October 20, 2019

Hi there

This year Stampin’ Up! released a new brochure for beginner stampers.  This brochure contains a select number of products and kits to help you get started with your creative journey.  One of the stamp sets featured in this brochure (page 10 & 11) is the Celebrate with Cake stamp set.  When you’re a beginner it’s hard to know what else to purchase along with your chosen stamp set.  Listed in this brochure are some ink colour options along with a few other product suggestions to help you create projects.

Here I’ve used the stamp set with additional supplies to create some birthday cards.

Celebrate with Cake Birthday Cards

Can you see the balloons have a glossy look?  Well this is created by adding the new Shimmery Crystal Effects once the image has been stamped.  This is a great way to add a bit of sparkle to your project.  Crystal Effects is a thick glue  which has white and silver flecks mixed into it.  You can find this new product on page 41 of the Holiday Catalogue

Celebrate with Cake - Balloons

The card base and mat are Soft Suede.  My coordinating colours are Mint Macaron for the letterbox, Soft Suede for the bird, Merry Merlot for the balloons and sentiment and Rococo Rose for the banner.

Celebrate with Cake - Balloons

I used my Stamparatus for the letterbox image.  I wanted a nice solid image so stamped and reinked this a couple of times.  The Stamparatus gives perfect realigning every time.

Celebrate with Cake - Balloons

The banner was stamped on a piece of scrap then ‘fussy cut’ and adhered with dimensionals.  The stamped image was stamped on a piece of Whisper White that had been cut out with the 5th smallest Stitched Rectangle die and matted with the 6th smallest die cut from Soft Suede.  This die set must be one of my most used sets – love it.

You can see the inside of the card has been stamped with the heart image using Merry Merlot.

The images in this set are great to create a range of birthday designs – I’ll be back soon with another design.

Until then …


Country Home – Cotton card with Puff Paint

By | October 15, 2019

Hi there

My Country Home stamp set hadn’t seem ink for quite some time but that has all changed with the arrival of our new Puff Paint (page 19 of the Holiday Catalogue).

Country Home - Puff Paint

Previously I had coloured the ‘cotton’ flowers in with different colours – check this post here.

I’m loving the puff paint – it’s up there with heat embossing :).  If you haven’t tried it yet you need to add this product to your next order.  At only NZD9.50 it’s a great product that will add texture and give a 3D look to your projects.  It’s really easy to apply – cover in the area you need or draw a line with the nozzle and heat it with your heat tool.  It’s fun watching it puff up.  Here are a couple of close up shots.

Country Home - Puff Paint

Country Home - Puff Paint

Doesn’t that look cool?

I used our Stampin’ Blends to colour in my image – Dark Old Olive for the leaves, Light and Dark Cajun Craze for the flowers, Dark Blackberry Bliss for the berries and Light and Dark Smoky Slate for the can.

Country Home - Puff Paint

The mat is Smoky Slate which has been dry embossed with the Tin Tile Embossing Folder, I then lightly sponged Smoky Slate ink across the top using a Sponge Dauber.  The image was stamped in Memento Black ink on a piece of Thick Whisper White which had first been die cut using the Rectangle Stitched dies (this was the 5th biggest) then matted to a piece of Cajun Craze (die cut with the 6th biggest die).  The Cajun Craze Linen Thread is from the Come to Gather Ribbon Combo on page 47 of the Holiday Catalogue.

I got hooked on this stamp set and design and have since made another 8 cards – I can’t share all of them yet as some only got put in the post today.

Until next time …


Perfectly Plaid ‘Parcel’ Christmas Card

By | October 7, 2019

Hi there

One of the great benefits of being a Stampin’ Up! demonstrator is that we get to order product one month before a new catalogue goes live.  By having access to the product early we get to play and create projects to then share with you to inspire and showcase what’s on offer.  As demonstrators we make ‘swaps’ which allows us to have an even greater range of projects to share with you.  For the current Holiday Catalogue I participated in a ‘swap’ and this is the card I made (well I actually made about 20 of these) featuring products from the Wrapped in Plaid Suite from pages 12 – 14.

Wrapped in Plaid

This is how a ‘swap’ works – once you know how many want to participate in the swap you make that number of the same card design – say 15.  You then give one of your cards to those in the ‘swap’ and each participant gives you a card they’ve made.  By the end of the ‘swapping’ you will have 15 different cards to show and get ideas from.

Perfectly Plaid

I based my design on a Christmas card my niece had given me years ago.  The paper is from the 6″ x 6″ Wrapped in Plaid pack which features 12 doubled-sided designs.  You get four sheets of each double-sided design giving you a total of 48 sheets.

The DSP measures 7.5cm x 9cm and the mat measures 8cm x 9.5cm.  I alternated the mat with either Cherry Cobbler or Shaded Spruce.  The ribbon is the Shaded Spruce/Gold 3/8″ Striped Ribbon.

Wrapped in Plaid

The sentiment on the front works perfectly with this design ” … wrapped in love & joy” and is from the Perfectly Plaid stamp set.  This suite has a ‘gold’ theme running through it so I heat embossed the sentiment in gold and added a gold foil mat (one of the dies from Perfect Parcel) to the ‘To: / From:” sentiment which is from the Itty Bitty Christmas set on page 16.  This set has 18 different sentiments so you’re sure to find a sentiment to suit your project.

On the inside of the card I stamped one of the trees and added some ‘ornaments’ using the Cherry Cobbler Stampin’ Write Marker.

I decided to also make another card in this design but from the Brightly Gleaming Suite – this time heat embossing in copper and using copper foil.

Brightly Gleaming Suite

The card bases for both designs are the Thick Whisper White and Thick Very Vanilla respectively.

I hope our weather starts to pick up – we’ve had enough rain in the last month I’m surprised we haven’t got web feet 🙂

Until next time …