July Card Class Projects

By | July 29, 2017

Hi there

It’s been a beautiful day here in Auckland – cold but blue skies and the sun has been shining down on us.  It’s meant to get down to 3 degrees tonight which is pretty cold for Auckland so I think I’ll be putting another layer on the bed.

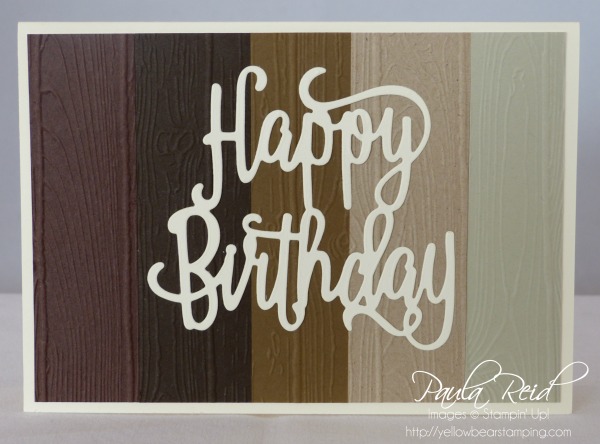
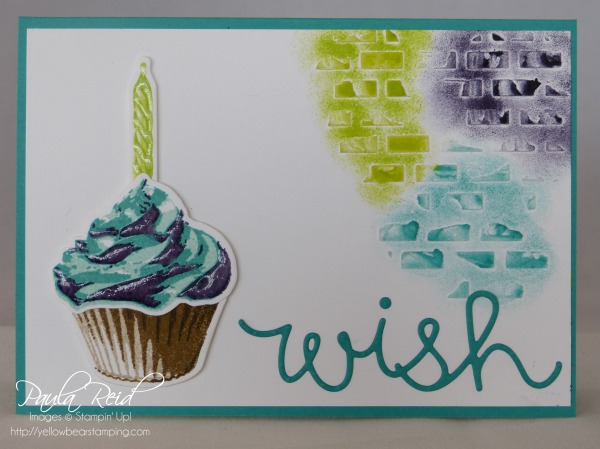
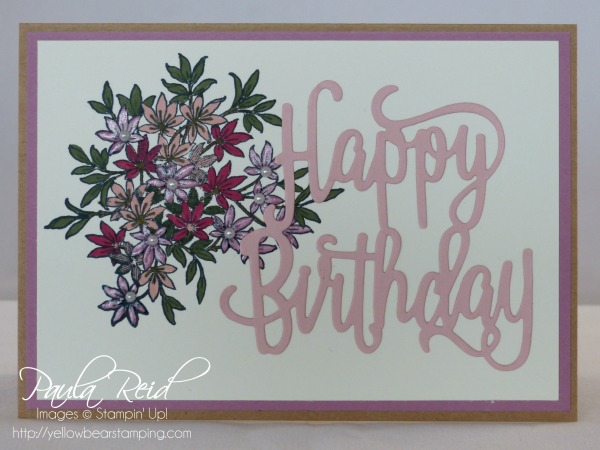
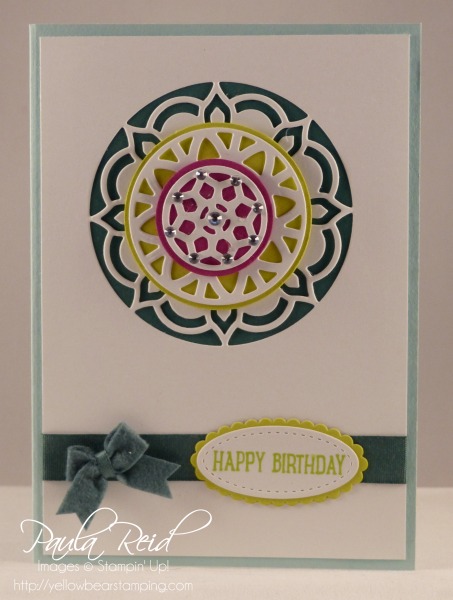
This months cards feature new products from the Annual Catalogue.  First up we have a card featuring the Color Theory Suite (pg 146-147 AC).  There’s not a lot of stamping on this card but lots of dies were used.

Happy Birthday Window Card - Front - July Card Class

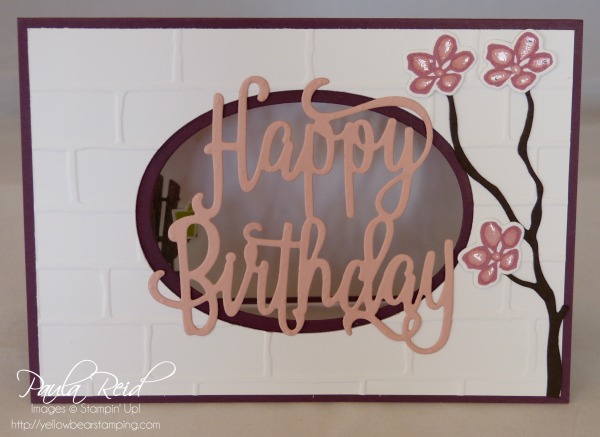
First up we cut the oval from the Fresh Fig card base then placed the Whisper White mat over the top and drew around the oval.  Then placing the biggest oval on the Whisper White cut out the second window.  Before adhering the two together we dry embossed the Whisper White with the Brick Wall Embossing Folder.  On the back of this we adhered a piece of Window Sheet (I found it was best to use the Tear and Tape to adhere this) then adhered both layers to the card base.  The ‘Happy Birthday’ is cut out of Blushing Bride with the Happy Birthday Thinlits die.  Before cutting this we adhered a piece of Multipurpose Adhesive Sheet to the back of the Blushing Bride card stock.  You may need t run this through the Big Shot a couple of times to get a good cut.  The Early Espresso tree branch (from the the Seasonal Layers Thinlits) was also cut out with Multipurpose Adhesive on the back – so much easier to stick down.  The flowers were stamped in Sweet Sugarplum and then we put some of the Fine-Tip Glue on to give a shine and some height.  I’ve found that it also changes the colour of the ink beneath so the flower looks two tone.

Happy Birthday Window Card - Inside - July Card Class

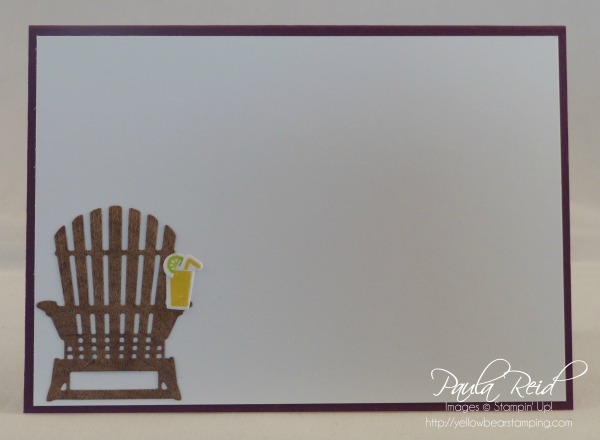
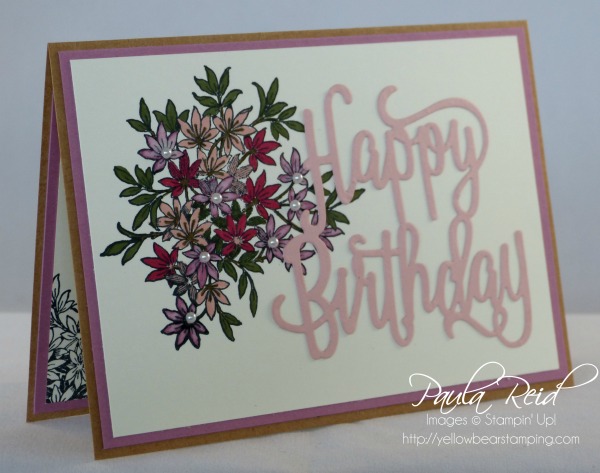
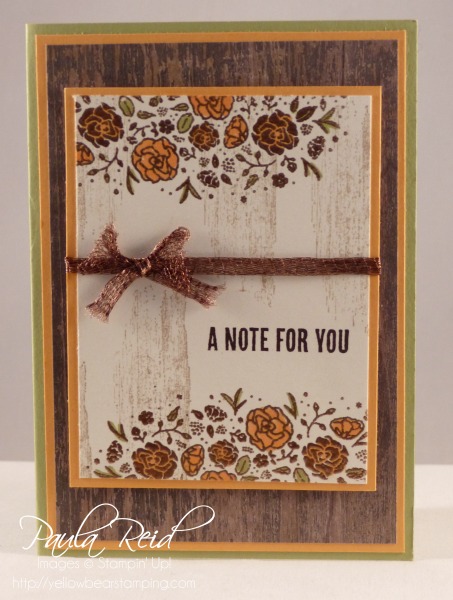
On the inside we have the chair (I’d call this a Cape Cod chair but I think it’s also known as an Adirondack Chair) which is cut out of the Wood Textures DSP – love this paper – and yes again I used the multipurpose adhesive sheets.  They make adhering those intricate pieces so easy.  On the arm of the chair we have a nice summer drink – lemonade with a slice of lime.

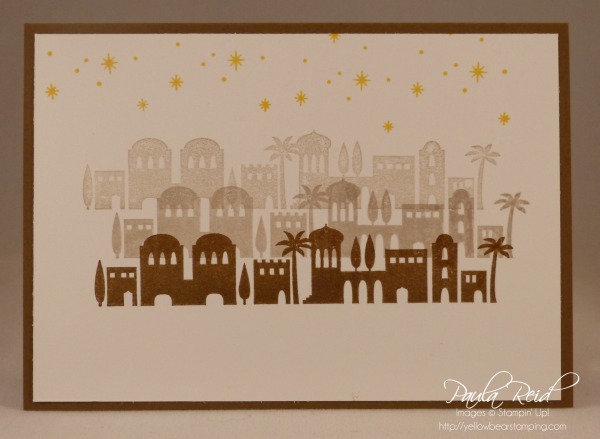
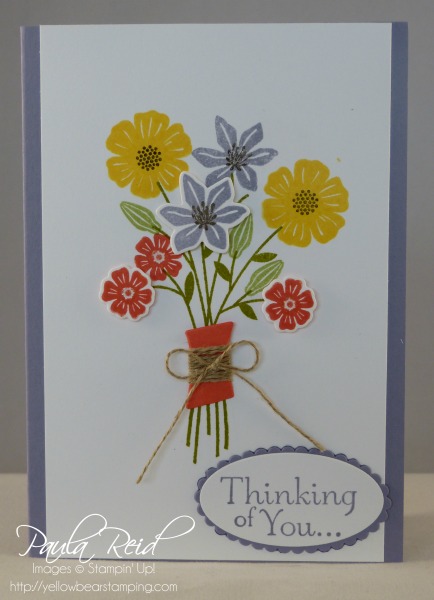
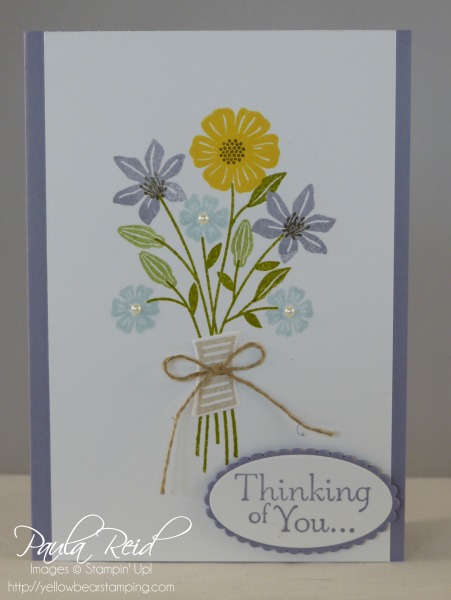
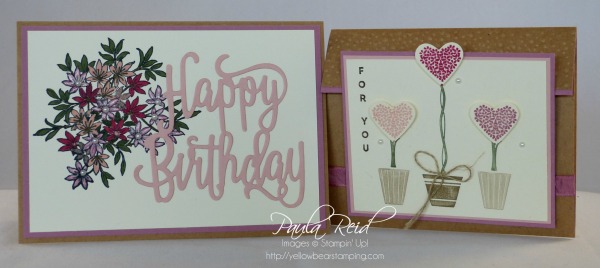
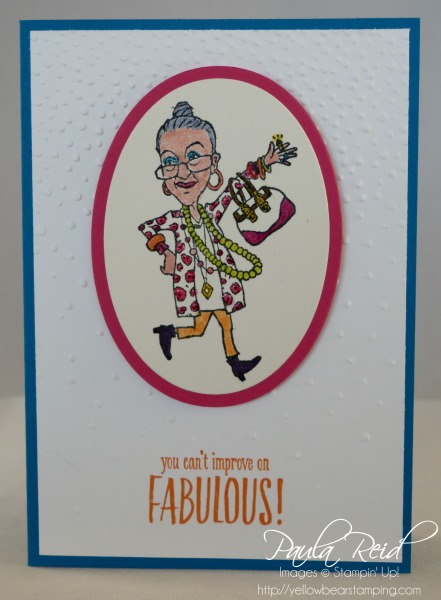
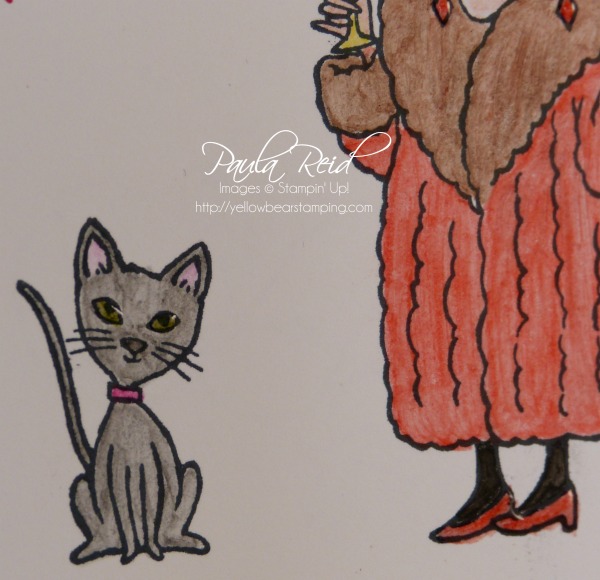
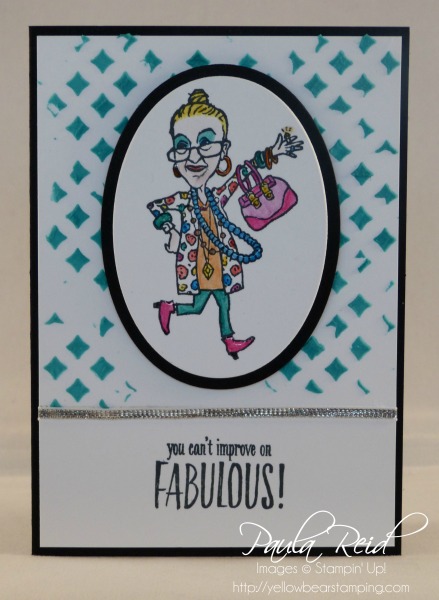
Next up we used the Embossing Paste and You’ve Got Style.  I’d made two samples using the two different images.

You've Got Style v1 - Embossing Paste - Front - July Card Class You've Got Style v1 - Embossing Paste - Inside - July Card Class

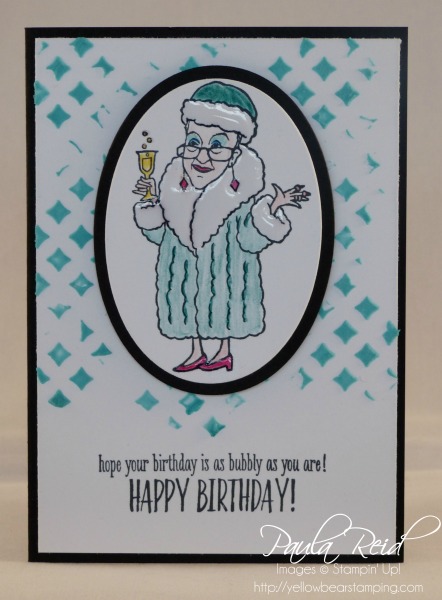
I’m in love with the new embossing paste – you don’t need to use much as a little goes a long way.  For this project we added a drop of Bermuda Bay Re-inker to the paste and mixed it in.  Using the Pattern Party Decorative Masks we applied the paste to the top 2/3rds of the card.  We didn’t cover the full area – just applied it in random areas.

You've Got Style v2 - Embossing Paste - Front - July Card Class You've Got Style v2 - Embossing Paste - Inside - July Card Class

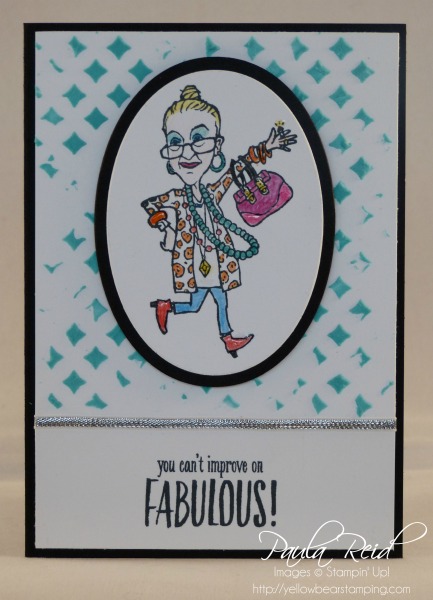
The images were stamped in Memento Black ink on the oval cutout from the first project :).  Using the Watercolour Pencils we coloured in our images and applied – you guessed it – Fine-Tip Glue to various parts of the images.  The images are matted with Basic Black and the base is Basic Black.  This goes really well with the Bermuda Bay colour of the paste.

I also taught this card as the Make n Take for my team training;

You've Got Style v3 - Embossing Paste - Front - July Card Class You've Got Style v3 - Embossing Paste - Inside - July Card Class

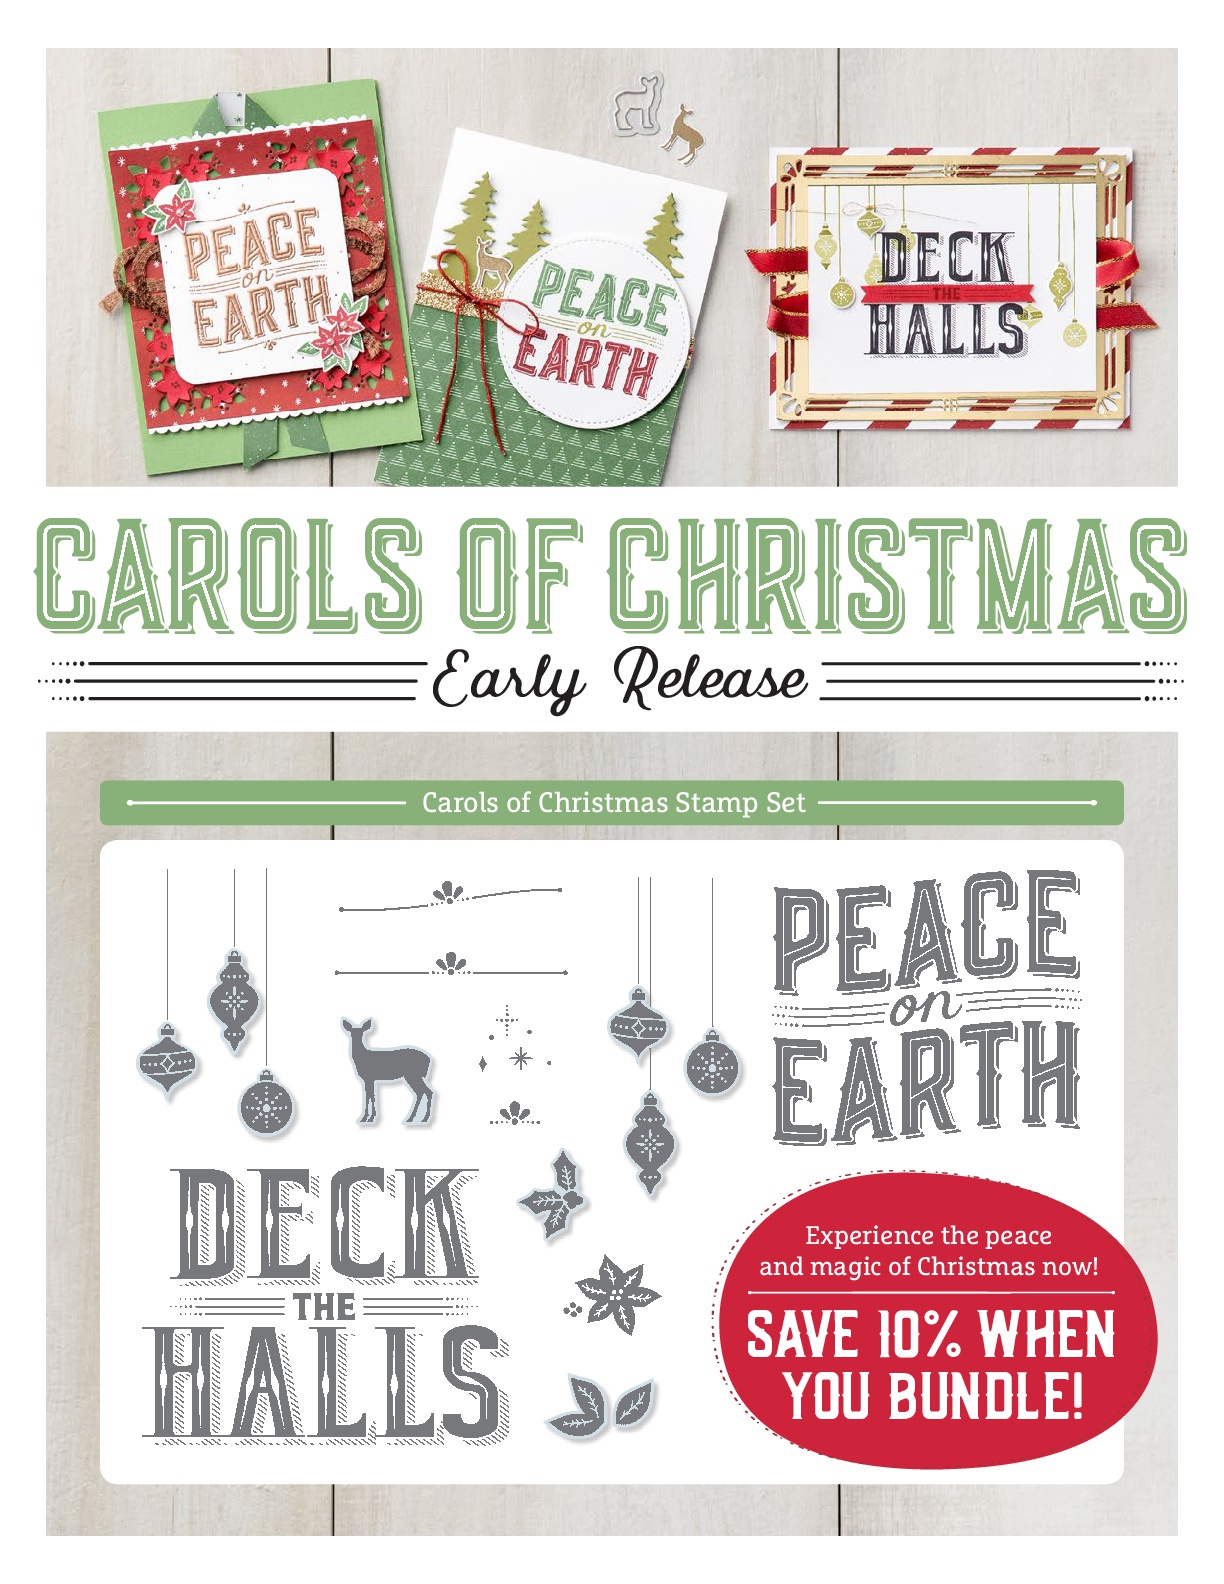
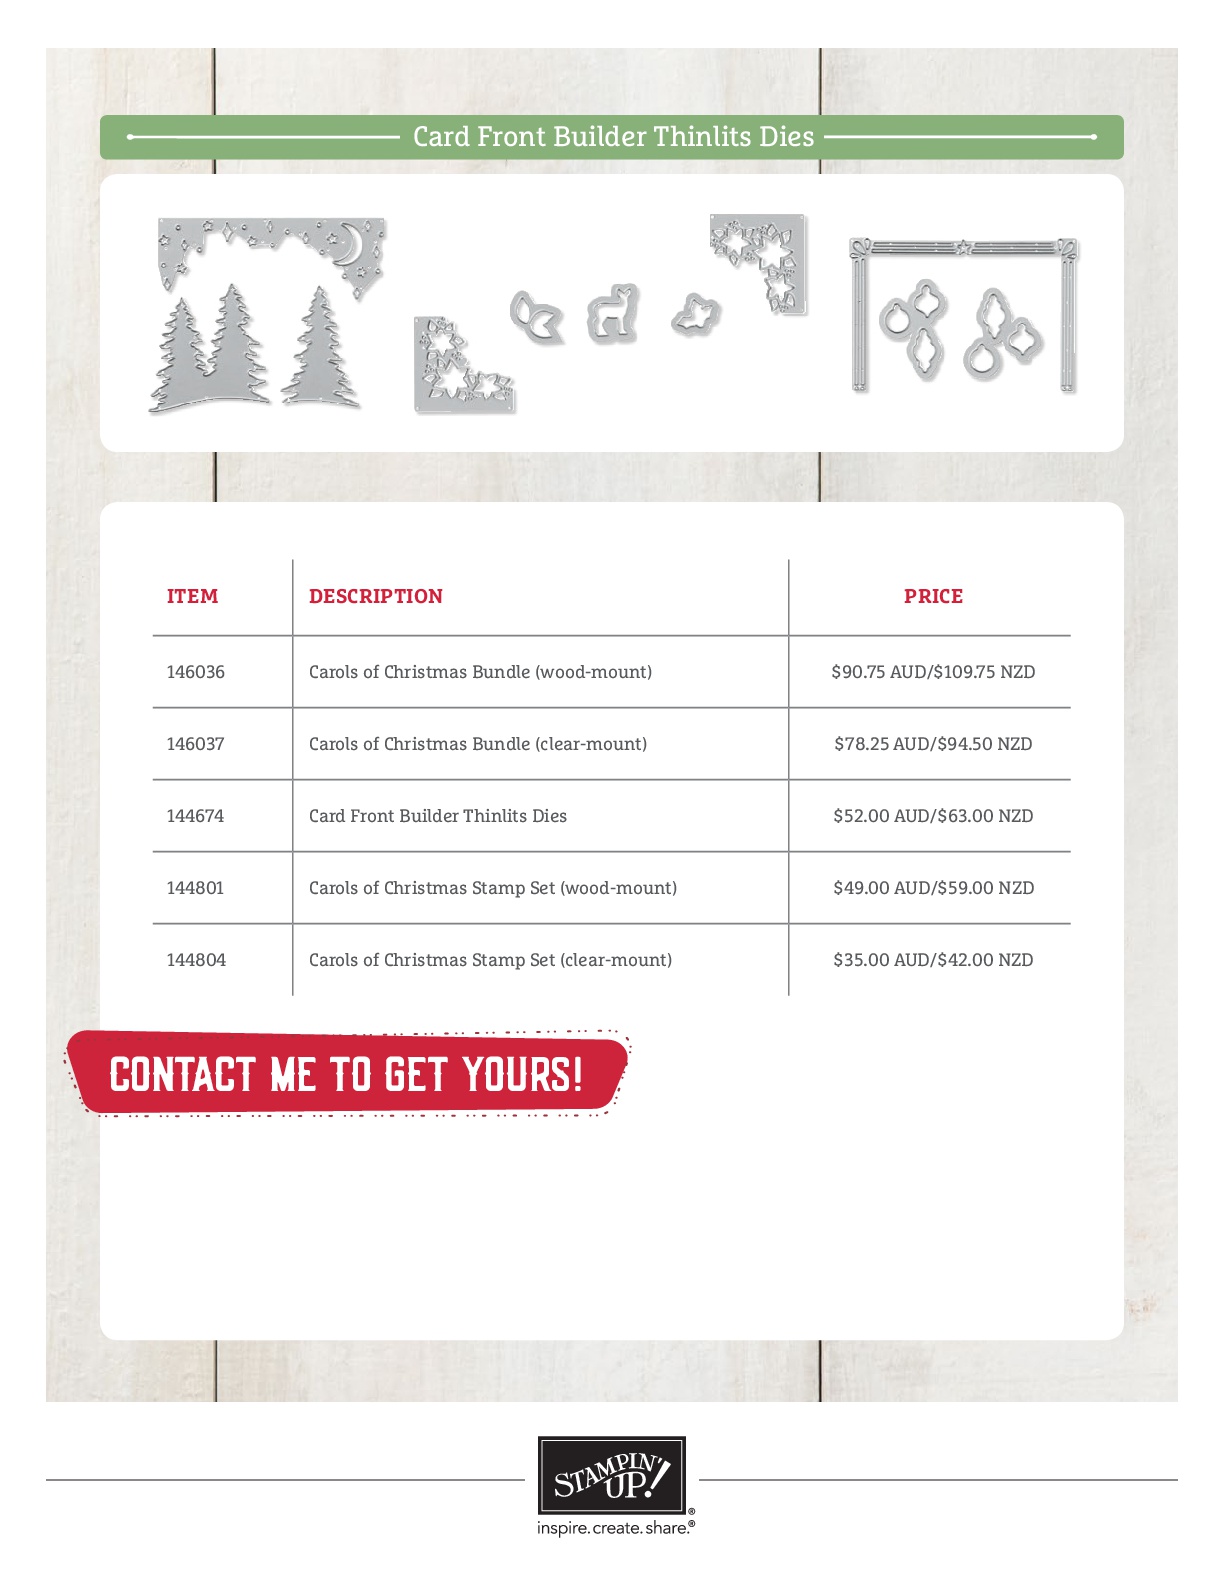
July is the perfect month to join Stampin’ Up! – Our Christmas in July promotion (1 -31 July) makes it easier than ever to sign up to be a demonstrator.  Your Start Kit will cost you $189NZD and for that you will receive $285NZD worth of product.  You will also receive a FREE Essentials Gift Pack including Paper Snips, SNAIL Adhesive, Grid Paper, two D Blocks and a Bone Folder. That’s an added value of $103 NZD!  Stampin’ Up! will also include the Carols of Christmas Stamp Set from the holiday catalogue for FREE ($42 NZD value)!

I would love to have you join my team so if you are interested in joining then give me a call.

Yellow Bear Signature

Extravaganza Projects – July 2017

By | July 24, 2017

Hi there

This past weekend we held our second Creative Inkers Extravaganza event for 2017.  We had a really good turnout – about 108 ladies and 2 gentlemen :).

If you’re not familiar with an Extravaganza here’s how it works.  You come along for a fun afternoon and create five projects.  You stay seated and we (the demonstrators) move from table to table.  All the kits have been pre-prepared and have all the piece you need to create the project.  We teach you different techniques, get you stamping and most of all have we have some fun.  If you would like to attend our next Extravaganza event keep Saturday 18 November free.  More details about this event will be out in October (cost is $45 which also includes afternoon tea).

So here are the projects that we taught.  First up is the one I taught with Sally and Michelle.  With Father’s Day on the 3rd September here in New Zealand we decided to do a masculine project – gift card holder.  This project was inspired by a similar gift card created by Dawn Griffith – a US demonstrator.

Extravaganza - July 2017 - Gift Card Closed

We’ve used two new In Colours – Lemon Lime Twist and Tranquil Tide along with two new products – 1/4″ Copper Trim and the 2 1/4″ Circle Punch.  Born to Ride is the main stamp set and the sentiment is from Guy Greetings.  We have everyone the option of ‘Happy Father’s Day’ or ‘Happy Birthday’.

Did you notice the coloured pearls down the side?  These are our Basic Pearls which have been coloured with a black Sharpie marker.  You could create different coloured pearls depending on the colour of you Sharpie marker.

Extravaganza - July 2017 - Gift Card Open

The gift card then slots into the pocket on the right.  This could easily be made into a card by just adding another piece of Whisper White instead of the Basic Black pocket.

The four other projects that were taught are:

Extravaganza - July 2017 - other projects

L to R – ‘You Move Me’ interactive card (by pulling the ribbon at the top up the image of the butterfly changes), Lollipop Card, Textured Paste Medallion Card.  Front – Wood Crate Memo Cube.

If you would like to know more details about the Extravaganza please email me – I’d love to have you join us.

Well that’s all from me for now.  Catch you back here soon.

Yellow Bear Signature


Another Milestone Birthday – 80

By | July 20, 2017

Hi there

This year seems to be the year for ‘milestone’ birthdays.  Earlier this month our aunt in the US celebrated her 80th.  We couldn’t send her flowers as she is holidaying in Europe with extended family so I sent her flowers by way of the card :).


Dolly Bday Card - Front

This uses the new Beautiful Bouquet Bundle.  The stamp set comes with a sentiment for every occasion – birthday, wedding, anniversary, thanks, congratulations and something for a friend.  I think this set will become a favourite ‘go to’ set for me.

My starting colour for this project was Fresh Fig.  I then checked out the below In Color Combinations chart to get my additional colours – Cherry Cobbler, Blushing Bride and Pear Pizzazz.  To add ‘dimension’ to the card I added pearls to the centre of the flowers and glue to bigger flowers at the back – not sure what type of flowers these ones are – maybe hydrangeas 🙂  The flowers are ‘tied’ together with a piece of Linen Thread.

2017InColorCombinations_SPUK-001

Well I hope you don’t get too wet or blown away in this wild weather.  Until next time 🙂

Yellow Bear Signature


Happy 21st Birthday

By | July 18, 2017

Hi there

I’m getting my priorities right tonight – blog first then clean the craft space so I can create more projects (and mess) 🙂

Last month my youngest niece turned 21 :).  I remember the day she was born – I was living in London and received a call from my brother late at night with the very exciting news.  The next day I went shopping at Harrod’s and bought her a Harrod’s Bear then onto Mothercare and bought her a cute dress and tights :).  I love being an aunt.  Now onto her card:

Hanna - 21st Bday - Front

I’ve used one of my favourite sets – Awesomely Artistic and teamed it with one of my favourite dies – Happy Birthday thinlit.  The image is stamped with Memento Black then coloured in using Rose Red, Blushing Bride, Sweet Sugarplum and Always Artichoke markers.

Hanna - 21st Bday - side

The sentiment is cut from Blushing Bride card stock and adhered with multipurpose adhesive sheets – love these 🙂  Some pearls were added and my go to technique – fine tip glue applied to some of the flowers.

Hanna - 21st Bday - Inside

For the inside I just stamped part of the image again ‘off the page’ and left it uncoloured.  Final touch ’21’ cut from Sweet Sugarplum card stock.

My niece had been busy studying for exams before her birthday – with her last exam on her birthday! – so hadn’t had time to decide what she wanted so I did a gift voucher entitling her to a ‘gift – yet determined’ :).  Check here for more details on the gift voucher holder.

Hanna - 21st Bday - card and voucher

Well I’m off to tidy my desk so I can create more projects to share with you.  See you soon 🙂

Yellow Bear Signature

June Card Class Projects

By | July 16, 2017

Hi there

I’ve had a very productive weekend – preparing 40 kits and 6 samples for next weekends Auckland Extravaganza.  Our project has 12 pieces so there were just a few cuts 🙂  But I’m all done and can relax for the rest of the week – well sort of.

With my technical issues now sorted I can catch up on my blog posting.  Here are the cards I taught at my June card class.

Eastern Palace - June Card Class

This card showcases the new Eastern Palace Suite and the new In Colours – the ladies got to choose which colour combos they wanted for their cards.  For mine I went with Tranquil Tide, Lemon Lime Twist and Berry Burst.  The card base is Soft Sky.  The Layering Circles came in handy with cutting the mats for the different layers.  I’ve also used the Layering Ovals and the Stitched Framelits – you can never have enough framelits (or thinlits)!

The next card is one I CASED from Mary Deatherage.

Wood Words - June Card Class

It uses products from the Wood Textures Suite – Wood Words stamp set, Wood Textures DSP and the ‘must have’ ¼” Copper Trim.  The image is heat embossed with Copper Embossing Powder and then coloured in using Peekaboo Peach and Pear Pizzazz markers.  I also used one of the stamps from Timeless Texture for the background which was stamped after the heat embossing process.

Don’t forget our promotion for July – Bonus Days.

For every $110 NZD your spend between 1–31 July (before shipping and handling), you will get an $11 Bonus Days Coupon that can be used 1–31 August.

Here’s how it works:
– place your order during July to receive your coupon.
– there is no limit to the number of coupons you can earn during this promotion.
– an email address is required to participate; Bonus Days coupon codes can only be delivered via email.
– once the order has been placed you will receive an email with the code for your coupon. Make sure you keep the email in a safe place.
– print your coupons off and save them.
– during August place an order and redeem your coupon.

You can earn these coupons by either ordering online via my website or you can place an order with me via email.

Yellow Bear Signature

Loving “You’ve Got Style”

By | July 14, 2017

Hi there

The moment I saw the stamp set “You’ve Got Style” in the new catalogue I knew I needed it – it just appealed to my sense of humor.  I also love line art images as they are so versatile to create projects with.

Here’s my first creation – Grandma escaping with her glass of bubbles!

You've Got Style - Embossing Paste - Front

I’ve used the new Embossing Paste and Pattern Party Decorative Masks to create my wall.   I love the texture the paste creates.  To colour your paste simply add a couple of drops of re-inker (Crumb Cake for this project) to the paste and mix well.  The ‘fur’ on her coat and hat have had glue from the Fine Tip Glue applied – it gives a slightly raised look and is glossy.  The image is coloured in with the Watercolour Pencils.  The sentiment is stamped on a narrow strip of Whisper White then the ends are punched with the new Pretty Label Punch.

I was having so much fun with this set I created another two cards 🙂

You've Got Style - Eccentric - Front

With this image you can really ‘go to town’ on your colour combo – I think I ended up using colours from all the colour families.  I love the sense of fun in this image.  Her hair colour – the blue rinse brigade – reminds me of my Nana Pat who partook of this ‘fashion’ back in the ’70s :).  I also added some of the Fine Tip Glue to some of her accessories.

Next up – lovely ‘old lady’ and cat.

You've Got Style - with Cat - Front

I’m a cat person and I really love this cat image – I think it will get used on a number of cards and not just with the eccentric ladies.

Here’s a close up showing the cats eye’s.  Adding a touch of Fine Tip Glue really makes the eyes stand out.  I’ve also made her shoes to become ‘patent leather’ by adding some glue.  If you don’t own a Fine Tip Glue I highly recommend you purchase one.

You've Got Style - with Cat - Closeup

Well that’s all for now.  It’s so good to have my ‘technical’ issues sorted so I’ll be back over the weekend to share some more creations with you.

Keep warm and dry

Yellow Bear Signature


Crafting Forever

By | July 12, 2017

Hi there

Sorry for the ‘break in transmission’ but I’ve been having major technical issues with my blog.  I’m hoping we’ve managed to get it finally sorted.

Last month I was fortunate enough to receive a lovely card from a fellow demo.

It uses the new Angel Policy stamp set – Crafting Forever – and DSP from the Delightful Daisy pack.  Each image has been ‘fussy’ cut and adhered to the card front.  Thank you so much my friend.

Now this stamp was an early entry on my ‘shopping list’ so here’s a card I created.  I’ve also used the new ‘Happy Birthday’ Thinlit.

I’ve used a collection of Stampin Write Markers to colour my image in.  The card base is Dapper Denim and the the Oval is Lemon Lime Twist.  The die has been adhered with the new Multipurpose Adhesive Sheets – they are fantastic with these narrow dies.

I hope you’re enjoying the new 2017-2018 Annual Catalogue.

Check back soon (I hope) for more creations.


Annual Catalogue Workshop Projects

By | June 20, 2017

Hi there

Last weekend I held a workshop for a group of 13 ladies.  We have lots of fun and they get to create two projects using the Notecards and Envelopes – have you seen we now have Very Vanilla Notecards as well as the Whisper White :).  I love our notecards and am really pleased we now have them in Vanilla.

The first project I’ll share features the new In Colours – Powder Pink, Berry Burst, Fresh Fig, Lemon Lime Twist and Tranquil Tide and the Label Me Pretty Bundle (stamp set and punch).  I made five samples to show the ladies and then they got to make one of the combinations.

Which one is your favourite?  Mine is the Lemon Lime Twist.

The image is stamped in Memento Black and then coloured in using the new In Colour markers.  This is then cut out using the Pretty Label Punch.  By cutting out two ‘Labels’ in coloured cardstock you can create a mat.  The paper is the Fresh Florals DSP stack.

The second card uses products from the Eastern Palace Suite

The large medallion is cut out of Dapper Denim with a Gold foil underlay for the second layer.  To adhere the Whisper White layer to the Gold foil we used the new Multipurpose Adhesive Sheets – these are so great for intricate designs and use with ‘word’ Thinlits.

Did you notice the new Gold Facted Gem in the centre of the medallion?  These come in three different sizes.

Sorry for the delay in blog posts but I’ve been experiencing some technical issues with my blog – hopefully they are all sorted now 🙂

Workshop Notecard Projects and promotion for June

By | June 3, 2017

Hi there

Don’t forget to read right to the bottom of this post to see what this months promotion is.

I was doing a bit of a ‘clean up’ of my photos on my computer and came across some projects I created for a workshop some months ago that I hadn’t shared!  The first card they made used the Beautiful You set and the second card used products from the Window Shopping bundle.

I love using the Whisper White Notecards and Envelopes and am looking forward to now having them in Very Vanilla – can’t wait to order some of those.  These projects were all created using the notecards.

I had made up samples using all three of the images and then let the ladies decide which image they preferred.

Each image is stamped in Memento Black Ink and then coloured in with the Watercolour Pencils.

I’m not sure if you can see in the card above but the ‘water’ looks a bit glossy.  This was done using the Fine Tip Glue Pen.

To create the lattice effect for the candles I used one of the dies from the Window Box Thinlits.  Behind this we added a strip of Peekaboo Peach for the candle flame and Pool Party for the candle itself.  The sentiment is from the Window Shopping stamp set.

I also made the card in a full card to show how you can upsize (or upsize) a design depending on what size card base you have.

For this one I used So Saffron for the flame and had the card front raised with dimensionals off the card base.

June is a great time to get your friends together and hold a workshop – not only has the new catalogue just arrived with wonderful new products but as hostess you get an additional NZ$50 in Hostess Rewards when your workshop sales totals NZ$500 or more.  So – if you would like to receive some additional $$ towards your shopping list give me a call to book a date.

Ribbon of Courage – team swaps

By | June 1, 2017

Hi there

It’s finally here 🙂  The new Stampin’ Up! 2017-2018 Annual Catalogue is now live.  It’s filled with lots of new products and some of your favourites have returned too.  If you need a copy of the catalogue please contact me and I’ll send you one.

Last month at our team training we did swaps using some of the new products.  Swaps are where we make a number of cards (in this case 20) in the same design and swap them with fellow demos.  This gives us in return a wide range of cards often made with products we haven’t yet purchased which we can share with you.  For my swaps I used a new stamp set, Designer Series Paper featuring the new In Colours and some ribbon in the new In Colours.

As I was making 20 of these I decided to do the same design but in the five new In Colours.  From the back left we have Berry Burst, Lemon Lime Twist and Fresh Fig and in the front we have Tranquil Tide and Powder Pink.

I’m loving the colours this year – they’re nice and vibrant and work well together.

This stamp set also comes with coordinating framelits – which I have yet to purchase – so my card was just stamping as I didn’t fancy cutting out 20 of these!

Enjoy reading through the new catalogue – each time I look through it I find different things!


Guy Greetings – Happy Birthday

By | May 31, 2017

Hi there

Last Friday was my husbands birthday (it was also my birthday – yes we share the same day but different years).  For ages I’ve resisted buying the Guy Greetings stamp set – I just can’t get past the image of the old fashioned boxer – but I finally succumbed to purchasing it.  I may even step outside my comfort zone and challenge myself to use THAT image!  So the first project I’ve created with this set was the birthday card for Phil.

One of the new products in the catalogue (which goes live tomorrow) is the Copper Trim – love it – and I wanted to use it on this project.  I’ve combined it with Copper Foil and Copper Embossing Powder for the image and the sentiment.  The new trim is great – it starts off thin but you can tease it out as I’ve done and it becomes ‘mesh’ like.  Copper goes really well with Very Vanilla and Night of Navy.

I’ve found that if you want a really good impression when using the Textured Embossing Folders is to light spray your cardstock with water before placing the cardstock in the folder and running it through the Big Shot.

I’ve even remembered to take a photo of the inside!  The ‘hat’ image is actually two rows of hats but I only wanted one so I masked off the line I didn’t want and stamped the remaining image twice along the bottom of the inside.  This image and the sentiment are stamped in Night of Navy.

Tomorrow is a big day in the Stampin’ Up! world as the new 2017-2018 Annual Catalogue goes live.  If you haven’t received your copy of the new catalogue please contact me and I’ll get one out to you.

Check back tomorrow when I’ll show you my swaps from our recent team training featuring a new set called Ribbon of Courage that Patty Bennett helped design as part of her Million Dollar Sales achievement.

Vertical Greetings – Card and Envelope Gift Card

By | May 28, 2017

Hi there

Sorry for the break in communication – last week I had some technical issues with my blog.  Thanks to my nephew we’re now back up and running but it means I’m behind in showing you my latest projects.

First up we have the projects I taught at card class.  This month both projects use the Vertical Greetings stamp set.  This set has three images and six vertical sentiments (and it’s carrying over to the new catalaogue).  The images can be stamped with ink but for both cards I showed how you can colour the images with markers.

To colour the front image we used three markers – Delightful Dijon, Pool Party and Basic Black.  We coloured the image in one hit which means you don’t have to worry about lining everything up each time you want to use a different colour.  The card base is So Saffron and I used the Softly Falling Embossing Folder on the front.

The inside image was coloured using Sweet Sugarplum, Basic Black and Pool Party.

To create the card base I embossed the front then cut 3/4″ off from the side  (you need to keep this cut off bit), then cut again at 1 3/4″ (this time you can discard this piece). Stamp your sentiment to the 3/4″ piece of cardstock.  The piece of Window Sheet measures 7.5cm X 14.8cm and is adhered to the main card base lining the right hand edge with the back of the card base, then adhere the 3/4″ strip .  From the back adhere the two strips of Basic Black (4cm x 14.8cm and 2cm x 14.8cm).  The Whisper White insert measures 20cm x 14.3cm.  The back is adhered to the base.  Wrap a piece of Bakers twine (88cm) around the middle, adhere some Rhinestones and a piece of ribbon (10cm) tied in a loose knot.

Create your card base first then do the stamping of the images.  When stamping the outside image to make sure it will line up when you put the card together I found it was easier to have the card base in front of you then line the Whisper White piece just below so you can line the image up with the window sheet (hope that makes sense).

Our second project was a gift card holder.

This project uses Kraft Cardstock which is unfortunately retiring at the end of the month.  You could use any coloured cardstock for this project.  I’ve teamed it with Sweet Sugarplum and Blushing Bride along with Very Vanilla.  The images are inked using Always Artichoke with Crumb Cake and Soft Suede for the pots.  The hearts are inked with Blushing Bride, Rose Red and Sweet Sugarplum.

An envelope is used to create the pockets inside the voucher which holder you voucher and a little card to write your greeting on.

The base is 4 3/4″ x 8 3/8″ scored at 3 1/4″ and 7 1/8″.  The front pieces measure:  Sweet Sugarplum – 3 1/4″ x 4″, Blushing Bride – 3 1/8″ x 3 7/8″ and Very Vanilla – 3″ x 3 3/4″.

The inside card is: Sweet Sugarplum – 3″ x 4″ and Very Vanilla – 3 3/4″ x 2 5/8″.  The thin strip of Sweet Sugarplum (just below the embossed portion) measures 1 1/4″ x 4 3/4″.

The ribbon that wraps around the front (behind the stamped panel) measures 18.5 cm and the linen thread bow measures 20cm.

I hope you’ve enjoyed seeing these project.  Check back soon for more projects.

If you would like to receive your own copy of the new 2017-2018 Annual Catalogur please contact me and I can get one sent out to you.

Eastern Palace – Part Seven

By | May 21, 2017

Hi there

Well today was a total contrast to yesterday!  Beautiful blue sky and lovely and warm in the sun.  What will tomorrow bring?

Today I have the last project in my Eastern Palace Suite series to share with you.  I’ve used some of the Eastern Gold Vinyl Stickers on this project – they are a really good weight and easy to apply.

I have adhered two strips of stickers to either side of the mat – the gold looks good with the Tranquil Tide mat.  Next I adhered a strip of DSP but before I adhered the DSP I stamped the small image in Tranquil Tide in the centre of the design.  Don’t forget you can stamp onto the DSP to make your own design.  Next up was the strip of Very Vanilla then I added a length of the Fresh Fig Finely Woven Ribbon to cover the join.

Using the Layering Circle Thinlits Dies (as I mentioned before this die set coordinates perfectly with the Medallion Thinlits set) I cut a scalloped circle (about 1 3/4″) out of Fresh Fig then adhered another vinyl sticker.  The sentiment is from the Eastern Beauty stamp set and is stamped in Tranquil Tide and punched out using the 1″ circle punch and adhered with a dimensional.

On the inside of the card I stamped the small image across the bottom in Tranquil Tide.

Well I hope you’ve enjoyed seeing these projects – I’ve had fun creating them.

Don’t forget – if you would like to purchase either of the bundles you have until 31 May to do so.  After that date you will be able to purchase the various products on their own from the new catalogue.

Keep warm and see you back here soon.


Eastern Palace – Part Six

By | May 20, 2017

Hi there

Well it’s certainly been a bit colder here today – time to put the summer clothes away and get the winter woollies out.

We’re drawing to the end of the Eastern Palace Suite series – just one more card to go tomorrow.  I’ve only just touched on the possibilities with this set but hope it’s given you some ideas and inspiration.

I decided I’d better show you some of the Designer Series Paper from the Eastern Palace Specialty Designer Series pack.  I think Lemon Lime Twist is my favourite new In Colour for 2017-2019 so I’ve chosen this colour of papers.  It’s teamed with Dapper Denim and Tranquil Tide.

My outer papers are cut at 3cm x 9.5cm, the thin strips are cut at 2cm x 9.5cm and the middle strip is cut at 2.7cm x 9.5cm.  These are all adhered to a piece of Very Vanilla that measures 9.5cm x 13.8cm.  The Lemon Lime Twist mat measures 10cm x 14.3cm.

The sentiment is stamped in Tranquil Tide and punched out using the 1cm punch and adhered with a dimensional.  The base for the sentiment is stamped in Lemon Lime Twist and is made up of two individual stamps then cut out with a coordinating die.  The inner ‘dots’ are stamped in Tranquil Tide.  This is also adhered with a dimensional.

Check back tomorrow for the final project (for the moment) in this series.

Eastern Palace – Part Five

By | May 19, 2017

Hi there

Are you ready for card number five?  This card was made for a special crafting friend who has a special birthday today.  We share the same name and our birthday’s are a week apart.  She is one the most talented crafters I know and I have always been in awe of her creations.  P1 – I hope you had a wonderful birthday celebrating with family and friends.

Here’s the card I made – my colours are Pool Party, Berry Bliss and Tranquil Tide.  I am loving the new In Colours this year – they’re nice and vibrant.

I love how the dies all coordinate together and the different looks you can get.  I’m so glad I bought this bundle.  This card was constructed in a similar way to the card I showed here.  The Layering Circles Framelits work in really well with the Medallion Thinlits to provide the background colour.

There are two other new products used on this card – the Berry Bliss Finely Woven Ribbon and a Berry Bliss Bitty Bow which is made out of felt.

Don’t forget you only have until 31st May to purchase the Starter Bundle and Premier Bundle – after 1 June these bundles will revert to individual products.  When you purchase the Starter Bundle you get a FREE packet of the new Very Vanilla Note Cards & Envelopes and with the Premier Bundle you get a FREE packet of Very Vanilla Envelopes and a packet of the new Thick Very Vanilla Cardstock.  So if you’re interested in purchasing either of these bundles please contact me before Wednesday 31 May.

Check back soon for some more creations with the Eastern Palace Suite.