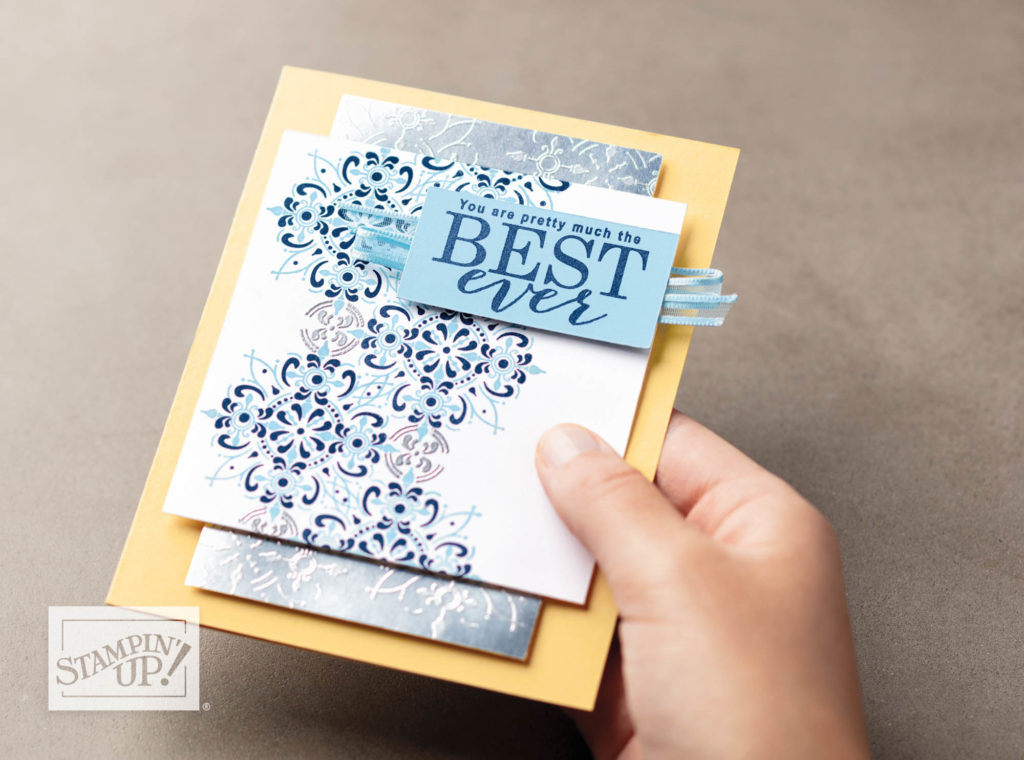
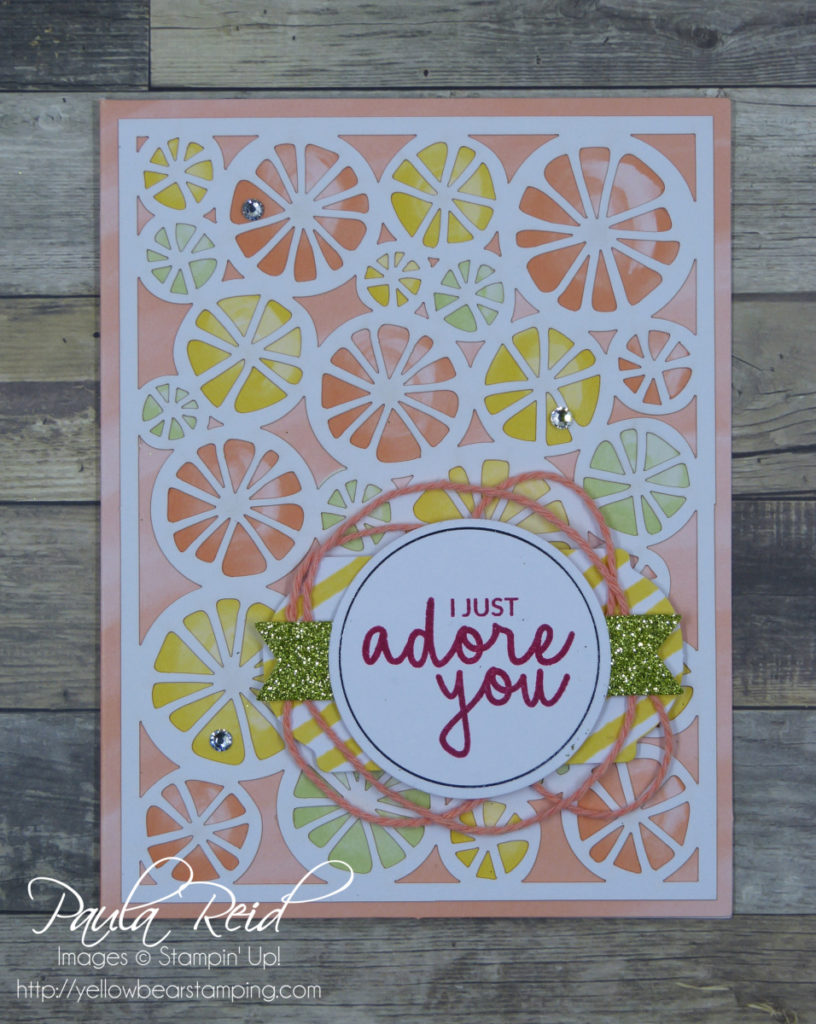
Stampin Up Storage System

By | April 5, 2019

Hi there

Somehow I managed to lock myself out of my blog!  but thanks to one of the IT guys at work I’m now back in and ready to share more projects with you :).

Earlier this week Stampin’ Up! released their new range of storage – how exciting is that.

This is a modular system which allows you to buy the components you need to build a storage system that suits your space and budget.  There a number of different shapes and sizes of storage that help you build your ultimate design – storage for the new style ink pads & markers, reinkers, Stampin Blends and an open cube for those miscellaneous items.  Check out the flyer and video below:

These storage units will feature in the upcoming 2019 Annual Catalogue but you don’t have to wait till June to get your hands on these you can order them now.  To place your order you can either order it via my online store or contact me directly.

If you have any questions about this storage system please drop me a line.

Until next time …

Incredible Like You Notecard & Envelope

By | March 25, 2019

Hi there

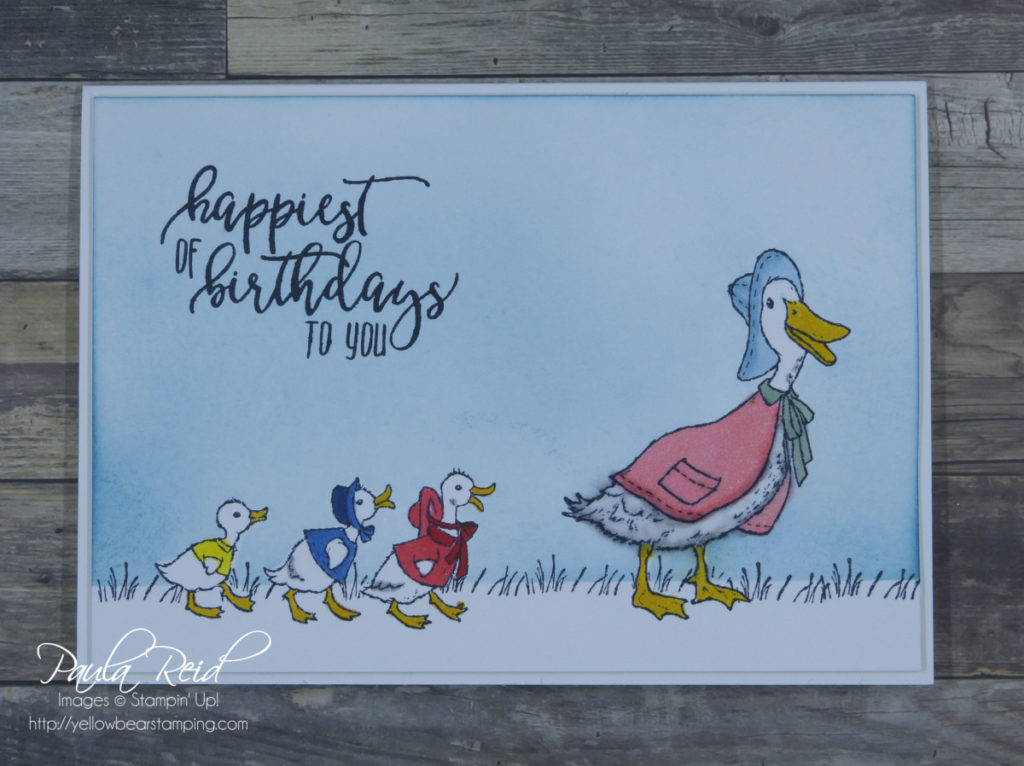
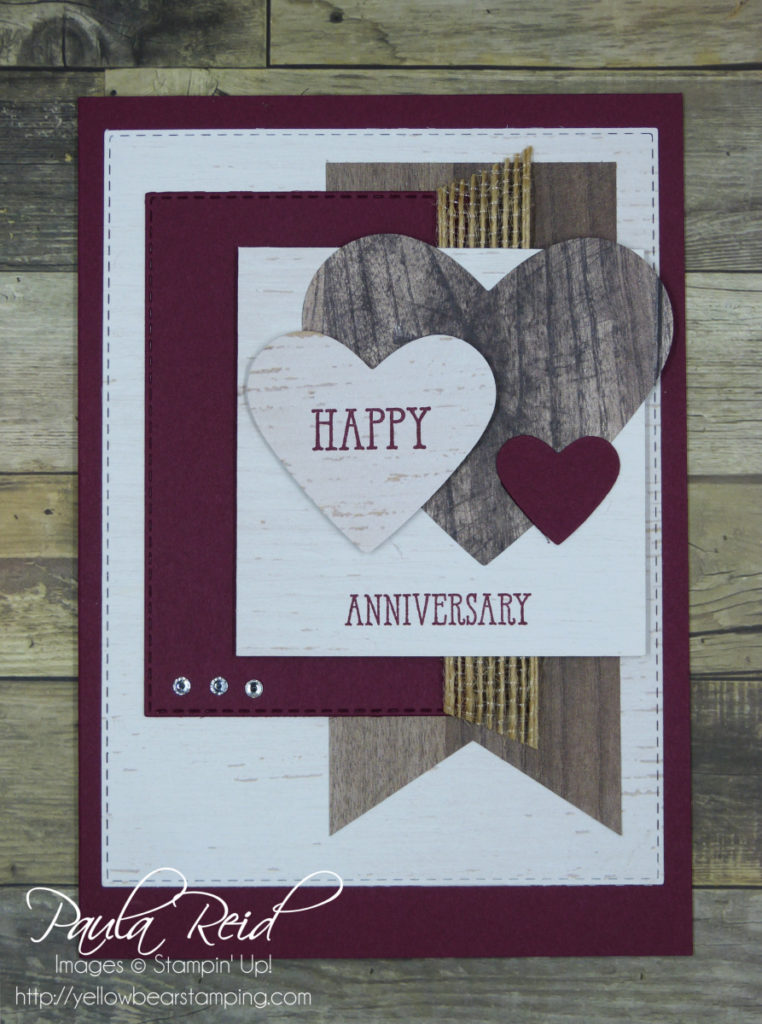
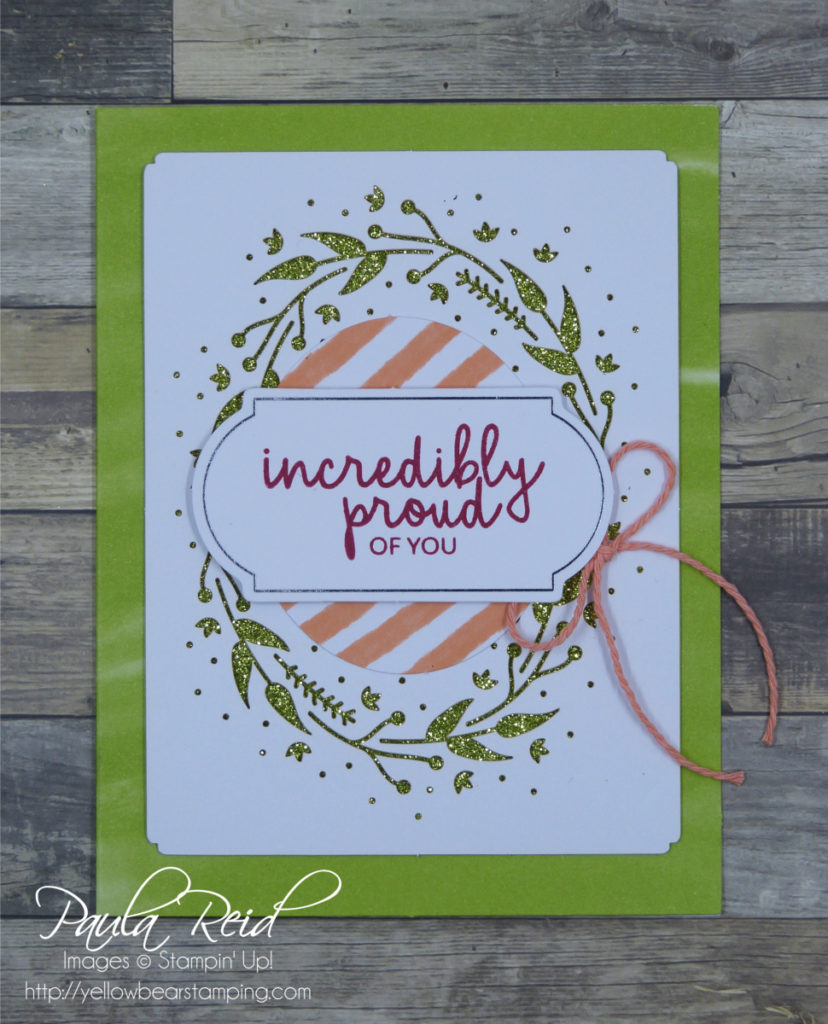
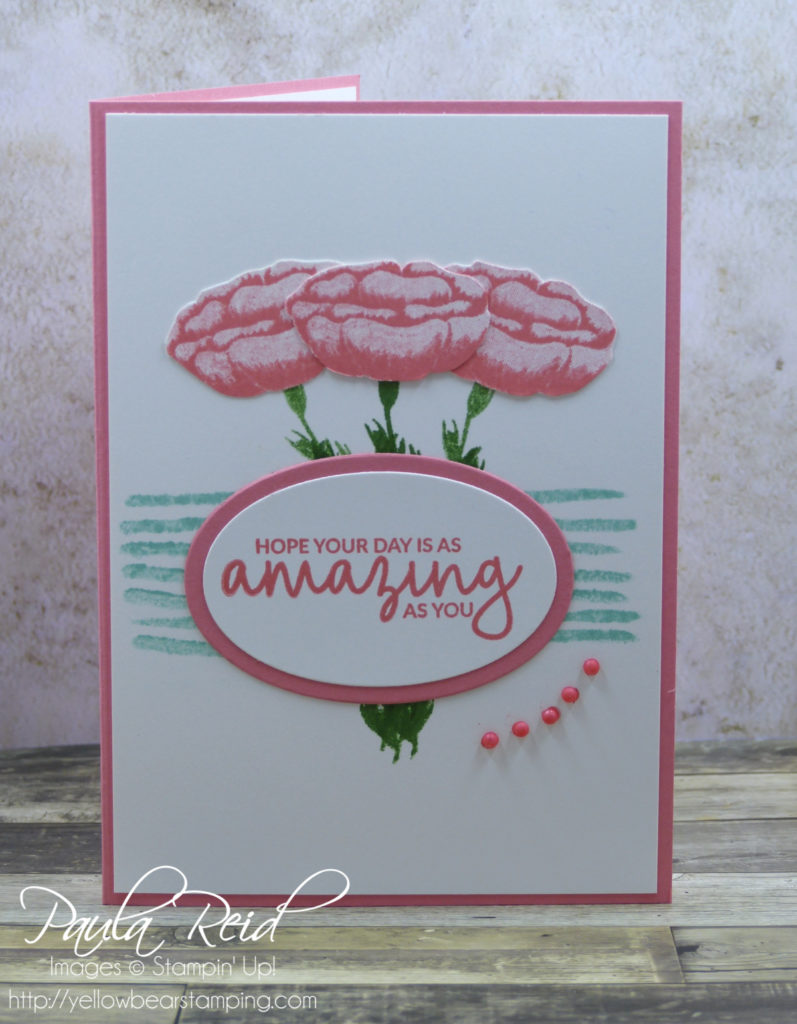
Yesterday I shared the first card from my recent workshop showcasing the Happiness Blooms Suite and today I’m going to share a card using the Incredible Like You stamp set (page 21 of the Occasions Catalogue).  This set coordinates with the Incredible Like You Project Kit.  You can see my samples from this kit here.

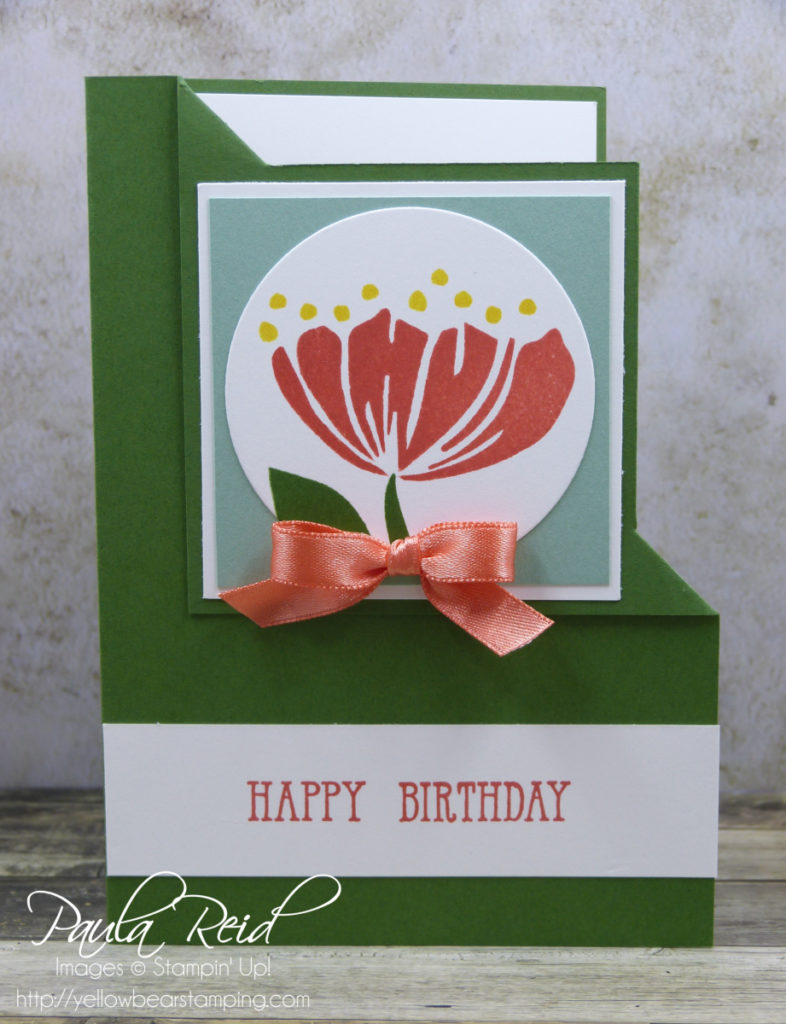
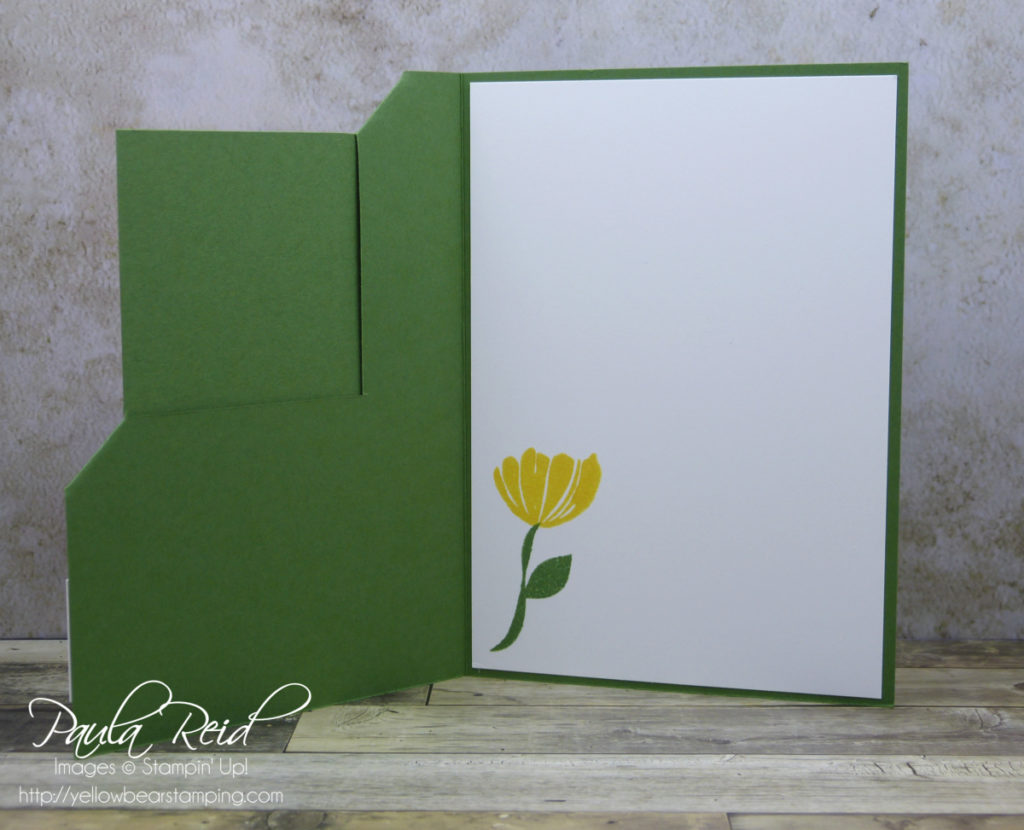
This is a two-step stamp which means the images are made up of two separate stamps.  I CASED my design from page 27 of the Occasion Catalogue.  Don’t forget to use the catalogues for your inspiration.

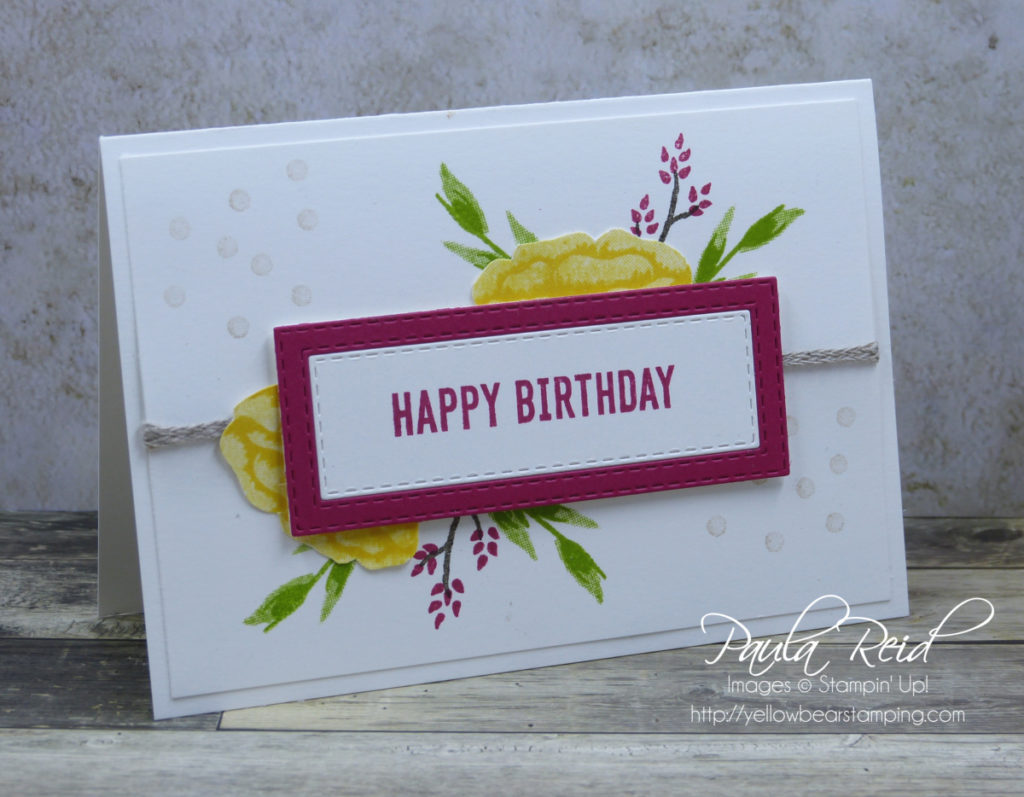
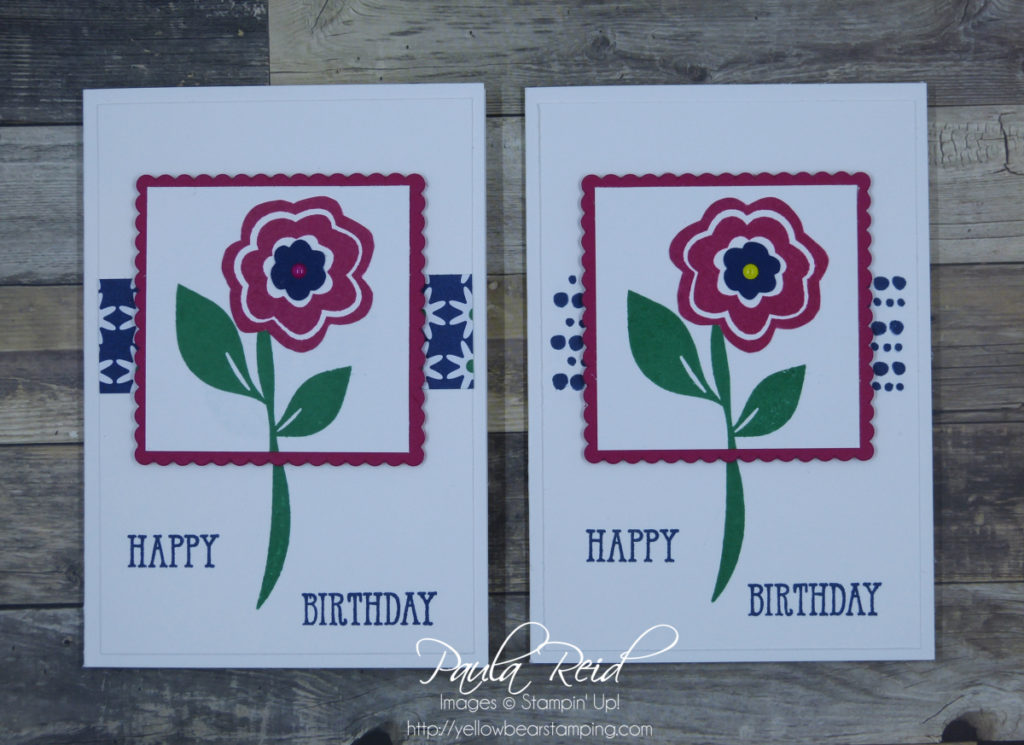
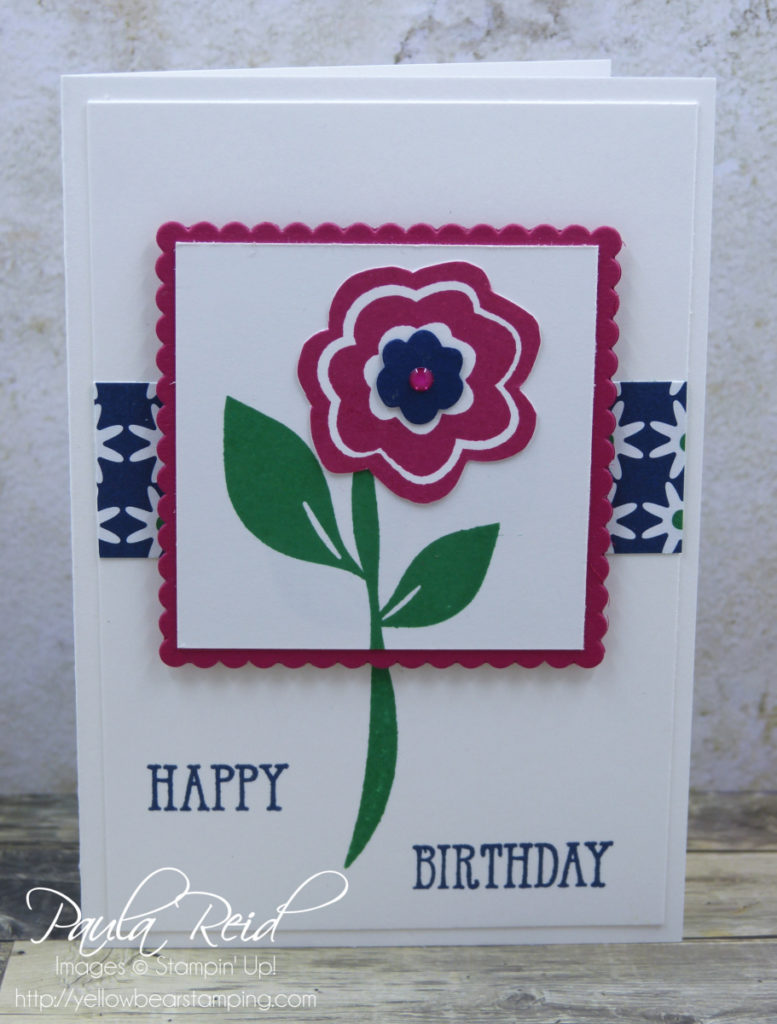
The card base is the same as yesterday’s card – 3 1/4″ x 4 3/4″.  The flowers have been stamped in Daffodil Delight on a scrap of Whisper White then fussy cut out.  The rest of the card is straight stamping onto the card base.  The ‘greenery’ has been stamped in Granny Apple Green, the flower stems in Early Espresso and the flowers in Lovely Lipstick.  The background ‘dots’ are stamped in Crumb Cake.

To create the framed sentiment nest two of the Stitched Rectangle dies on top of a piece of Lovely Lipstick and run it through the Big Shot.  This creates the frame.  Stamp the sentiment in Lovely Lipstick – this is one of the greetings from the Itty Bitty Birthday stamp set – on a piece of Whisper White and die cut with the smallest die used to create your frame.  I wanted to adhere my sentiment with dimensionals but as it was in two parts I cut out a piece of Whisper White (3cm x 8cm) for a base and adhered the two pieces to it before adhering to the card.

The Braided Line Thread (16cm) was attached at the back of the base and then the cut out flowers were positioned on top of the stamping and finally the sentiment was attached.

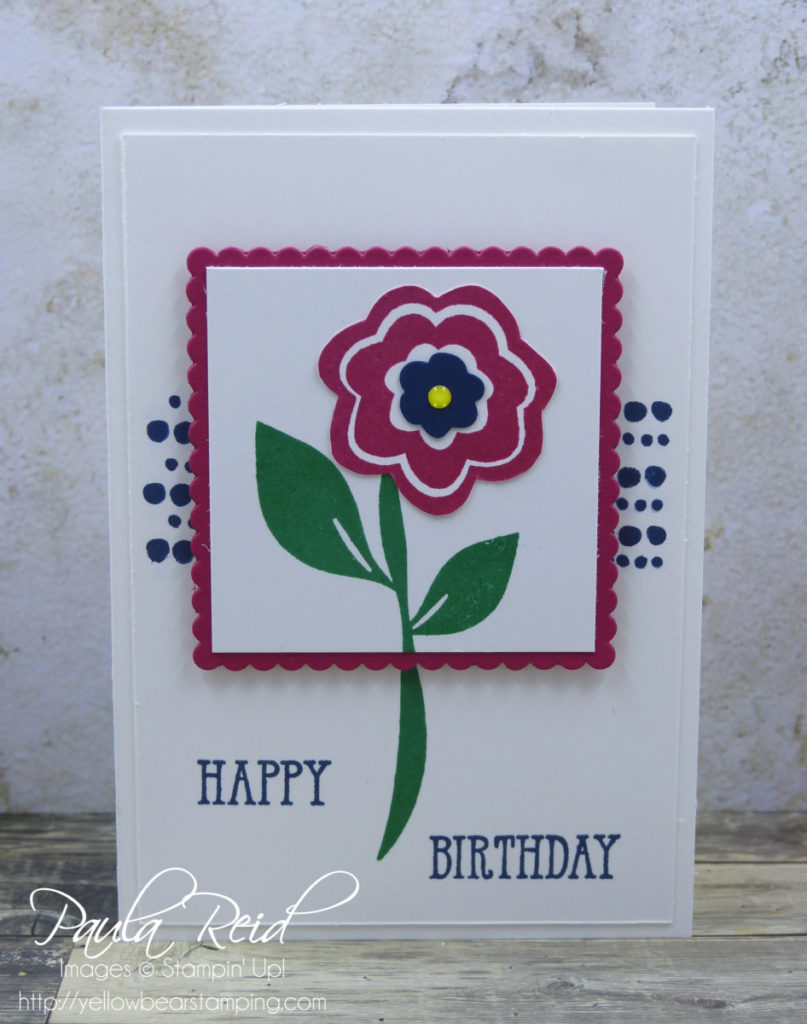
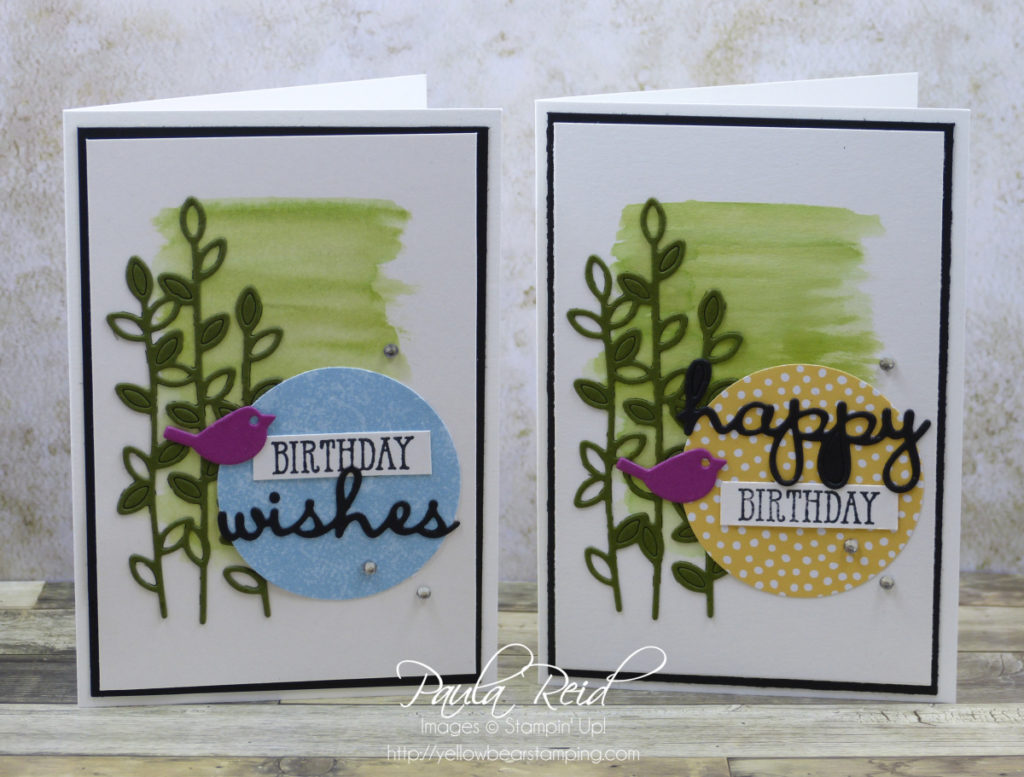
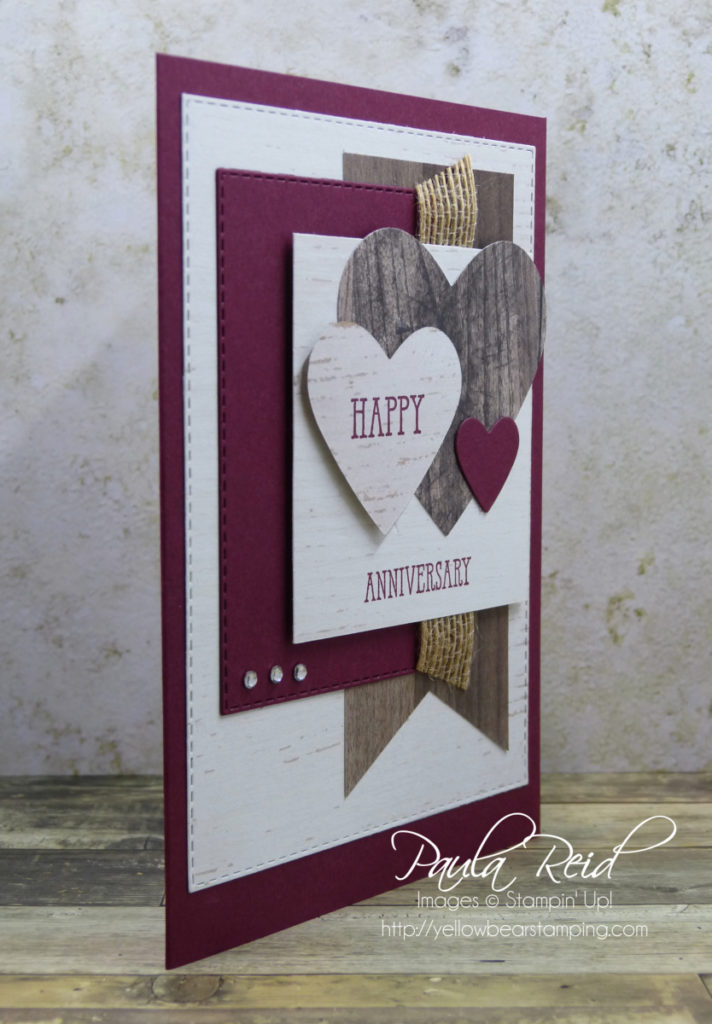
I like to have a couple of samples so everyone can see what they’re creating so I decided to make my second sample a full sized card to show how you can upsize (or downsize) a design to fit your desired card base.

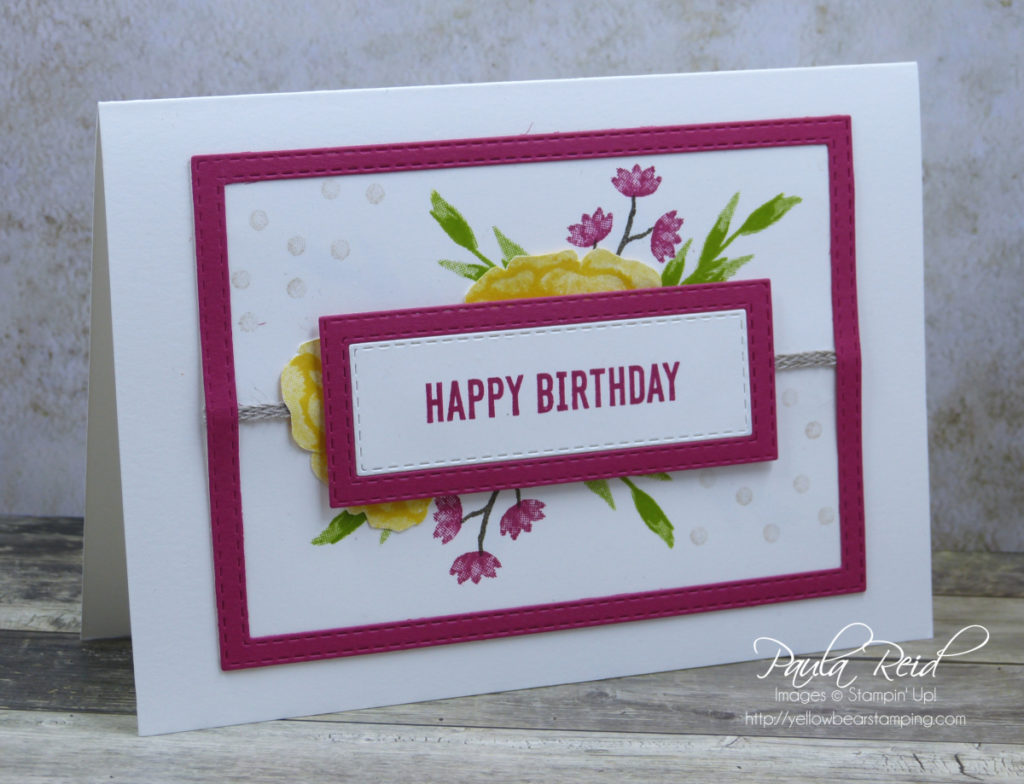
My additional frame was die cut using the second and third largest frames from the Stitched Rectangle Framelits.  I think these dies are now my favourite and most used dies.

I also changed the small flower stamp for this card so they could see the two options.

If you would like to order any of the products from these cards or anything else please let me know – I’ll be placing my final order for March tomorrow night.

Until next time …


Bloom by Bloom Notecards and Envelopes

By | March 24, 2019

Hi there

The Happiness Blooms Suite really appealed to me as soon as I saw it – it has so many components to it and there’s bound to be something for everyone to like.  I decided to use this suite for one of my workshop cards.  I made two samples – one using a strip of the Happiness Blooms DSP and one using the Bloom by Bloom stamp set.

The ladies were able to choose which option and some went with the stamp and put the DSP on the inside.

Option one uses a strip of  DSP measuring 1″ x 3 1/4″.  The card front measures 3 1/4″ x 4 3/4″.  The flower stem has been stamped in Call Me Clover with the sentiment coming from the Well Said set.  This is a great set to have and there are greeting combinations for any occasion.  This sentiment has been stamped in Night of Navy.  The Lovely Lipstick mat has been die cut with the third largest scallop square die and the stamped Whisper White square measures 2 1/4″ x 2 1/4″ .

Option two uses the ‘dots’ stamp (stamped in Night of Navy) and fits perfectly across the card base.  The flower was stamped in Lovely Lipstick on a scrap of Whisper White then ‘fussy cut’ out and adhered on top off the Call Me Clover stem.  This suite comes with the Bitty Blooms Punch Pack which has four different punches – we used one of the punches to create the flower centre from a scrap of Night of Navy.  Layer it all together and adhere with dimensionals to the card base.

The final touch  to the card is adding an Enamel Dot.  There are five colours to choose from – Pineapple Punch, Lovely Lipstick, Calypso Coral, Call Me Clover and Night of Navy.

Tomorrow I’ll share the second card we made which uses the Incredible Like You stamp set.

We’ve had a lovely weekend staying with Phil’s aunt & uncle who are over from the US.  It was a really relaxing time and great to get out of the city for the weekend.  All good things must come to an end – back to work tomorrow 🙂

Until next time …

Lovely Lipstick Foil Sheets

By | March 23, 2019

Hi there

They say ‘there are no mistakes’ in paper crafting – and it’s true.  I was creating a card using the Detailed Floral Thinlits as an overlay but when I stamped my sentiment something went wrong.  Rather than throw it away I decided with two cuts I could create something new 🙂

The Detailed Floral Thinlits dies come with two dies that don’t cut the edge and one that does.  By lining up the ‘edge’ die above the ones that don’t cut I created two separate pieces.  For my background I used some of the gorgeous foil that is one of the FREE items you can receive during Sale-A-Bration.  As a reminder you have until 31 March to place an order of NZD110 or more to receive a FREE Sale-A-Bration item.

I cut two pieces of Lovely Lipstick foil the width of my card overlay and then trimmed one end using the cutting die so that it would match up with the overlay.  I adhered these together with some Tombow and let it dry.

I used a full card front of Whisper White (10cm x 14.3cm) and placed my two ‘overlay’ pieces on so I knew where to stamp my sentiment.  Once the sentiment was in place (stamped with Lovely Lipstick and using one of my ‘go to’ sets – Beautiful Bouquet) I then adhered the overlay pieces to the Whisper White and mounted it on a Basic Black card base.

I think I much prefer this design with the detailed piece slightly raised than when it is all one piece – might not have been a mistake after all 🙂

I even remembered to photograph the inside of the card 🙂  This image is from the Floral Phrases stamp set – I love the shading of this stamp and the different colour depths you get from the one image.  This has been stamped in Lovely Lipstick.

Don’t forget you have until Sunday 31 March to place an order of NZD110 to qualify for a FREE Sale-A-Bration item.  You can place an order via my online store or directly with me.

Unitl next time …


Fable Friends – Happy Birthday Mum

By | March 20, 2019

Hi there

Growing up in suburban Auckland we had a number of pets including ducks.  My brother & I gave our parents nicknames and one of Mum’s was Jemima Puddleduck after the famous Beatrix Potter character.  After seeing a card created by a fellow demo using Fable Friends (will share my CASE of this card soon) I did a double look at this set and fell in love with it.  Needless to say I now own Fable Friends :).

Once I got the set I knew exactly what I would create for Mum’s birthday card.  This card has a few techniques to it – masking, sponging and then colouring.  For my colouring I’ve used our Stampin’ Blends.

The first step in creating this card is to stamp the duck images in Memento Ink onto the card (9.5cm x 13.8cm).  To create the mask I restamped the images on Post It notes and cut out them out (just inside the stamped line).  The ducklings were a bit fiddly but I got there.  Once cut I placed them on top of the stamped image then using a sponge and some Balmy Blue ink I sponged the background carefully going over the top of my Post It notes.  While the mask is covering the ducks I stamped the ‘grass’.  When you remove the Post It notes your images come to the front and really standout even though at this stage they are just line images.  I then stamped the sentiment – it’s best to stamp the sentiment first – you don’t want to have spent all that time colouring and then do a ‘boo boo’ with stamping the sentiment :).

The next thing is to choose your colours and get colouring.  I went with Flirty Flamingo for the coat, Mint Macaron for the bow, Balmy Blue for the hat, Daffodil Delight for the beak and feet.  For the body of the duck I coloured it with light Smoky Slate then used the Colour Lifter to remove some of the colour – it gives some definition to her ‘feathers’.

The ducklings represent me and my siblings – can you pick which one is ‘me’?  The colours used for the ducklings jackets are – Poppy Parade, Night of Navy and Pineapple Punch.

I used Thick Whisper White cardstock for the base and front layer.

Mum – Happy Birthday and I hope you have a lovely day celebrating.  We love you heaps xx

Until next time …

Well Said Bundle – Notecards

By | March 15, 2019

Hi there

The Well Said Bundle is one of my favourites from the Occasions Catalogue.  This bundle consists of the Well Said stamp set that contains 51 stamps (so there’s a word or phrase for all occasions) and the Well Written Framelits that contains 24 dies (14 words and 10 images).  Check out page 27 of the Occasions Catalogue to view all the options.

The below cards have been created using the Notecards and Envelopes – if you don’t have a pack of these add them to your next order – they’re such a useful size.

The watercolour wash has been applied with Pear Pizzazz ink and an Aqua Painter to Shimmery White Card stock.  The ‘greenery’ has been cut from Mossy Meadow card stock.  I applied this with the Fine Tip Glue pen which is great from thin cuts or you could use our Multi Purpose Adhesive sheets which you apply to the back of the card stock before you die cut the image.  The bird is one of the images from the Well Wriiten dies and has been cut in Berry Burst.  I will be sad to see this colour go at the end of May but I’m sure there will be other lovely In Colours to replace it.  Make sure you stock up on the 2017-2019 In Colours before they retire at the end of the current Annual Catalogue.

The coloured DSP is a 2″ circle and has been cut from Tranquil Tide DSP (left) and Daffodil Delight 6″ x 6″ DSP.  The sentiments have also been cut using the Well Written dies.

For a bit of difference I’ve left parts of the die cuts in.  After adhering the ‘greenery’ to the card base I then randomly adhered pieces into their cut out spaces.  I used the Fine Tip Glue for this.  I then repeated the process with the ‘happy’.

This bundle allows you to create your own greeting and with so many combinations to choose from you won’t be short on options.  I’m hoping the stamp set and dies carry over to the next Annual Catalogue which will be released at the beginning of June.

If you would like to order any of the products used in these cards you can order them directly on line via my online store or contact me directly.  If you order between now and 31 March and your order comes to NZD110 you will be able to choose a FREE product from the Sale-A-Bration brochure.  If your order comes to NZD220 you can order two FREE items (with the orange icon) or one FREE item (with a green icon).

Until next time …


Lasting Lily – Sympathy Cards

By | March 11, 2019

Hi there

I find it hard to create a sympathy card – deciding on the stamp set to use and then what words to write inside.  At last years OnStage in November we got a sneak peak at the Sale-A-Bration brochure and one set that jumped out was the Lasting Lily set.  This set is a ‘distinktive’ stamp – read right to the end of my post to find out more about this new style of stamp.  Here are two samples I’ve made using this lovely set:

This first card is a full sized card – the base is Thick Whisper White and the mat is Highland Heather.  I’m not normally a ‘purple’ girl but since this colour got added to the colour family I’ve really enjoyed using it.  Yellow will still be my favourite colour :).  The stems of the flowers are Granny Apple Green and compliment the Highland Heather.

I’ve used a piece of the new Whisper White 5/8″ Flax Ribbon behind the stamped sentiment.  This ribbon can be left whole or as I’ve done here separate out the threads.  I did leave the bit behind the sentiment whole for ease of adhering.

As you can tell I love my new Rectangle Stitched Framelits 🙂

For my second card I used one of our Notecards & Envelopes – these are a perfect size and already come pre-scored so it doesn’t take long to create a card.  This time I only used one flower as the card area is smaller.  The stem for this flower is just a stem and then there is a second stamp which stamps the leaf on the right.  I really wanted another leaf to the left so I turned the stamp around 90 degrees and used the lower part of the leaf stamp – it worked a treat.  The sentiment is stamped directly onto the image in Memento Black.

As mentioned at the beginning of this post the Lasting Lily set is a ‘Distinktive’ stamp set.  ‘Distinktive’ stamp sets are a new patent-pending range of stamps.  The stamps made with this ‘distinktive’ process lay down the ink at different opacities giving the finished image more depth.

Here’s a quick video from Stampin’ Up! showing you how to use these stamps and also gives some handy tips.

At the beginning of this month Stampin’ Up! bought out a limited time release of dies that coordinate with some of the Sale-A-Bration stamp sets – well Lasting Lily is one of those sets so between now and 31 March you can purchase the coordinating framelit dies for this stamp set.  I’m hoping to have time this week to create something with my set – so watch this space.   Check out my post here for more details.  If you’re interested in placing an order let me know or you can order online via my online store.

Well that’s it for now.  Until next time …

Sale-A-Bration Coordinating Products PLUS a Third Release

By | March 2, 2019

Hi there

WOW – Stampin’ Up! have definitely pulled out all the stops for this years Sale-A-Bration.  They have now released some new coordinating products which you can purchase – framelits dies to coordinate with the Hello Cupcake, So Hoppy Together, Lasting Lily and the Painted Seasons stamp sets. plus a new stamp set (More Than Words) and a punch (Story Label) that are part of this offering.  These products can be purchased between now and 31 March.  Click on the image below to view the flyer.

PLUS there is now a THIRD release of Sale-A-Bration FREE products for orders placed over NZD110 between now and 31 March – the majority of these are products from the Annual Catalogue.  Check out the latest new products on offer by clicking the image below.

Both of these new product offers will also be on my Catalogues page along with the first and second release brochures.

So, if you are tempted to purchase or gain these rewards you can place an order online via my online store or you can contact me directly via email or phone.

Until next time …

60th Wedding Anniversary

By | February 25, 2019

Hi there

Wedding Anniversaries are to be celebrated and on the 14th February my parents celebrated their 60th wedding anniversary.  Congratulations Mum & Dad on this amazing milestone – the love you have for each other shows through everyday.

This is the card that I made them.  I CASED (copy and share everything) it from Audrey DaCruz who had CASED it from another demo Mary Fish.  I changed mine a bit as I didn’t have any current ‘heart’ framelits.

A 60th wedding anniversary is ‘diamond’ but the only ‘diamonds’ on here are the three Rhinestones – each one representing 20 years :).

I don’t normally do cards with lots of layers but I loved how the original card looked so went with the same layout/design.

A couple of the layers have been cut using the fantastic Rectangle Stitched Framelits – if you haven’t ordered these yet you NEED to :).  I have used them so much and there is so much you can do with them – make them into squares, create extra sizes with an additional run through the Big Shot.  The bottom piece of DSP was cut using the largest die, the banner measures 5cm wide and the end was shaped using the Banner Triple Punch (another must have tool).  The Merry Merlot cardstock was cut using the 4th smallest die and the DSP square in the middle measures 7cm x 7cm.  The hearts were die cut with the retired Hearts Framelits (the original design used the new Be Mine Stitched Framelits from page 6 of the Occasions Catalogue).

The sentiment is from the Well Said stamp set – also in the Occasions Catalogue – and stamped in Merry Merlot.  The DSP square and stamped heart have been adhered with dimesionals to give the card some height even though there are lots of layers.

Thank you Mum and Dad for giving us and so many others a wonderful example of marriage.  Later this week we are all heading to Cirque du Soleil to celebrate.

Until next time …

Sale-A-Bration 2nd Release Products

By | February 17, 2019

Hi there

02.01.19_HEADER_SAB_2ND_PREORDER_UKSP

We now have a second release of Sale-A-Bration products for you to choose from.  There are two new items available for orders of NZD110 – the ‘All Adorned’ stamp set and the ‘Country Floral Dynamic Textured Impressions Embossing Folder’.  Below are some samples using these products plus a quick video:


For orders over NZD220 we have the Painted Seasons bundle which consists of the Painted Season stamp set and the Painted Season Designer Series Paper

Here are some samples using this bundle

Check out the Catalogues page to view the 2nd Release brochure

These new releases are available until 31 March.

Until next time …

Bloom by Bloom – Corner Flip Card – Team Swap

By | February 10, 2019

Hi there

Yesterday I shared my Bloom by Bloom Fold Over card where the front image gets partially cut out with the circle die.  Rather than throw this piece out I decided to use it for the second swap group I was in.  After a bit of playing around with different options I chose the Corner Flip Card for my design.

With two simple cuts of the paper trimmer and a flip (times 20) my bases were ready for the assembly line again.  The measurements for the Whisper White square is 7cm x 7cm and the Mint Macaron is 6.5cm x 6.5cm so you can get 12 of each of these per sheet of A4.  The sentiment is from the Well Said  set on page 27.  This stamp set has 51 words and phrases and has been my ‘go to’ for a number of cards so far this year.  I’m hoping it will carry over to the 2019-2020 Annual Catalogue – fingers crossed.  There are sentiments for all occasions in this set and it coordinates with the Well Written Framelits Dies.  The Well Said and Well Written are also available as a bundle till 3 June 2019 which means you save 10% on the total cost.

The Stamparatus has got to be up there with the Big Shot as one of my ‘must have’ tools.  I used it so much on these two cards.  Even if I was only going to be creating one or two of this design I still would have used it rather than just stamping ‘free hand’.  One of the biggest benefits of using the Stamparatus is that if your image doesn’t come out as clear or well inked as you wanted you can confidently restamp your image knowing it will stamp in exactly the same place.  As I was needing to stamp 20 of the sentiment once I has it lined up I knew that each strip would be identical and evenly spaced.  It made stamping so much quicker.  The bows for this card were also tied on the train on the way to work 🙂  A great use of time when you don’t have to worry about driving.

I also used the Stamparatus to stamp this flower image on the inside of the card – instead of using Calypso Coral I went with my favourite colour – yellow – for the flower head.  I ended up using Daffodil Delight as the other shades of yellow just didn’t look right.

I hope these two cards have inspired you to have another look at the Bloom by Bloom set – there’s something for everyone in the Happiness Blooms Suite.

Don’t forget we have our Sale-A-Bration offer on till 31 March – for every NZD110 you spend between now and 31 March you get to choose a FREE product.  There will be a second release of FREE products coming out at the end of this week so keep an eye out for more details.  There is no better time to join the Stampin’ Up! team than during Sale-A-Bration.  You pay NZD189 for your Starter Kit and receive NZD375 worth of product and for an additional NZD51 you can purchase the amazing Craft & Carry Tote worth NZD105.  For more information on these amazing offers check out my Promotions page or contact me directly.  I would love to have you join my team.

Until then …

Bloom by Bloom – Fold Over Card – Team Swap

By | February 9, 2019

Hi there

There are so many wonderful stamp sets in the current Occasions Catalogue to choose from but one of my favourites is the Bloom by Bloom stamp set.  This set is part of the Happiness Blooms Suite (page 24-26).

Each time a new catalogue is released we have a team swap – this is where you make say 20 of the same design and then swap with fellow demonstrators to receive the card they made.  You then end up with 20 different designs.  For my first swap I used the Bloom by Bloom stamp set on one of my favourite styles of cards – I call it a ‘fold over’ card.  It’s easy to create and rather effective – I love the colour bands down the side.

I often find that when a stamp set is part of a suite that includes DSP I tend too only use the colours of the DSP for that set which is quite limiting.  So I decided my first creation with this set would use a different colour combo than what is in the suite.

The deciding factor for this colour combo was that I found I had a few packs of Garden Green cardstock so I then went on a search to find complimenting colours and came up with Calypso Coral and Granny Apple Green.  Check out my post here that has another card made in this style plus measurements so you can recreate this style of card yourself.

As I needed to stamp the image 40 times (inside and out) I set up my Stamparatus and started my production line.  After getting the placement correct (took a few attempts) I was away and they were done in no time at all.  I used Thick Whisper White for the stamping as this gives the card more weight than normal Whisper White.  With the stamping complete next up is a Big Shot workout on my arm with cutting the circle out of the front (don’t throw this away as I have a second swap to share tomorrow that uses that) and creating the surround.  Then it’s a matter of layering to assemble the card.

I was running out of time to get my cards made so while on the train into work in the mornings I sat there and tied 20 bows 🙂  I’ve used the 3/8″ Calypso Coral Satin Ribbon which is part of the suite – it’s gorgeous and makes beautiful bows.

Check out my post here that has another Fold Over card made in this style plus measurements so you can recreate this style of card yourself.  I hope you’ll give the Bloom by Bloom stamp set a go either in the colours of the suite or of your own choosing.

Check back tomorrow for my second swap that uses the circle cut out – nothing going to waste.

Until then …

Incredible Like You Project Kit

By | January 31, 2019

Hi there

In my last post I shared a card that used the Incredible Like You stamp set from page 21 of the Occasions Catalogue.  This stamp coordinates with the Incredible Like You Project Kit.  I’ve made up a few of our kits and I think this is my favourite kit of all.  You get to make 16 cards – 4 each of 4 designs.

Each card has a delicate laser-cut overlay that lets the colour of the pre-printed card peek through.  The kit contains card bases, matching envelopes and all the embellishments needed to create these beautiful cards – all you need to add is the stamp set and some inks (or we could get together and I’ll provide the inks and stamp set).  You can store or gift your cards in the reuseable storage envelope that comes with the kit.  Here’s a closer look at the cards:

I think this is my favourite sentiment from the stamp set – I’ve used it heaps already and we’re only at the end of month one of the catalogue.

This is a really pretty layout – you could easily change the sentiment and this card could be used for any occasion.  The ink colours used for these cards are Coastal Cabana and Lovely Lipstick.

These cards are quick and easy to assemble and by the end of it you have 16 beautiful cards ready to give away.

Now there’s a bit of a trick with this card.  Before you adhere the overlay make sure you have it in the right orientation so that it covers the printed pattern correctly.

Stampin’ Up! have prepared a video on this kit – check it out below.

This kit would be great for types of crafters – beginners right up to avid.  You can follow the instructions or add you own personal flair to each design/card.  If you like this kit and would like to get a group of friends together one afternoon I’d be happy to come and bring the inks and stamp set and help you assemble the kit.  If you interested in this please contact me.

I’m now going to make up the rest of this kit and I might just add my own personal touch to the cards.

Until next time …

Incredible Like You – Flirty Flamingo birthday

By | January 27, 2019

Hi there

It’s a long weekend here in Auckland – it’s our city (region) anniversary day – and that means an extra day off work.  I love these short weeks but you always end up cramming 5 days work into 4.

At OnStage in November all attendees were given the lovely stamp set Incredible Like You.  It coordinates with the Incredible Like You Project Kit on page 21.  It’s a lovely kit and I have made up some samples which I’ll share with you later this week.  For today’s post I used the stamp set on its own to create a birthday card for a fellow demo whose birthday falls on Christmas Day.  This set consists of images and sentiments so you can create cards using the one set.

The stamps are Photopolymer which helps as it’s a two step set (try saying that quickly).  Two step stamping is when you use two (or more) coordinating stamps to create a complete image.  For this image we have a solid background stamp and then the other is the detail.  The background stamp was inked with Flirty Flamingo and then stamped off once on scrap paper before stamping on Whisper White cardstock.  The detailed stamp was inked in full strength Flirty Flamingo and then stamped on top off the background stamp to create the full image of the flower.  I repeated this process another two times and then ‘fussy cut’ my flowers.

The horizontal lines are stamped in Coastal Cabana.  The stamp only has five lines but I wanted more so I stamped it once then created a mask and covered my stamped image and then restamped another two lines.  The stems of the flowers are stamped in Garden Green.  Garden Green is often an ‘unloved’ colour but I’ve been using it a bit lately.

Did you notice my Flirty Flamingo pearls?  These are our basic pearls which have been coloured with the Flirty Flamingo Stampin’ Blends.

Well that’s all from me.  Until next time …

Musical creation – Happy Birthday Seb

By | January 22, 2019

Hi there

Last week our friends eldest son turned the ripe old age of 13.  I must admit I struggle with masculine cards at the best of times – but what do you create for a 13 year old?  Thankfully Seb is really into his music – he’s got amazing talent and has been playing drums since he was little and has now added the guitar.  I had seen ‘guitar’ cards so thought I’d give one a go.

I found a template on Splitcoast Stampers and then started my creation.  The Wood Textures DSP gives the perfect effect for the guitar.  I used copper foil instead of gold as the gold looked a bit ‘brassy’.  The ‘strings’ were a bit fiddly – I used my paper piercer to make six holes in the strip of Basic Black cardstock then threaded the Copper Metallic thread through and then secured it on the back of the guitar.  To cover up the front I used some retired White Candy Dots.

The guitar is raised with mini dimensionals off the Basic Black card base.  The box is filled with Whittakers Chocolates (of course).

I didn’t want to spoil the front with a stamped sentiment so I die cut the ‘happy birthday’ from Basic Black using the new Well Written Framelits – I have used these dies so much since I got them.

The card was a huge success – he even tried strumming the strings 🙂

Well that’s all from me tonight.  Until next time …