Year-End Closeout

By | December 5, 2018

IT’S YOUR LAST CHANCE TO SHOW 2018 SOME LOVE!

The Year-End Closeout is our chance to do a little inventory cleaning—and your opportunity to take advantage of special year-end deals on retiring and surplus items. Remember: Some items are last-chance and limited-inventory, so place your order while supplies last!

Check out the retiring and surplus items by downloading the list of products here

Remember retiring items in the holiday catalogue will not be available after 2 January so be in quick to secure the items still on your wishlist.

Box in a Card

By | December 4, 2018

Hi there

We had a ‘fun’ morning here in Auckland –  a storm passed through with amazing thunder, lightning and rain.  I was glad I’d already reached the office before the heavens opened.  And what a transformation by the evening – sunny and warm.  Now that’s Auckland weather for you.

Today’s post is a project I’ve wanted to make for ages.  It’s called a Box in a Card because that is what it is.  You make a box and then put it into a card base.

The original design I saw got you to cut the ‘hole’ in the card base with your paper trimmer but I have found an easier way to do this using the Layering Square Framelits.  I used the 6th largest Square die to cut through both layers of the base and it worked a treat.

For the insert I did the same thing but used the 7th largest die.  To make sure I had the correct positioning I placed the insert on the back of the card base and made pencil marks where the ‘hole’ was.  I then placed the die on the outside of the pencil marks and ran the insert through the Big Shot – you get a nice mat of the card base showing through.

The measurements (mix of inches and centimetres) for my box are:

Lid – 9.5cm x 9.5cm card stock, scored at 2cm on all sides

Base – 6″ x 6″  DSP, scored at 5cm on all sides

I’ve used the Festive Farmhouse Suite for these cards – Festive Farmhouse DSP, Elements and Twine and coordinated it with the Takeout Treats Bundle – stamp set and dies.  The card base and box lid are Cherry Cobbler.

This would be a great card/gift holder to give at any time of the year – just change your DSP and sentiment to suit the occasion.

Unitl next time …

Tags & Tidings Bundle

By | December 2, 2018

Hi there

I had hoped to post these project on Friday night but my computer decided to pack a sad on me – thankfully my nephew was able to fix it for me – so better late than never.

Today’s post features the Tags & Tidings Bundle (page 24) from the Holiday Catalogue.  This bundle is a single stamp that includes 16 images and a coordinating die that cuts out all the images with one go – super quick and fast to create tags for your Christmas gifts.  You can also use this stamp for a card as I have below:

I stamped the image with VersaMark then heat embossed it with Copper Powder on a piece of Whisper White (10cm x 14.3cm).  I then repeated the above except this time I ran it through the Big Shot with the coordinating thinlits die to create the individual tags.  Using a variety of Stampin’ Blends I coloured in the images (both the sheet and the individual tags).  I chose five ‘tags’ to adhere to the base and did this using dimesionals so they were raised.  This card was my swap for a team training – I think I made 20 of these 🙂

Here’s a quick tip for making sure your stamp set fits perfectly in the thinlit die so when you cut your images match the outline.  I found that placing the die (cutting side up) on my desk then placing the stamp ‘face’ down inside the thinlit meant I could make sure the stamp was aligned correctly.  I then put the large clear block on the stamp and stamped away – perfect cutting every time.

I also created individual tags – with one ‘wind through’ of the Big Shot you can create 16 tags.  Here are some of my creations – plain and altered.

Some of these I’ve left ‘as is’ and others I’ve added a simple mat.

For these tags I’ve paired the Tags & Tidings bundle with products from the Festive Farmhouse Suite on page 13.  I’ve used three addition background punches – Pretty Label, Everyday Label and the Tailored Tag along with a few Circle punches.  I also added a plain Whisper White or Very Vanilla card stock backing to these tags to allow somewhere to write the ‘To: and From:’

These tags I used a combination of the Scalloped Tag Topper and Banner Triple punches – two of my most used punches.

If you would like to purchase this bundle (or anything else from the Annual or Holiday Catalogue) I will be placing an order next week so let me know by Tuesday 8pm.  This will guarantee arrival before Christmas.

Until next time …

So Santa – scooting by

By | November 26, 2018

Hi there

Well I can now breathe – I have just completed 81 altered notebooks for staff Christmas gifts.  I’ll try and take some photos of them later this week to share with you.

Tonight’s project features two stamp sets from the Holiday Catalogue – the fun So Santa set and the very versatile Buffalo Check.

This is my first project using the Buffalo Check but I’m sure it will be used more now that it’s been inked.  The Buffalo Check is a big stamp and you can use it with the big clear block or your Stamparatus.  I went with the Stamparatus and am glad I did as I needed to restamp my image a couple of times to get the strong colour I wanted.  By using the Stamparatus over the clear block each time I restamped the image it was perfectly placed on my cardstock.  It also so helps to have a nicely inked ink pad so I reinked it before stamping.  This helps to get good coverage of your stamp.  The card base is Call Me Clover and the Buffalo Check is stamped in Real Red.

The Santa image is stamped in Memento Black and then coloured in using a variety of Stampin’ Blends.  The square is cut using the Layering Square Framelits but you could cut these manually if you didn’t own a Big Shot.  If you take a close look at Santa’s beard and the ‘fur on his hat and suit you will see that it has a slightly raised glossy look.  I used the Fine Tip Glue pen on the white areas once I’d done my colouring in to get this effect.

Being in the Southern Hemisphere and having Christmas in the summer this stamp set is great as it doesn’t feature snow 🙂

Well that’s it from me for now.  Until next time …

Online Extravaganza Sale

By | November 22, 2018

Hi there

We have an exciting promotion starting tomorrow Friday 23 November – it’s the Online Extravaganza sale.  Online Extravaganza will run for six days – 23 November till 28 November.  During this time, we’ll be throwing three, 48-hour sales featuring a selection of products from the 2018–2019 annual catalogue—all at 10% off!   Each 48-hour sale will feature two product categories (e.g., paper, stamps, ink, etc.).  When one sale ends, the next sale begins; this cycle will continue until Online Extravaganza is over.  By the end, nearly every item from the annual catalogue will have been on sale!

If you would like to see the full selection of discounted items during each 48-hour sale, please visit my online store from Friday 23rd.  Each sale will be given its own category, which will contain all available discounted items for that particular 48-hour sale.  After that, the only thing left to do is shop!

Happy shopping


So Santa – Fold Over Card

By | November 21, 2018

Hi there

I hope you’ve kept warm and dry over the past few days – summer is meant to be around the corner but it feels like winter has come back.  The positive is we haven’t had to water the garden :).

Talking of summer – down here in the South Pacific it’s summer when we celebrate Christmas so for me seeing cards of snow and open fires just doesn’t seem right.  It’s great that Stampin’ Up! provide applicable holiday stamps for the various regions. One such stamp that is available in the current Holiday Catalogue is the So Santa set.  It consists of three fun line art images and coordinating sentiments.

I couldn’t decide which image to use so created three cards.  This is a fold I used for a card back in April 2015 based on a creation by Dawn Olchefske.

I’ve used Shaded Spruce, Real Red and Thick Whisper White cardstock for my cards.  The ribbon is the Real Red Mixed Satin Ribbon from the Holiday Catalogue.  I used different dies to create the circle surround – here I’ve used the Stitched Shapes Die and then cut a circle from the centre.  I was actually able to ‘nest’ the two dies together and die cut in one go.  Santa has been coloured in with our Stampin’ Blends.  Santa’s skin has been coloured in using the Ivory blend and then I used a variety of colours for the rest of the image.

For this card I used two circle dies to create my surround.  I cut the circle from the Whisper White first then made some little pencil marks on the inside so I knew where to stamp my image so that he would show through the hole.  The image and sentiment are stamped in Memento Black.  As there is no white Stampin’ Blend I applied our Fine Tip Glue to his beard, moustache, hair and fur on his suit.  This just gives the image a bit of a 3D look.

For the last card I used the Scallop Circle and an ordinary circle for the surround.  The Shaded Spruce cardstock measures 10.5cm x 14.2cm, the Real Red measures 9.5cm x 14.5cm and the Thick Whisper White measures 8.5cm x 29.7cm (folded in half).  Adhere the two coloured pieces of cardstock together then add the Whisper White making sure they are all lined up at the bottom.  I used Thick Whisper White so that the card will stand up on it’s own and is stronger than just ordinary Whisper White.

And here’s what it looks like side on.  You could use any colour combination for this card and you could also make the aperture any shape – I might give this a go with an oval.

These cards were fun to create.

Until next time …

Lovely as a Tree Christmas Card

By | November 19, 2018

Hi there

I had a very productive weekend – I’ve been making the work Christmas gifts.  So far I’ve made 45 so only about 35 to go :).

With Christmas only 5 weeks away I thought I’d share some Christmas projects with you this week.  I hope they inspire you to get creative.  First up is a card using a good old favourite set ‘Lovely as a Tree’.  This is probably one of the most versatile sets I have.  I think it was one of the first stamp sets I purchased when I got into stamping and the images have been used for multiple occasions.

I CASED this card created by Niki which I saw on Pinterest.  I was wanting to use the Festive Farmhouse Elements along with the coordinating DSP.  These embellishments come in a pack of 32 and contain the words ‘merry’, ‘joy’ and ‘noel’ along with some little stars and trees.  They are wood elements with a light
grey finish.  You can give them a light sand for a distressed appearance or as I’ve done here coat them with the Shimmer Paint – I’ve used Copper.  To apply the Shimmer Paint I used the end of a cotton bud and then let it dry before adhering to my card with Tombow Glue.

I punched the top of the banner with the Scallop Tag Topper before I stamped the tree image in Mossy Meadow and then trimmed the bottom to the required height.  I felt my tree was looking a bit bare so I used the end of the cotton bud (which was still damp) to dab a bit of the copper onto my tree.

The card mat of Cherry Cobbler has been dry embossed with the Pinewood Planks Embossing Folder.  The Festive Farmhouse DSP banner was cut at 5cm wide and then I punched the bottom with the Triple Banner punch and trimmed it down to the desired size.

The last touch for this card is the ribbon.  I fell in love with the Merry Merlot & Copper Ribbon which is part of the Joyous Noel Suite and couldn’t resist using it for this project.  The ribbon is tied together with the Festive Farmhouse Cotton Twine.  I LOVE this – it’s so soft and can be tied as is or teased out as I’ve done here.

Well that’s all from me for now.  Until next time …

Animal Outings Birthday Card and Box

By | November 15, 2018

Hi there

Last month our neighbours youngest turned 6.  I don’t have many suitable stamps for this age so turned to a ‘go to’ favourite to make a fun card – Animal Outings.  I CASED the design from another demo – Amanda Mertz – thanks Amanda.

This set has four line art images and five sentiments that can be mixed and matched with the images.  Colouring in is very relaxing and for this project I used our Stampin’ Blends.  They are so lovely to use and the colour just glides on.  If you haven’t had a play with these and would like to before you buy some give me a call and we could make this card or one similar for you to try them out.  There is an ever growing range of colours available.

Here you can see three of the images – check right to the bottom of this post to see the fourth image.  The birthday sentiment is actually from my most used set – Picture Perfect Birthday.

The images were stamped on Whisper White with the Memento Black ink.  I had die cut three squares using the 2nd smallest Stitched Shapes Framelits Dies but you could just cut out the squares with your trimmer.  The Giraffe is coloured in using the Light Crumb Cake and Light Cajun Craze Blends.  The branch is coloured in using Light Soft Suede and Light Old Olive.  The card base is Crumb Cake with the mat for the DSP being Cajun Craze.  The DSP is from the coordinating Animal Expedition papers.

And here’s the fourth image – very Australian but cute anyway :).  I was running behind in making a box so went with the Bakers Box Die (which is actually retired).  It’s a great size and holds Whittakers Mini Slabs – yum.

Well I’m off to try and make more of the work Christmas gifts – I’ve made 12 so far with only another 60+ to go.  What was I thinking!

Until then …

Snowflake Showcase

By | November 13, 2018

Hi there

It may not be snowing here in New Zealand but somewhere in the world it is so here are some products that are on offer this month that showcase Snowflakes.

This promotion is on offer for the month of November and consists of two stamp sets, some coordinating dies, embellishments and specialty paper.

Here are some samples that have been created by Stampin’ Up!

The first three use the Snow is Glistening stamp set along with the Snowfall Thinlits Dies.  The White Velvet sheets have been used with the dies to create the snowflakes.

The next two cards use the Happiness Surrounds stamp set.  This set has a range of sentiments which helps you create a card for all occasions.

This first card uses the long image stamp to create a patterned background by stamping it straight and then again off-centre – the possibilities are endless.

The background for this card is a sheet of the Wood Textures DSP from the Annual Catalogue (pg 191) and then the large image has been stamped on top of it – a very cool effect.

If you are interested in any of these products you can either contact me to place your order or hop on over to my on-line store and place it directly.

Don’t forget this promotion finishes on Friday 30 November.

Until next time …


Sending Thoughts and Prayers

By | November 11, 2018

Hi there

It’s been a while since I posted here so sorry about that but I’m back now.

On the 19th September my wonderful brother (in-law) passed away in Australia after a short battle with cancer.  I am so thankful that I was able to visit the week before he died to say my goodbyes and let him know how much he was loved and to support my sister and her family.  Our whole family returned again at the beginning of October for his funeral.

During this time of his illness and at his passing I have been blessed by friends who have sent me cards letting me know they were thinking and praying for me and my family – thank you so much, it meant heaps.

I find sympathy cards the hardest to make and then there is the ‘what do I write inside’.  Well now having been on the receiving end the simple words ‘thinking of you’ means so much.  I have now challenged myself to not just think about somebody going through this but to actually send them a card and let them know.

Here are some of the beautiful cards I received:

I also challenge you – if you know of somebody that’s going through a rough time at the moment or has suffered a bereavement, send them a card and let them know you’re thinking of them.

Until next time …


It’s Our Birthday Stamp Sale – 24 hours only

By | October 23, 2018

Hi there

Put on your party hats, and get ready to save. It’s time for It’s Our Birthday Stamp Sale! For 24 HOURS ONLY, you can save 15% on select stamp sets. This sale will be gone in a flash, so get ready to place your order and celebrate with me!

Promotion Details

  • All selected sets are offered at a 15% discount.
  • You can place an order online via my online store or with me directly.
  • Discount applies to select stamp sets only when purchased individually during the 24-hour promotion period. Bundles featuring stamp sets from the promotion will not be discounted.
  • In the event that we run out of stamp sets, we will honour the discounted price as long as the order is closed within the promotion deadlines. You will receive your discounted stamp set as soon we are able to fulfil your order.
  • Order must be placed by 8:00pm (NZT), Tuesday 23 October 2018.

Here’s the list of stamp sets that are part of this promotion.

Contact me or place an order online by 8:00pm tonight to take advantage of these great deals.

Until next time …


Country Home Gift Card Set

By | September 24, 2018

Hi there

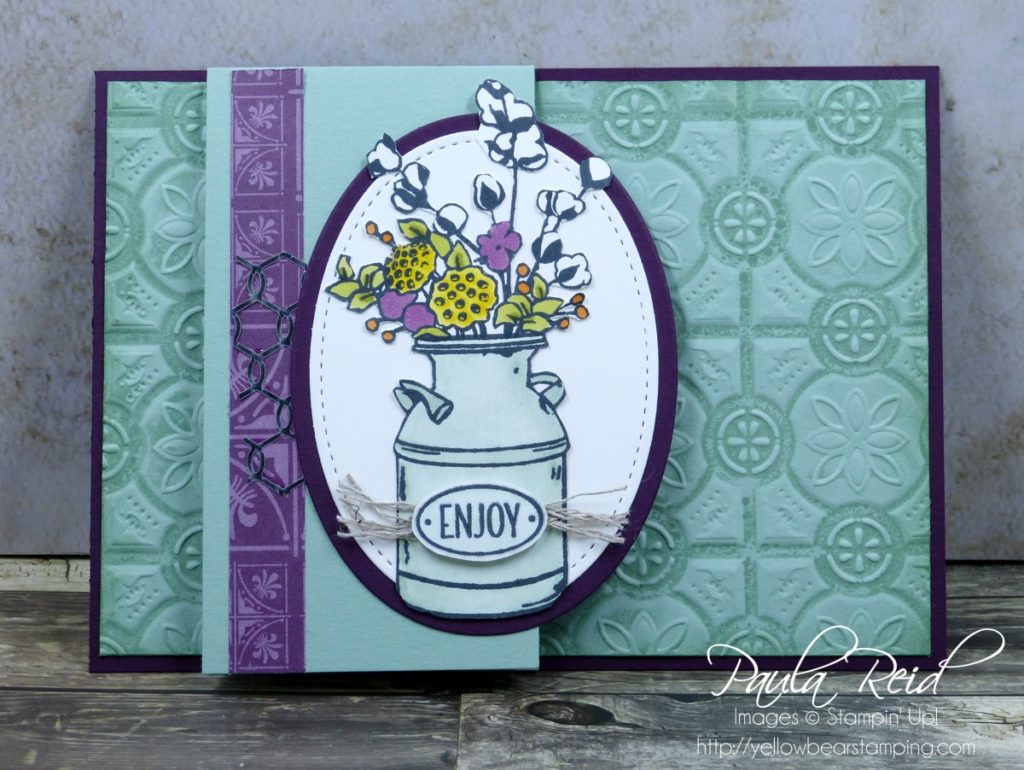
A couple of weeks ago I held a workshop and taught two projects featuring products from the Holiday Catalogue.  The first project features the Country Lane Suite.  I used the Country Home stamp set, Tin Tile Embossing Folder and the Chicken Wire Elements to create the Notecard & Envelope samples below. After the event I made some more cards and the holder as I wanted to create a gift set for my sister.

I hope you enjoy these creations as much as I enjoyed creating them for my sister.

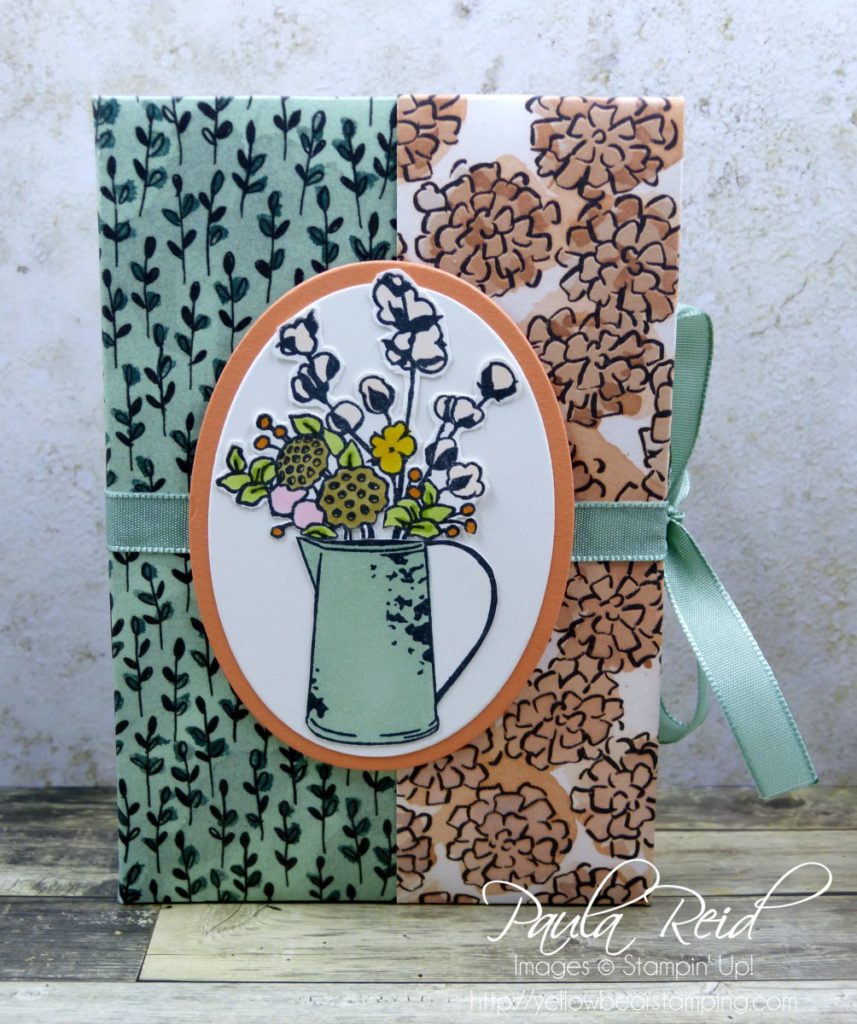
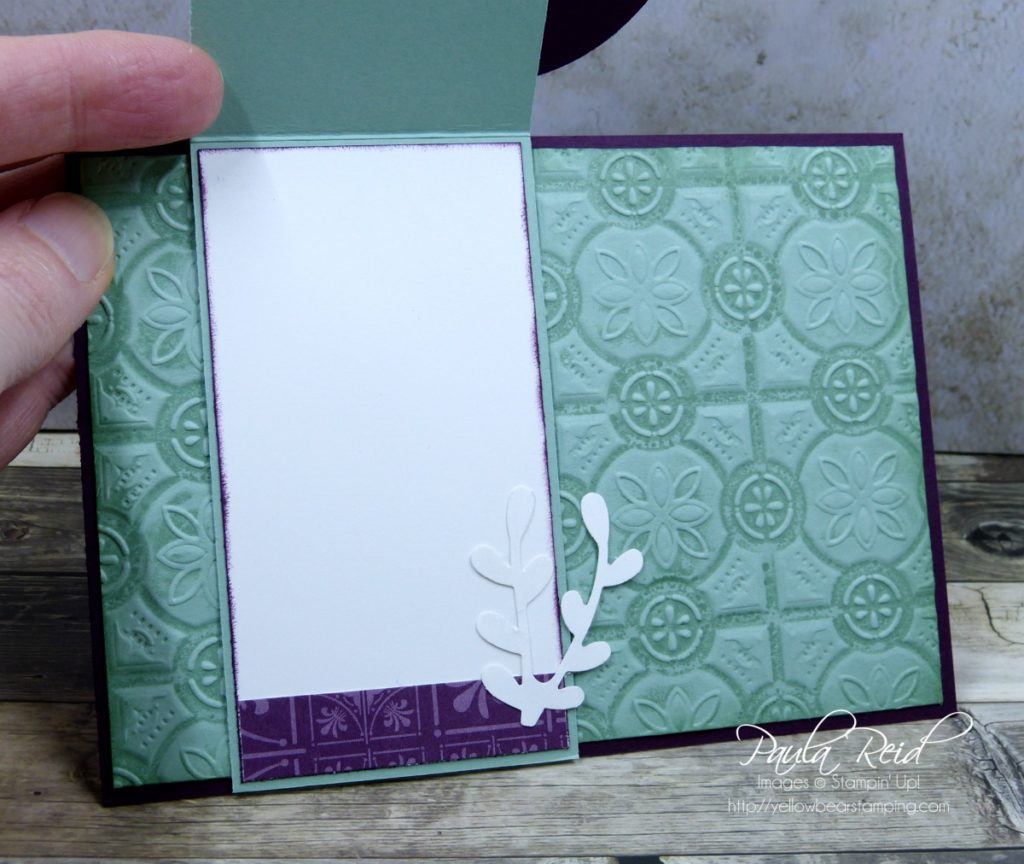
For the Note Cards & Envelopes I created this little folder to keep them in.  It uses a sheet of 12×12 DSP.

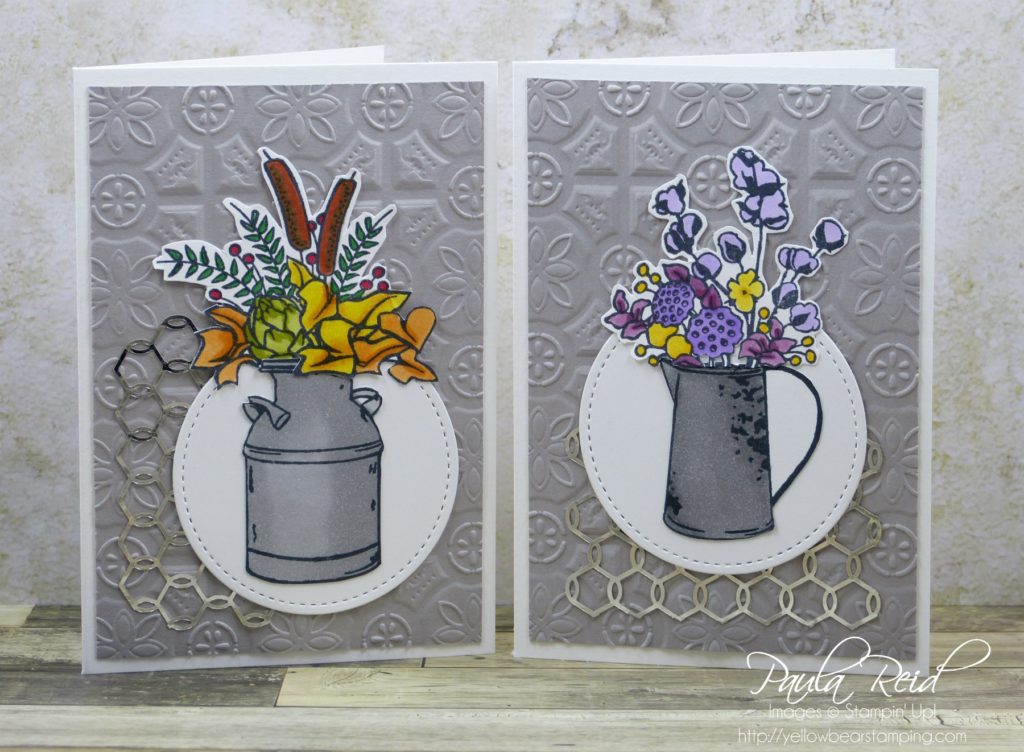
The images are stamped in Memento Black and coloured in with a range of colours using the Stampin Blends.

The background cardstock of Gray Granite was embossed with the new Tin Tile Embossing Folder

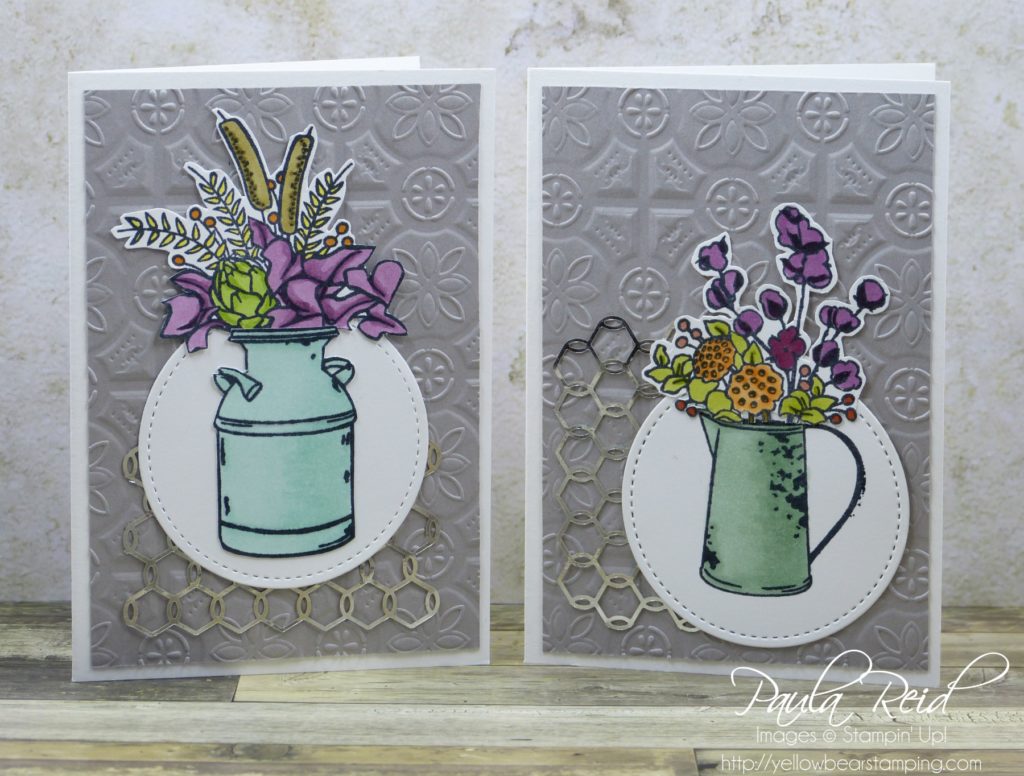
I cut up a sheet of the Chicken Wire Elements into six pieces and adhered it to the card.

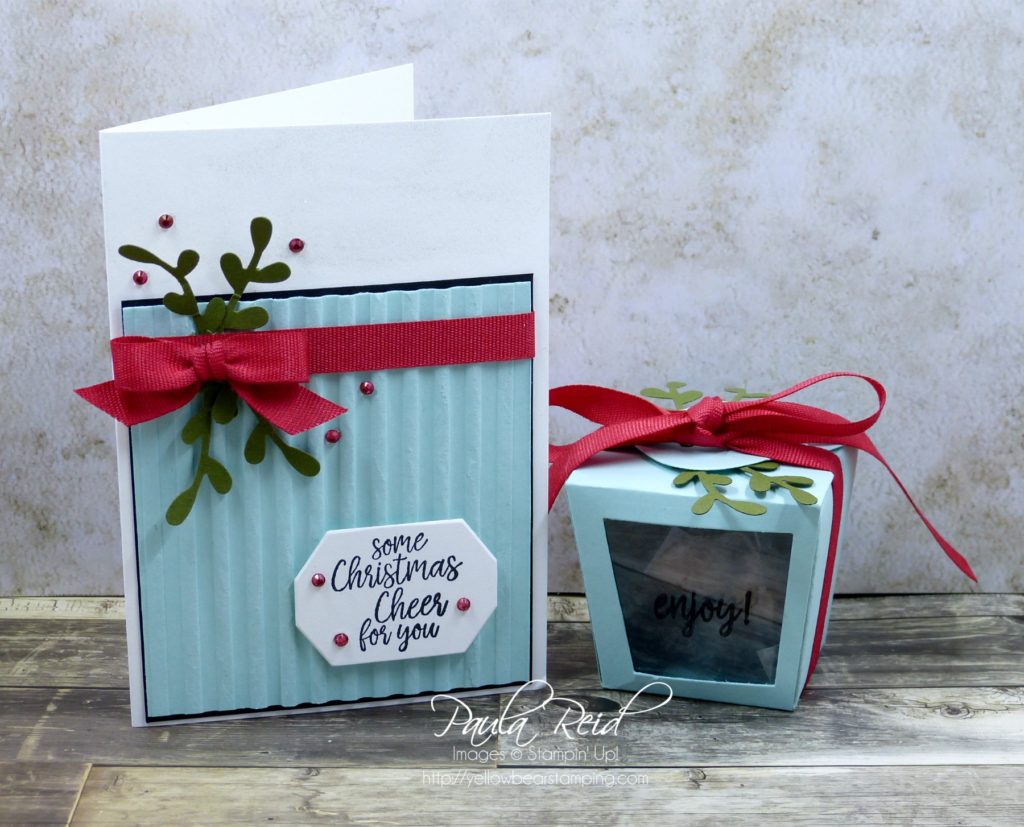
Once I got started I couldn’t stop at the Note Cards so I then created her some full sized cards which I put into our Acetate Card Boxes.

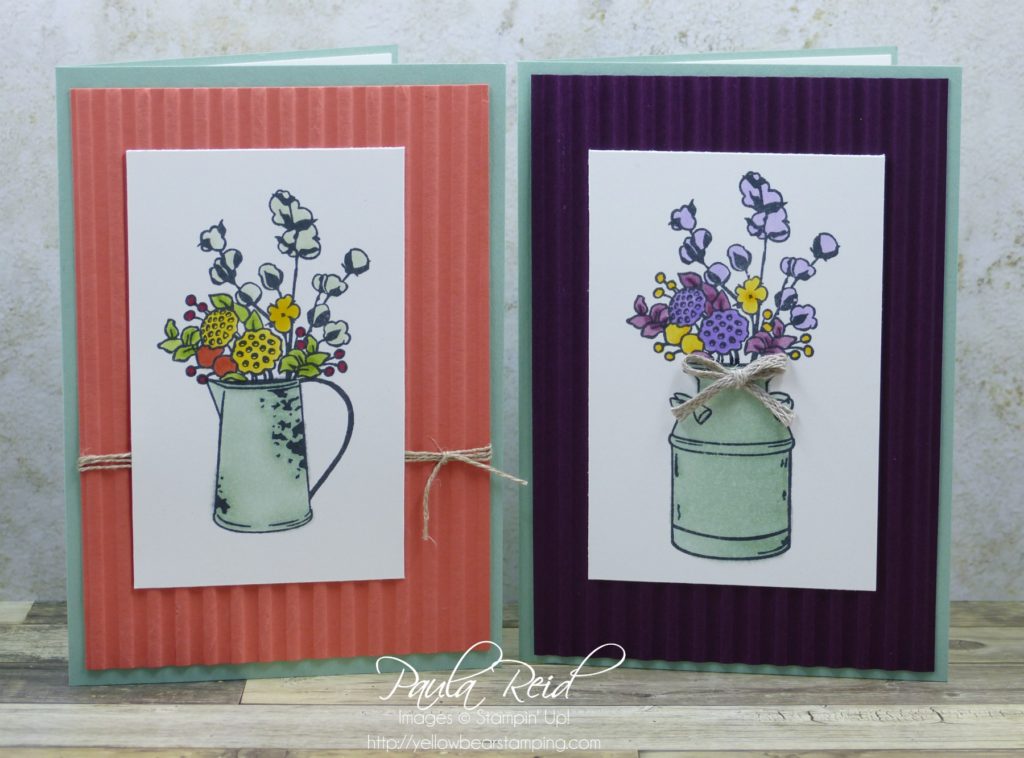
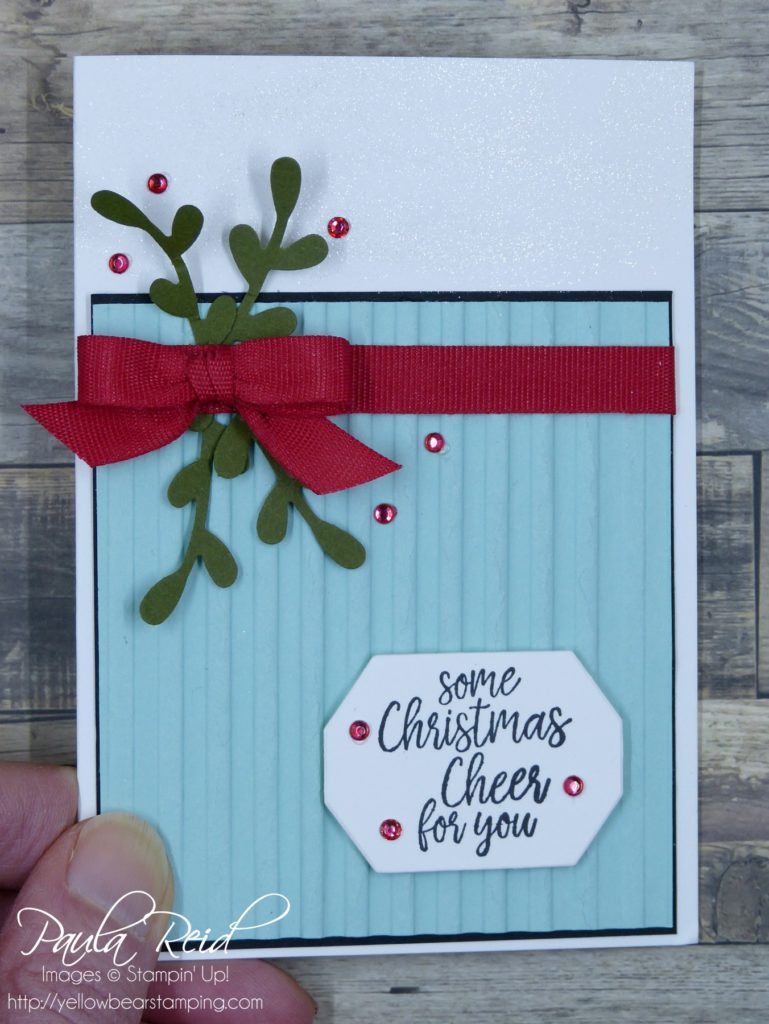
The card bases for these two cards is Mint Macaron with the mat being Calypso Coral and Blackberry Bliss which have been run through the Big Shot using the new Corrugated Embossing Folder

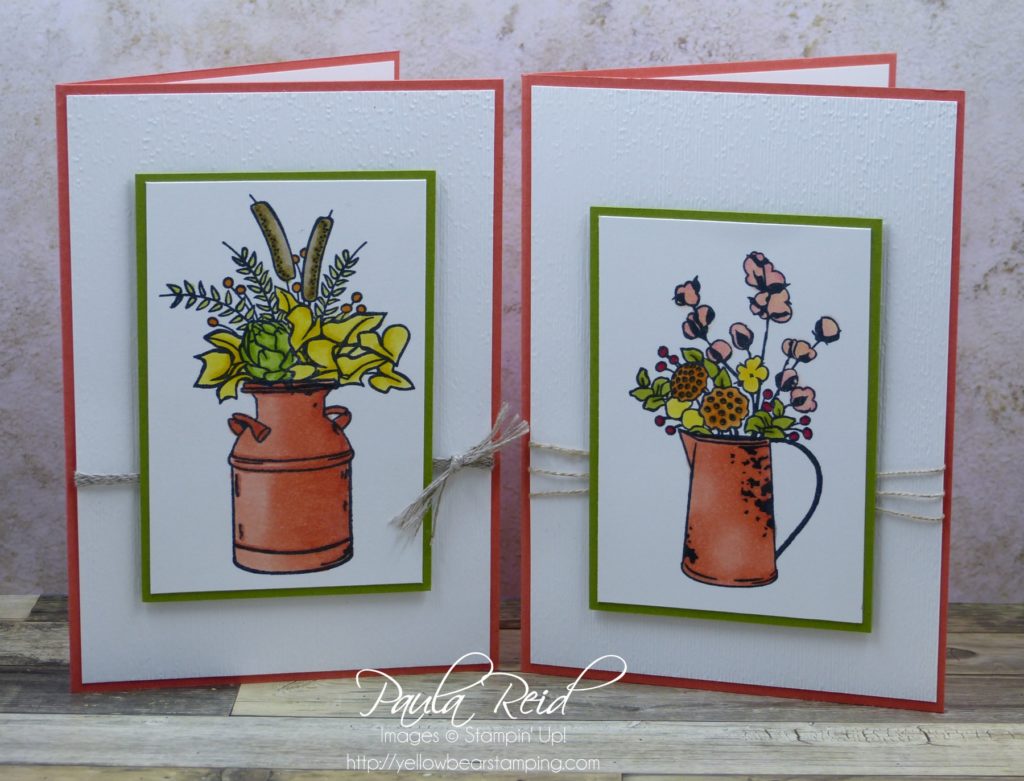
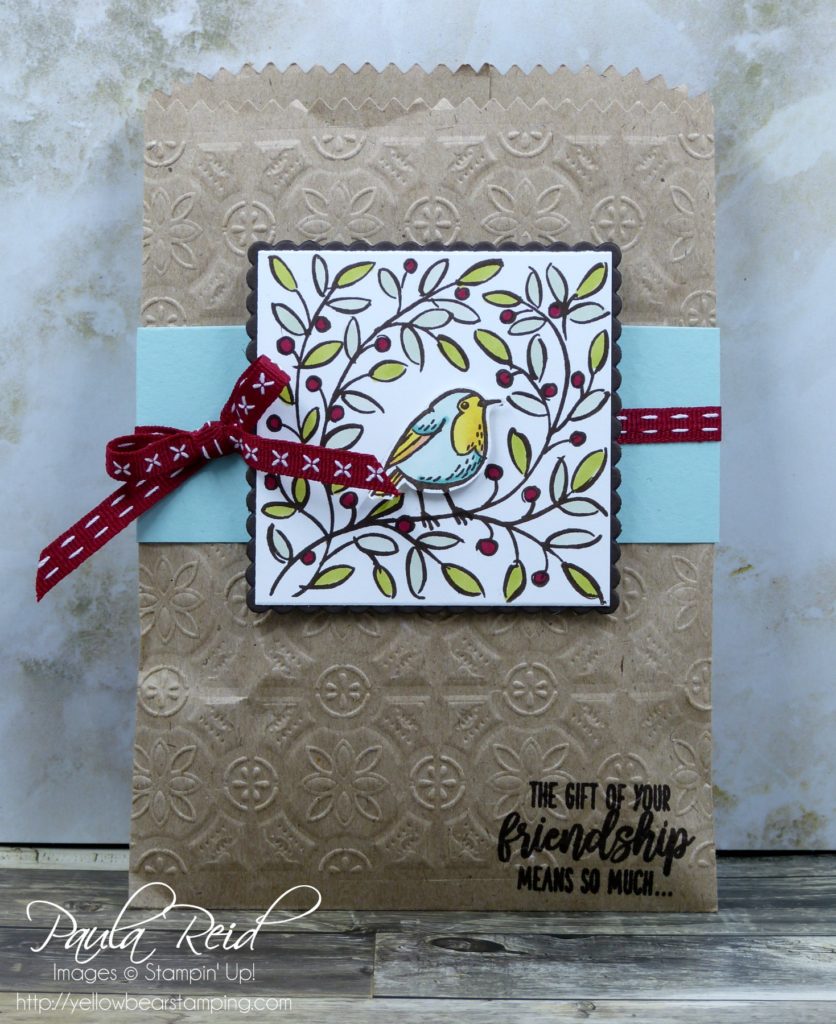
These two cards are on a Calypso Coral base with Granny Apple Green used for the mat.  The Whisper White was embossed using the Subtles Embossing Folder – if you don’t have this folder yet you need to purchase it – it is so lovely.

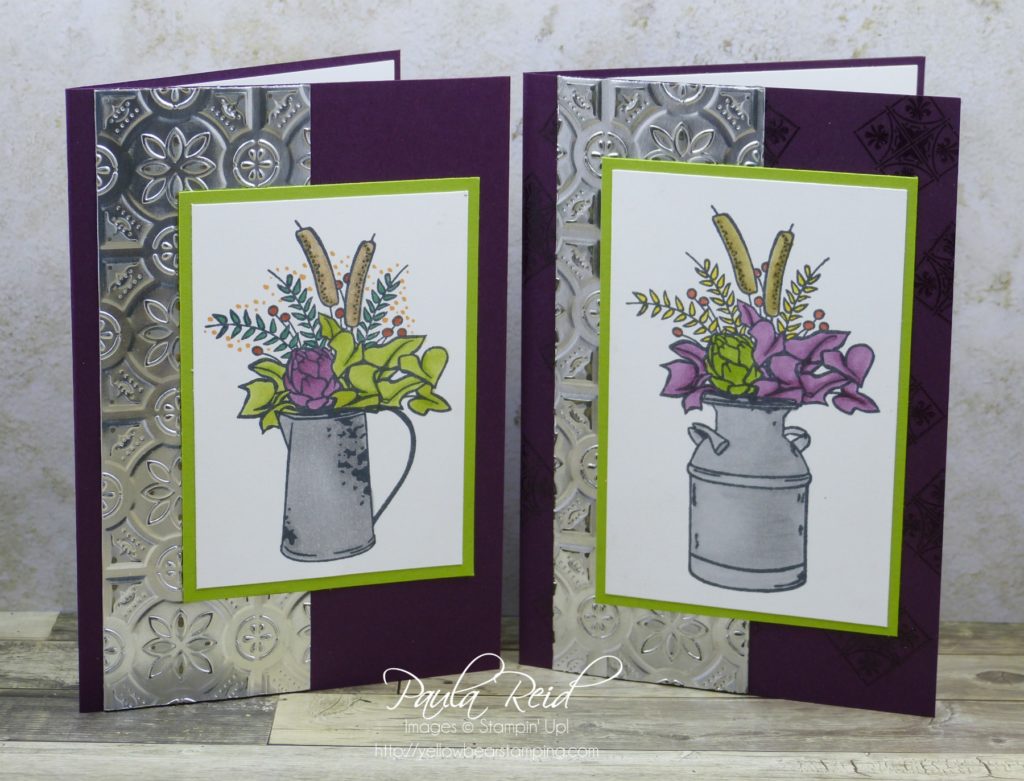
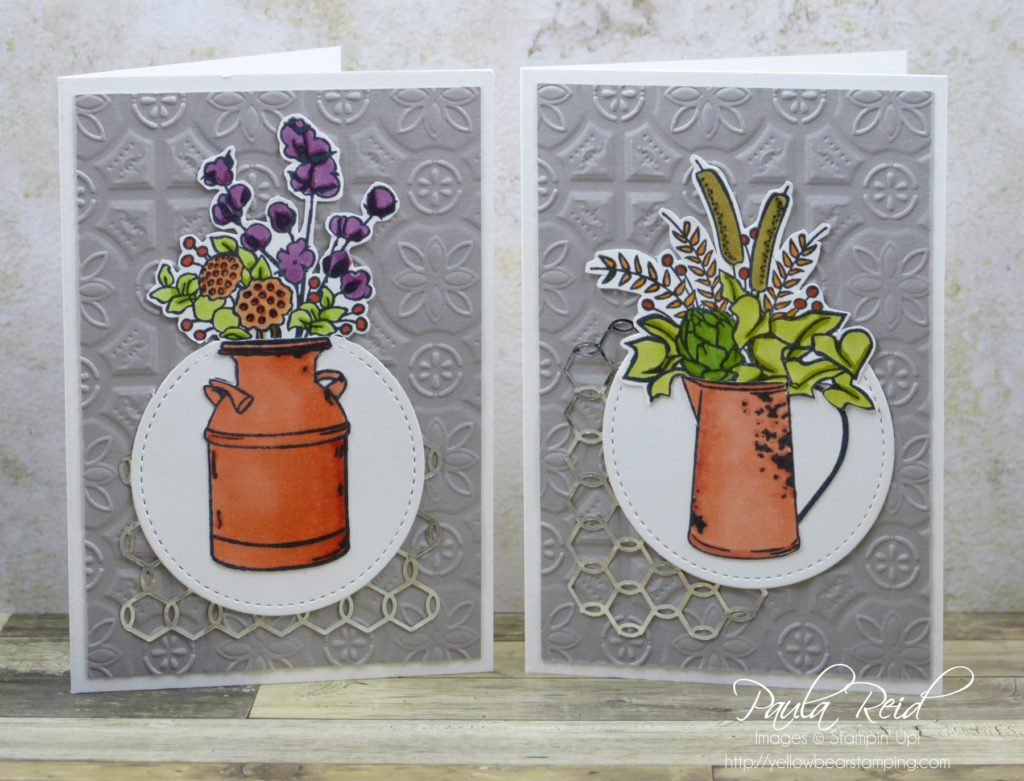
These last two cards have a Blackberry Bliss base, Silver Foil which has been embossed in the Tin Tile Embossing Folder and a Granny Apple Green mat.  I did give the foil a bit of a sand before using Soft Suede and a dauber to tone down the shine.

I can’t remember which colours I used for the flower arrangements – I think by the end of it I’d used every colour.

If you would like to purchase any of the supplies I’ve used for these cards please let me know or you can visit my on-line store to order directly.

Until next time …


Country Home Fancy Fold

By | September 16, 2018

Hi there

It’s been a very relaxing weekend – coffee out with a friend, some gardening and today I’ve managed some crafting.

Today’s post is the last project we made at our team training last month and features some of the products from the Country Lane Suite on page 43 of the Holiday Catalogue.  I’ve been playing with this suite today and I think this has to be my favourite stamp set at the moment.  Combine it with the Stampin Blends and the possibilities are endless.

This card uses 5 products from the Suite – Country Home stamp set, Country Lane DSP, 3/16″ Braided Linen Thread, Chicken Wire Element and the Tin Tile Dynamic Textured Impressions Embossing Folder.

Before we embossed our piece of Mint Macaron we ‘wiped’ the ink pad over the embossing folder this then transfers the ink to the cardstock while it embosses and you get this cool effect on the cardstock.

I used Mint Macaron, Blackberry Bliss, Pumpkin Pie and Old Olive Stampin’ Blends to colour my image which was stamped in Memento.  There are no dies for this set so my trusty Paper Snips were set to work to cut out my images and then adhered to my ovals.  I stamped the flowers and can separately – makes it a bit easier for cutting out.

This is a cool ‘fancy fold’ card and one that is easy to recreate.

Did you notice the Chicken Wire Element on the front of the card?  This comes in a pack of six sheets (9.5cm x 13.7cm) and the sheets can be cut up easily if you only want a small piece for your project.

I love this colour combination of Mint Macaron and Blackberry Bliss and am glad to have these previous In Colours back for good.

Well that’s all from me for now – until next time …

Takeout Treat Bundle – card and 3D box

By | September 15, 2018

Hi there

I’m back with the second project we made at our team training last month.

I don’t do Halloween but I’ve learnt from past Holiday Catalogues not to skip over the Halloween section as there are products in this section that can be used for non Halloween projects.  Did you see the Black Foil Sheets, Baker’s Boxes, Blends and Black Glittered Organdy Ribbon on page 49 or the Takeout Treats Bundle on page 50?  These products can be used for a number of different occasions.  Today’s project uses the Takeout Treats for a Christmas gift.

Now I’m a sucker for 3D boxes and fell in love with this cute little box.

This project uses the Notecards and Envelopes, Basic Black for the mat and Pool Party for the top layer which has been run through the Big Shot with the new Corrugated Dynamic Textured Impressions Embossing Folder (pg 13 HC).  The Pool Party cardstock started out the same width as the Basic Black but once it’s been run through the Big Shot it shrinks so make sure you cut your cardstock wider than your finished measurement.  The sprigs have been punched out of Old Olive using the new Sprig Punch (pg 29 HC).  This punch can be purchased individually or as part of the Peaceful Noel Bundle.  The sentiment is from the Takeout Treats stamp set and then die cut using one of the dies from the Takeout Thinlits Dies.  These can be purchased as a bundle which means you save 10%.  It’s a bit hard to see in the photo but I spritzed the top of the card base using the new Champagne Mist shimmer paint (pg 38 HC).  The rhinestones have been coloured with the Real Red blender pen.

Now isn’t this cute?  I’ve filled mine with the Maltesers that were part of our table gift (they only stayed in the box long enough for the photo!).  The box has been made using Pool Party and we added two more ‘sprigs’ to the top of the box then tied it with our 1cm Real Red Cotton Ribbon from the Annual Catalogue.

The ‘window’ in the front was die cut at the same time the box was cut out.  There is one ‘die’ and you cut two of them to create the box.  You can make two complete boxes from one piece of A4 cardstock.  The sentiment has been stamped with StazOn onto a piece of Window Sheet then adhered to the inside of the box.  When you’re stamping with StazOn onto a Window Sheet and your ink smudges just wipe it off with Isopropyl Alcohol (Rubbing Alcohol) and start again.  If you create a ‘window’ in your box you will need to trim one of the ‘tabs’ so that it doesn’t show on the window.

The finished size of the box is 5.4cm (w) x 4.4cm (d) x 5.1cm (h)

The last project I have to share features the Country Lane Suite.  So until then …

Team Training – Table Gifts and Dashing Deer

By | September 9, 2018

Hi there

Last month we had a wider team training day where we got to have a play with some of the new products from the Holiday Catalogue which went live this week.  There are so many great new stamps, papers and accessories in this catalogue – the products in this catalogue are available till 2 January 2019.

Here is the table gift we received – some goodies to help us through the day 🙂

The stamped image is from the new Feathers & Frost set and the bag has been embossed with the Tin Tile Dynamic Textured Impressions Embossing Folder – try saying that quickly!

And these goodies were inside.  The Rhinestones came in handy for one of the projects which I’ll share soon.

Our first project used the Dashing Deer Bundle – one that I don’t have so great to be able to have a sample to show you.

The stamp set used is called Dashing Deer and has a coordinating die set called Detailed Deer Thinlits Dies.  You can buy these separately or as a bundle (and save 10%).  The deer has been heat embossed in gold and the background has been dry embossed with another new folder – Swirls & Curls Textured Impressions Embossing Folder.  This has also be ‘spritzed’ with the new Vegas Gold Shimmer Paint.

The background mats of Tranquil Tide have been embossed with the Subtle Embossing Folder and the DSP is from the Joyous Noel Specialty Designer Series Paper.  The ribbon on the front is the gorgeous Merry Merlot & Copper Reversible 5/8″ Ribbon – the shimmer is lovely.

Well that’s all for now – I have another two projects to share with you so check back in a couple of days to see the next installment.

Until then …