Waterfront Happy Father’s Day

By | September 3, 2018

Hi there

I’ve been having issues with the photo editing software I use and have had to change software – so we are now back in business and I can share my recent creations.

Yesterday was Father’s Day here in New Zealand.  I am very fortunate to still have my dad around and be able to let him know how much I love him and what he means to me.  He is an amazing role model for our family and we love him heaps.

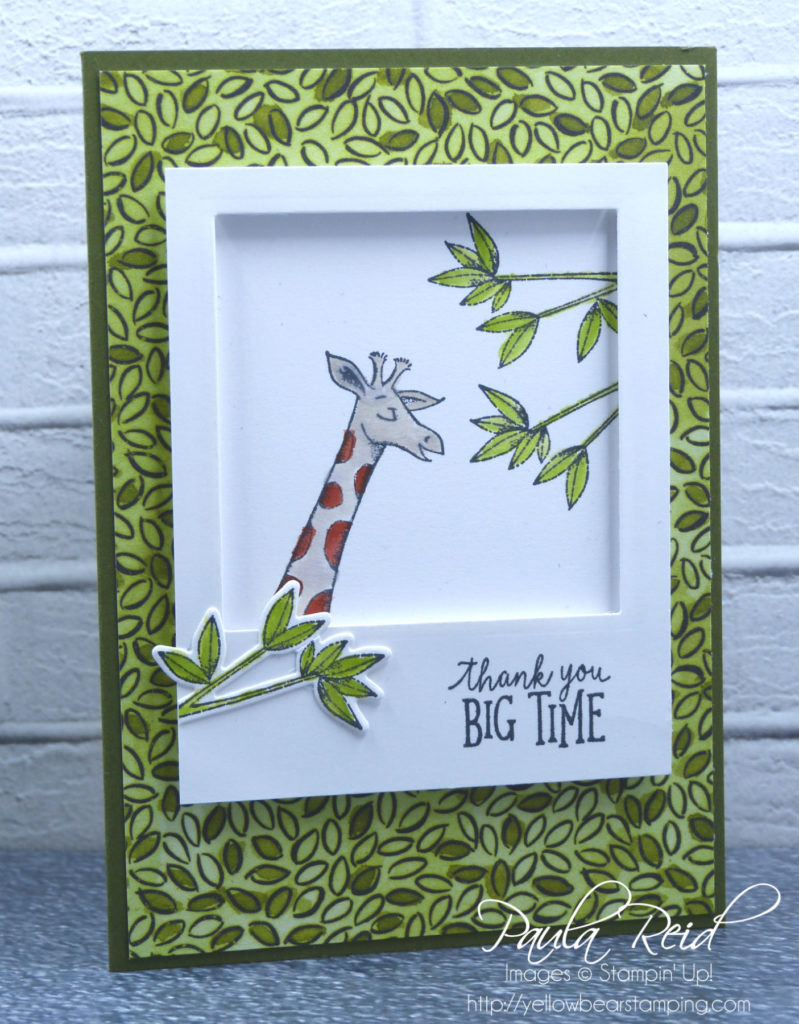
With that in mind I wanted to create a special card for him.  I decided to use the Waterfront stamp set (I hate to admit this but this is the first time ink has been applied to this set) as dad used to do watercolour painting.

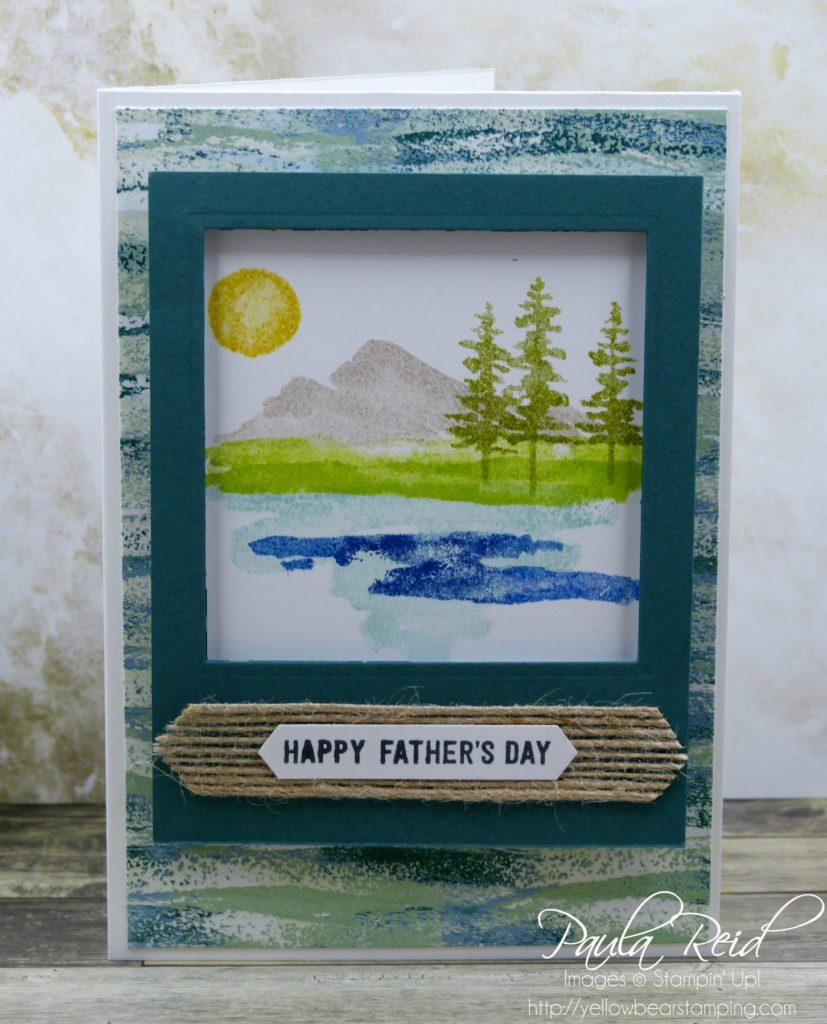
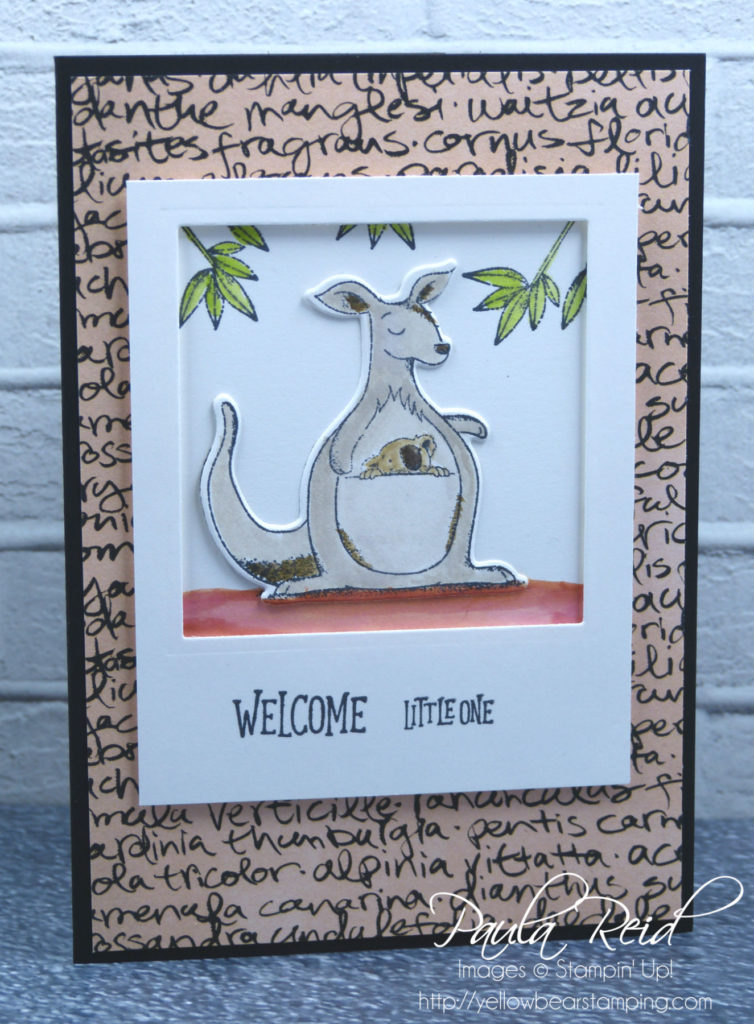
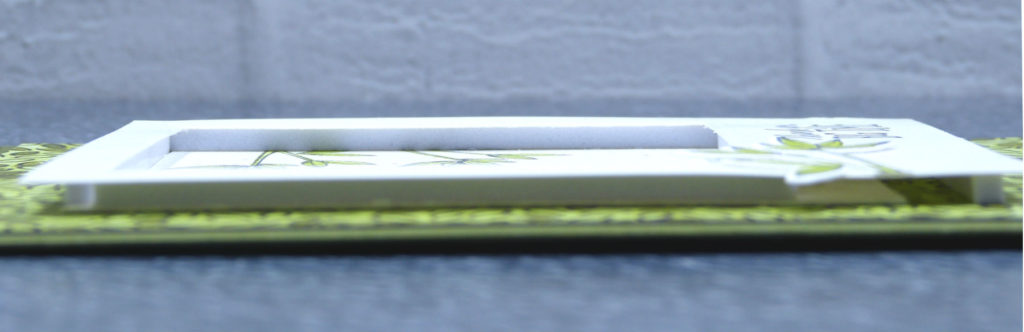
As the image wasn’t that big I created a ‘polaroid’ frame using the largest Square Framelit cut out with Tranquil Tide card stock.  I mounted the frame to the image using our Foam Adhesive Strips.  I’m not sure why it’s taken me so long to use this stamp set – it’s so easy to create a ‘scene’ with these stamps, you really can’t go wrong.

I used the following inks for my creation – Crushed Curry for the sun, Sahara Sand for the mountains, Lemon Lime Twist for the grass which I stamped twice for a bit more depth, Old Olive for the trees.  These were all stamped at full strength.  For the water I used Pool Party with the bigger image and then Blueberry Bushel for the smaller image – both of these were ‘stamped’ off so that the ink wasn’t the full strength.

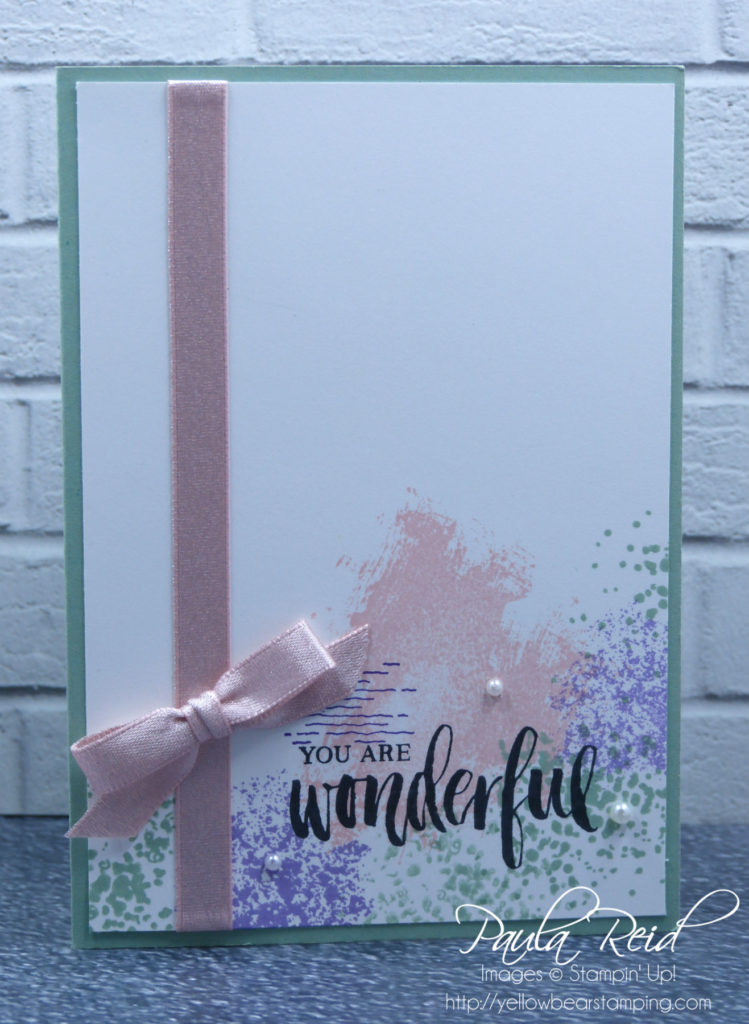
The sentiment is from Thoughtful Banners set and punched out with the Classic Punch then adhered to a piece of Burlap Ribbon.  The background paper is from the Tranquil Textures DSP pack and I was able to find a piece that didn’t have the Fresh Fig ‘stripe’ in it so that the background looked like the water.

Well that’s all from me for now – until next time …


Colorful Seasons CASE

By | August 26, 2018

Hi there

I’ve just realised it’s been almost two weeks since I did a blog post – I’ve been busy in my craft room making swaps for our team training which we had yesterday.  It was a great day catching up with fellow Creative Inkers’ and having a play with some of the new products in the upcoming Holiday Catalogue.  I’ll share my swap with you later this week.

Last weekend my Sister-In-Law had a special milestone birthday.  I wanted the card to be a special one but I was struggling to come up with something.  On one of the Facebook groups I belong to I saw a beautiful card that would be perfect so I CASE’d it – with a few changes.  Thank you to Narelle Farrugia for your inspiration.

The original card was in the peach tones so I changed it to the purple tones – colours more suited to my Sister-In-Law.

The stamp sets I used were Colorful Seasons, Picture Perfect Birthday and Timeless Textures.  Colorful Seasons has a coordinating die set called Seasonal Layers Thinlits which made cutting out the flowers and leaves a breeze.  Before cutting out the two ‘branch’ pieces I adhered some Multi Purpose Adhesive sheets to two strips of Early Espresso card stock – saves getting glue all over my fingers :).

The numbers are from the retired Large Numbers Thinlits – a little more subtle being on the inside of the card :).  The flowers were stamped in Highland Heather and Gorgeous Grape then the stamen was stamped in Early Espresso.  The DSP is from Wood Textures (3cm x 12,8cm) and the strip of card stock is Sahara Sand (3.5cm x 10.5cm).

For the leaves I inked up the stamps using Sponge Daubers.  The first layer was Old Olive and then I lightly added some Garden Green.  To the tips of the leaves I added a small amount of Early Espresso.  When you ink up a stamp this way don’t forget to give it a bit of a ‘huff’ before stamping :).  The images where then cut out with the die.

The fun then begins in layering up the image – working out the best placement for the various components.  I was really pleased with how this card turned out and my Sister-In- Law liked it as well 🙂

Until next time …

Wreath Card using your Stamparatus

By | August 14, 2018

Hi there

The Stamparatus is our new stamp positioning tool – it’s great for lining stamps up so you get them straight every time but you can also use it to create a ‘wreath’ style card.  Today I have three samples to share with you using this technique.  If you haven’t purchased a Stamparatus yet and would like to have a ‘play’ with one before you buy it give me a call and I can show you some of the great features this tool has to offer.

The stamp set that I’ve used for the first two cards is Pick A Pennant.  I stamped the outline in Memento Black then the solid image in Highland Heather and the leaf in Granny Apple Green (a new favourite).  The ‘Happy Birthday’ sentiment is from the Beautiful Bouquet set.

The background is embossed using the new Subtles Embossing Folder.  The ribbon started out as Whisper White satin with silver metallic edge but after being introduced to our Stampin’ Blends became Highland Heather Satin ribbon with silver metallic edge 🙂

This card uses the Basket Weave Embossing Folder which gives a real 3D effect.  I’ve kept the wreath on the square and then matted it with a Blackberry Bliss scallop square.

The last card was created with a bigger square and then trimmed down with the circle framelit.  The images are from the Beautiful Bouquet stamp set.  I used our new colour coach for the colour theme – Highland Heather, Melon Mambo, Pumpkin Pie, Blackberry Bliss, Pear Pizzazz and Pool Party.

I also used some of the ‘Highland Heather’ satin ribbon.  If you are wanting to create your own coordinating ribbon make sure you add Whisper White Satin and some Stampin’ Blends to your next order.

I’ll try and create a photo tutorial to show you how I made the template to create these cards.

Don’t forget to check out my Promotions page to see more details about the specials on offer this month – Colour Your Season and Bonus Days Coupons.

Until next time …

Baby Wipe Reinker Technique

By | August 7, 2018

Hi there

Today’s cards use the Baby Wipe Technique.  This is a really effective technique and easy to do.  All you need are a couple of baby wipes folded in half and some bottles of ink.  Drop some ink onto the baby wipe – you will need an area just larger than the stamp you are going to use.  The baby wipe then becomes your ink pad.  Ink up your image as you would with a normal ink pad and voila your stamp is ready to be stamped on card stock.

I used three inks – Bermuda Bay, Blackberry Bliss and Pool Party – to create my dragonfly base which was then die cut with the outline die.

The intricate dragonfly die was cut from Basic Black.  Before I cut it out I adhered our Multi Purpose Adhesive sheet to the back of the card stock – this makes it a lot easier to adhere.

The background image is created with a ‘D’ block.  I placed the block on the ink pad and then ‘stamped’ it on the Whisper White card stock.  It gives a nice texture and you could use any size block to achieve this.

Here’s a close up of the marbled wings.  I also added some Wink of Stella to the dragonfly for a nice shimmer – it’s a it hard to see it in this photo.  The dragonfly is adhered with dimensionals.

I encourage you to have a go with these techniques using reinkers.  If you don’t have any reinkers why not add them to your next order.

Until next time …


Colour Your Season

By | August 4, 2018

Hi there

We have an awesome promotion on offer for you this month – it’s called Colour Your Season.

The Colour Your Season products include:

  • Blended Seasons Stamp Set, an exclusive 10-piece wood- or clear-mount stamp set with images for every season! ($82.00NZD)
  • Stitched Season Framelits Dies, a coordinating stitched die that includes stitching on both the positive and negative images! ($69.00NZD)
  • Watercolor Pencils in 10 new colours! Note: These Watercolor Pencils may be available in a future publication. ($26.25NZD)

You can buy the stamp set and dies as a bundle ($136.00NZD) – and save 10%.  The products will be available while supplies last until 31 August.  This means products will only be available until 31 August or while supplies last, whichever comes first so if you fall in love with these products be in quick to order them.

Here are some samples using these products

Check out my Promotions page to see the flyer that shows the stamp set, dies and coloured pencils in detail.

We also have another promotion happening this month (details also on my Promotions page) – Bonus Days.  For every $110NZD that you spend during August you will receive an $11NZD voucher to spend on your next order in September.

So if you have a number of items on your wish list why not purchase them in August and be rewarded in September with some FREE product.  You can either order on-line via my store or contact me directly.  I look forward to helping you.

Until next time …


Shaving Foam Reinker Technique

By | August 1, 2018

Hi there

Reinkers are a great product to have in your craft space.  In my last post I shared two different styles of cards that used reinkers and Glossy Cardstock.  Today I’m going to share another technique using reinkers and shaving foam – I just buy the budget brand from the Supermarket.

These first two cards are the samples I made for a class I held last month.  The colours used are Night of Navy, Balmy Blue and Granny Apple Green.  I managed to get two cards from the shaving foam before the colours got too mixed up.  When I was trying to construct the card I felt the sentiment die got lost in with the marbled background so after a few different options I settled with a Stitched Whisper White Oval behind the words so that they stood out more.  I adhered our Multipurpose Adhesive Sheets on the back of the cardstock before I ran the die through the Big Shot – makes it so much easier to adhere the words once cut.  For the inside of the card I used the candles from the Birthday Backgrounds stamp set and stamped them along the bottom of the insert.

I did a quick demonstration for my class on how to add the drops of reinker to the shaving foam then swirl the color around to create your pattern.  Rather than create another card front I decided to use a scrap of Whisper White cardstock I had on hand and this is what I then created with it.  I already had the sentiment sitting on my desk (left over from another project) and as it was the same colour found a use for it.


I did a second card to show them how you can get more than one card from your shaving foam ‘pad’.  This time the colours are more mixed in as I added the scrapped off foam from the first card back onto the foam ‘pad’.   I spray my shaving foam onto some brown paper (or you could use a paper plate) as this is easier to clean up afterwards.

The Whisper White card front is embossed with my favourite embossing folder – Subtle – from the Annual Catalogue.  I like the crispness the white gives behind the Granny Apple Green lettering.

This is such a fun technique and each time you do it you get a completely different look.

I have one more reinker technique to share with you so, until next time …

Glossy Cardstock Reinker Techniques

By | July 28, 2018

Hi there

Reinkers are great not just for reinking your ink pads but they can be used in a number of different techniques.  Today I’m going to share with you two different ways to use them with our Glossy White Cardstock which has a beautiful glossy finish on one side.  Ink dries slowly on this cardstock so it gives you time to try fun techniques with it.  You can find this cardstock on page 192 of the Annual Catalogue.

The first technique creates a multicoloured background by adding drops of colour onto the Glossy Carstock.  Next spritz the drops with water using our Stampin’ Spritzer (page 203) and allow the colour to spread.  Blot off the excess ink with a paper towel.  Once it’s dried add it to your project as a full mat background or as below just using a strip.

The reinker colours I’ve used are Blackberry Bliss, Grapefruit Grove and Mint Macaron.  These are some of the colours used in the Natures Poem Suite as I wanted to used some of the accessories for this card – Faceted Dots and the Nature’s Twine.  The twine is a ‘three strand’ twine so I unraveled it for something different.

The sentiment is from Rooted in Nature and is stamped in Blackberry Bliss.  Did you notice the ‘subtle’ embossing on the mat?  The texture from this embossing folder reminds me of wallpaper we had as kids called Anaglypta – it was textured paintable wallpaper.  Anyone else remember Anaglypta?

The next technique is called ‘Polished Stone’ which creates a marbled background effect.  I’ve made my background with two different colour tones to create sky and grass.

To create this effect soak a cotton ball in rubbing alcohol also know as Isopropyl Alcohol (I bought a 1 litre bottle from Mitre 10).  Add a couple of drops of each ink colour to the cotton ball and then dab the cotton ball over your cardstock until you get the look you want.  The rubbing alcohol causes the reinkers to blend together.  Once the ink has dried you can finish creating your project.

The colours for the ‘sky’ are Pacific Point, Balmy Blue and Pool Party and for the ‘grass’ I used Shaded Spruce, Granny Apple Green and Call Me Clover.  On the first card I think I had my tree a bit low so made another sample with it higher and a different sentiment.

You can also try this technique on any nonabsorbent surface like Vellum and Acetate.

So if you don’t have any reinkers why not add some to your next order and give these techniques a go.  I’ll be back soon with two more techniques using reinkers.

Until then …

Varied Vases and Share What You Love – June projects

By | July 24, 2018

Hi there

I’ve just realised I haven’t shared with you two projects from June that feature the Varied Vases bundle and Share What You Love suite.

Mary Fish – a US demonstrator recently reached 1 Million Dollars in sales – how amazing is that.  As part of reaching this milestone the demonstrator gets to help design a stamp set and Varied Vases is the Mary Fish inspired set.  This stamp set also comes with a coordinating punch and is sold as a bundle.  Here are two cards made using this bundle.

This first card was from my June Workshop and it was a great card for the ladies to create using the bundle and the new Stamparatus to get the correct positioning of the flowers.  The Stamparatus makes stamping with a two-step stamp set so quick and easy.

The second card was made for my June card class and shows how you can use the same layout from a Note Card for a full sized card with ease.  Using the Stamparatus we were able to stamp the outlines of the flowers in one go and then the coloured images were stamped altogether in another go.  By using our ink spots it was easy to have all the solid images on one plate and ink up without getting the wrong ink onto the neighbouring stamp.

At my workshops they get to make two cards (both using the Note Cards & Envelopes which are precut and prescored) and this is the second card we made.  It features products from the Share What You Love suite.

Don’t you just love the crispness of the embossed image – this is one of the Textured Impression Embossing Folders which gives a deeper emboss.  The sentiment is from the Love What You Do stamp set.  This set contains 13 photopolymer stamps – 4 sentiments and a variety of image stamps.  The Share What You Love Specialty Designer Series Paper is a heavier weight than our normal DSP and has a lovely pearlised finish as do the doilies.  The final touch for this card is a mixture of our basic pearls and the new Share What You Love Artisian pearls which come in five different colours.

For my June card class I used the same suite and similar design for a full sized card.

The card base and mat are Rich Razzleberry and this time we’ve only embossed the corner of the mat and not the whole of the card front.  This did take a bit of juggling around to make sure the embossed pattern was the right way up and in the right spot – but we got there :).  The Baker’s Twine wrapped around the top is the Siler & Whisper White Twine that carried over from the Occasions Catalogue.  The banner is 1″ wide and we used the Banner Triple Punch to create the end.  The sentiment is another one from the Love What You Do stamp set.

Unitl next time …


Team Shoebox Swaps

By | July 22, 2018

Hi there

In my last post I shared the card I taught for our Shoebox swap – today I’m going to share the cards the rest of my team prepared.

First up is this lovely bright birthday card using all the new In Colours.  We were able to choose a background colour so of course I had to choose the Pineapple Punch – love it.

It’s hard to tell from the photo but the words are lovely and glossy and have a bit of a sparkle.  This was created by covering the letters with Wink of Stella and then coating it with glue from the Fine Tip Glue Pen.  It’s very effective.

Next up is a fancy fold card using DSP from Share What You Love Specialty pack and one of my favourite sets from the Annual Catalogue – Accented Blooms.

Again the photo doesn’t really show up the Wink of Stella used to colour in the flowers which have been stamped with VersaMark and then heat embossed in Black – love that black embossing powder is back in the catalogue.  The ‘Hello’ has also been heat embossed in black.  The colour of the card stock is Petal Pink.

This next card uses Artisan Textures (which was a Prize Patrol set at April’s OnStage) for the background images and the sentiment is from Rooted in Nature.  The colours are very soft and work well together – Powder Pink, Mint Macaron and Highland Heather.

The last card uses the Dandelion Wishes stamp set and is a smaller version of the Triple Time Stamping technique.  The yellow/orange tones work really well with the Granny Apple Green card stock.

Well that’s it for now.  Until next time …


Animal Outings – Team Swap

By | July 19, 2018

Hi there

Last month for our team swap we tried something new – it’s called a ‘Shoebox’ swap.  The idea is that instead of swapping fully made cards you each bring your ‘shoebox’ with all the supplies needed to make the card and then you teach the card.  At the end of the time together you go home with a bunch of fully made cards.  It was a fun afternoon spent together.

I decided to use the Animal Outings stamp set which we all received free at the April OnStage event.  This is one of the perks of being a demonstrator and this month is the perfect month to join up as you receive an entire colour family of inks FREE.  You can find out more about joining my team here.

There are three image stamps in this set so I decided to make three samples and let the team decide which image they wanted to use.  There are also a number of sentiments which can be mixed and matched.  The design of the card was the same for all images.

The images are stamped in Memento Black on Thick Whisper White card stock.  Thick Whisper White card stock is great to use for watercolouring.  For these cards I used Aquapainters but you could also use Blender Pens – whichever you are most comfortable with.

The colours used for the Rhino card are:  Smoky Slate, Basic Gray, Granny Apple Green, Pineapple Punch, Rich Razzleberry, Blackberry Bliss.

I’ll let you in on a secret – there is another Kangaroo under the one you can see :).  I didn’t like my first attempt at the colouring so I restamped the image on a scrap piece of Thick Whisper White and started colouring all over again.  This stamp set comes as part of a bundle so I used the coordinating die and die cut my image out then adhered it over the top of the original image – it gives another dimension to the card.  So if you aren’t happy with your first attempt on a card – don’t throw it away – use coordinating dies/punches or else ‘fussy’ cut the image.

The colours used here are:  Sahara Sand, Soft Suede, Early Espresso, Crumb Cake, Granny Apple Green, Cajun Craze.

My last card sample is the giraffe.  I’ve already used this image a number of times for cards here and here.  The following colours were used:  Sahara Sand, Cajun Craze, Granny Apple Green.

After putting this card together I felt the bottom left hand corner of the frame was a bit bare so I stamped the leaf/branch image and die cut it with the coordinating die.  The DSP that I’ve used for all three samples is from the Share What You Love Specialty DSP pack.  I don’t know if you’re like me but I often buy packs of paper which I love but then don’t want to cut into it.  Well that’s changing this year – for the three different designs that I’ve used I cut each sheet into 6 pieces so that I have instant card fronts.  My challenge to you for 2018/2019 is to use your DSP.  July is the month to purchase some DSP as we have a special promotion on – for every three packs of selected paper you purchase you get a fourth pack FREE.  If this is too much for you why not join with your friends and place one order then share the paper – that way you get a real selection.

To create the ‘photo frame’ I used our Foam Adhesive Strips to adhere the frame to the stamped image then used Tear & Tape to adhere it to the DSP.

Next up I’ll share the other cards my team members taught.

Until then …

One Sheet Wonder – Share What You Love – Cards 12 to 14

By | July 15, 2018

Hi there

It’s another ‘indoors’ day today here in Auckland.  It has been raining non stop with some really heavy falls – there has been quite a bit of flooding around the city so best to stay warm and dry inside.

This is the last post for my One Sheet Wonder using the Share What You Love DSP.  My birthday card tin is now full and I’m ready to send these cards out over the next couple of months to friends and family who are celebrating birthdays.

As I mentioned in one of the earlier posts the good thing with a One Sheet Wonder template it that once you have cut up the paper you can change the card base orientation and placement of the DSP to suit they style of card you want and also the sentiment you are going to use.

On the original template design the card base was portrait with the DSP at the bottom.  I switched the card to being a landscape orientation which put the DSP to the left as I wanted my sentiment on the right.  Next time I use this template who knows how it will turn out.  There is no ‘right’ or ‘wrong’ with a One Sheet Wonder template.  The DSP on this card is matted with Blackberry Bliss, Mint Macaron and So Saffron.

After trying a few combos for the matting of this DSP I finally decided to use Basic Black – the sentiment is also stamped in Black Memento ink.  Memento is my ‘go to’ black.  I think I have about 3 or 4 ink pads 🙂

And here’s the final card in this series – again matted in Basic Black.  The Basic Black looks good against the Whisper White card base.  All bases are the Thick Whisper White – this is a good option to use when you aren’t using a full mat for the front.

I finally got round to altering the template I used so that the DSP pieces would better fit our South Pacific card bases measurements (10.5cm x 14.8cm).  If you have any questions just let me know.  I hope you’ve enjoyed seeing the cards I created and that you give a One Sheet Wonder a go if you’ve never done one before.

Here’s the link to the original template I used.

Until next time …

One Sheet Wonder – Share What You Love – Cards 8 to 11

By | July 14, 2018

Hi there

Well it’s definitely been an indoors day today – great for crafting.  I’ve been busy prepping a little ‘RAK’ project for my work colleagues.  It’s that time of the year when the winter sniffles are around so I thought I’d make everyone a tissue packet holder.  The prep work is now complete so over the next couple of nights I’ll start the assembling – photos to follow.

Here’s the next instalment of my One Sheet Wonder cards.

Our Stampin’ Write Markers are great for colouring sentiment stamps – especially when you only want to use part of a stamp.  The sentiment stamp I’ve used for this card (and the last one in this post) has another line to it but I only wanted the ‘Happy Birthday’.  Using the markers is an easy way to achieve inking up the portion you require.

When cutting the DSP template the card above and below started out as a rectangle.  To get your rectangle into the two pieces you mark down an inch from the top left hand corner and mark up an inch from the bottom right hand corner.  Place the DSP back in your paper trimmer lining the two pencil marks in the cutting groove and cut.  Mat your DSP and you have two card fronts completed.  The sentiment is from the Picture Perfect Birthday stamp set.

The sentiment for this card is from the Beautiful Day stamp set.  The Blackberry Bliss twine is part of the Nature’s Twine packet – the pack consists of four colours that coordinate with the Nature’s Poem suite but also coordinate with the Share What You Love DSP.  The twine has three strands so for the piece that is wrapped around the DSP I unraveled it but kept the twine the full thickness for the bow which was tied around the strands.

I’ll share the final instalment of cards from this set with you tomorrow so make sure you check back.

Until then …


One Sheet Wonder – Share What You Love – Cards 5 to 7

By | July 12, 2018

Hi there

Back again with the next installment of cards using the One Sheet Wonder template.  I really enjoyed creating these cards so I’m thinking I might make another set up using the Tranquil Textures DSP and make them ready for masculine birthdays.  Don’t forget we have a DSP special on this month – buy three packs of DSP and get one FREE – Tranquil Textures is one of the packs included in the special.

I created these cards in a ‘clean and simple’ style but by adding some embellishments you can step the cards up.

This card and the last card in this post both use the Sunshine Sayings stamp set for the sentiment.  This is a stamp set that I haven’t used that much – I must remember to get creative with it.  The DSP has been double matted with Grapefruit Grove and Basic Black.

This card is similar to one from the first post – this time matted and inked in Mossy Meadow.  The sentiment has been adhered with dimensionals.

I was originally going to mat this DSP with just the So Saffron but felt it blended too much into the Whisper White so added a second mat of Basic Black.  Basic Black really does help to frame the DSP.  I think I ended up trimming the DSP a bit from the original measurements once I decided to do the double mat to get an even frame around it.  That is the joy of a One Sheet Wonder – you can improvise as you go and create your own unique template each time.

Well that’s all from me for now – don’t forget to check out my promotions page here

Until next time …

One Sheet Wonder – Share What You Love – Cards 1 to 4

By | July 10, 2018

Hi there

Further to my last post here are the first four cards I made using the One Sheet Wonder template and a sheet of DSP from the Share What You Love Specialty DSP pack.

I’ve chosen a paper that has an all over pattern rather than a one way pattern.  This makes it easier for placing the paper on the card base as often you want to change the orientation to suit the sentiment.  If you have a ‘one way’ pattern this can become a bit harder.

The sentiment for these cards is from the Beautiful Day stamp set (pg 134).  I didn’t want to use the full sentiment of the stamp so I coloured in the portion I wanted with my Blackberry Bliss marker and stamped it on scraps of Whisper White cardstock or directly to the Thick Whisper White card base.  The DSP is matted on Blackberry Bliss.

These next two cards use a sentiment from one of my favourite sets which I was very happy to see carry over to the Annual Catalogue – Picture Perfect Birthday (pg 76).  I have used this set so many times for cards – the images and sentiments are great.

This paper has 13 colours in it so you have a huge range of options for matting – I used Mint Macaron on the top card and Basic Black on the bottom card.  The twine is from the Nature’s Twine pack and I’ve gone with the Grapefruit Grove.  This twine consists of three strands – I’ve kept it altogether for the ‘wrap around’ piece then tied a shorter length to it and then unraveled it.

The good thing with a One Sheet Wonder is that you can change the placement of the DSP – you don’t have to copy the template layout 100%.

Don’t forget we have two specials on this month – the DSP offer of buy three packs and get one FREE and the second offer of an ink pad assortment when you sign up to become a Stampin’ Up! demonstrator (hobby or business).  If you’d like to know more about either of these promotions just give me a call or send me an email – I’d love to help you (and have you on my team).

I’ll be back in a couple of days with the next installment of my One Sheet Wonder cards.  Until then …

One Sheet Wonder – Share What You Love cards

By | July 8, 2018

Hi there

As mentioned in yesterday’s post I had a very productive afternoon – I made 14 cards using a One Sheet Wonder template, a piece of 12″ x 12″ DSP and some cardstock for matting the DSP.  After I cut up my DSP I realised that the template was actually designed to fit the US card bases which are slightly shorter than our NZ card bases so I did a few ‘modifications’ to the layouts to accommodate this.  Tomorrow nights task is to alter the template to fit NZ card bases :).

If you’re wondering what a One Sheet Wonder is let me explain.  A One Sheet Wonder is a technique where you take a sheet of cardstock or patterned paper and cut it into specific shapes and sizes to give you many components that you can then use on a number of different cards. You can also create your own patterned cardstock to use – check out my blog post here.  There are a number of free templates to use or you can create your own – it’s lots of fun.  Here are the 14 cards I made.


I used three stamp sets for the various sentiments – Beautiful Day, Picture Perfect Birthday and Sunshine Sayings.  I picked a couple of colours from the DSP to use to mat the papers and stamp the sentiments.  The card bases are the Thick Whisper White.

Over the next couple of nights I’ll share the cards in more depth so stay tuned.

Until next time …