I have a new fold (to me) to share today – it’s a variation on an ‘Arrow’ card that I saw online. The original one I saw (by Tina Hewett) was done as a square card so I used the same method and created a standard portrait sized card.
I think this looks really cool and it was simple to create.
Fold your card base in half and then make a mark along the bottom at the centre point of the card front. Place your card base in your trimmer and cut from your pencil mark to the top corners where the score line is. Do the same with your Designer Series Paper (DSP) and then adhere to your card pieces. My starting piece of DSP measured 9.5cm x 13.8cm. I’ve used the soon to retire Ice Cream Corner DSP.
I used both sides of my DSP – one design for the centre triangle and then the other side of the paper for the two side triangles. Before you adhere your side triangles have a play with positioning them so that you know where to place them once they have adhesive on them. NB: also note how far you need to apply the adhesive as it is only partially adhered. I found it was easier to adhere the side triangles with liquid glue as it gives you a bit of ‘wriggle room’ to get them in the correct location.
I hope you like this fun fold card and give it a try – another great way to use your DSP.
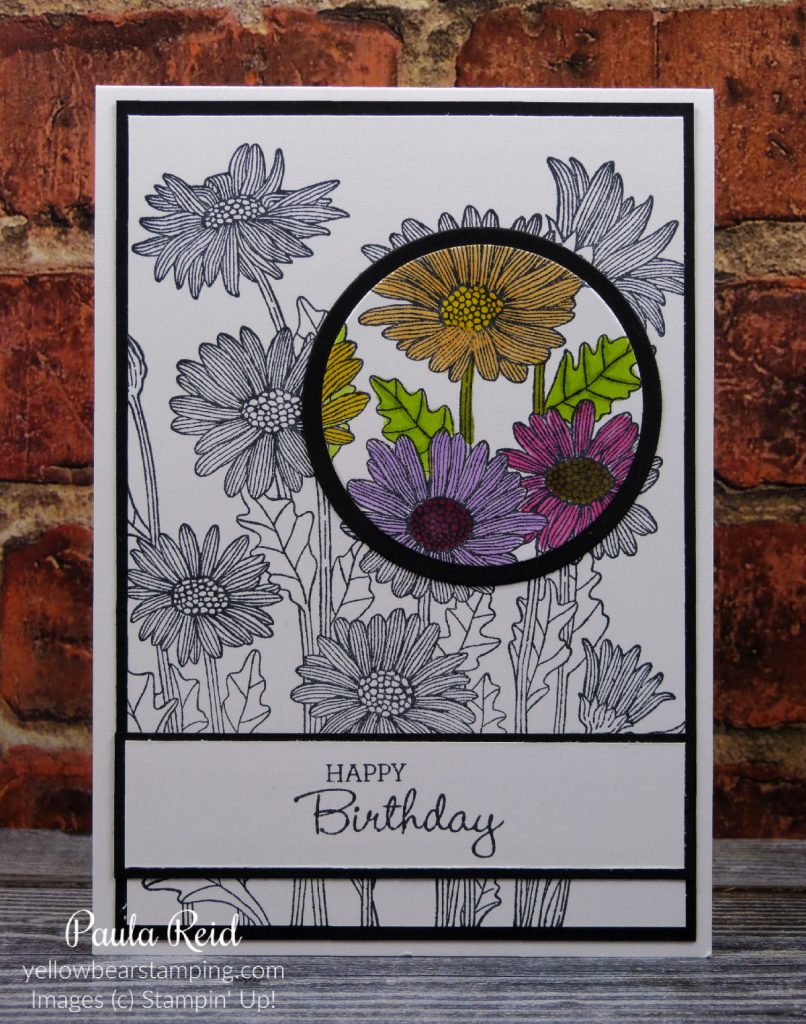
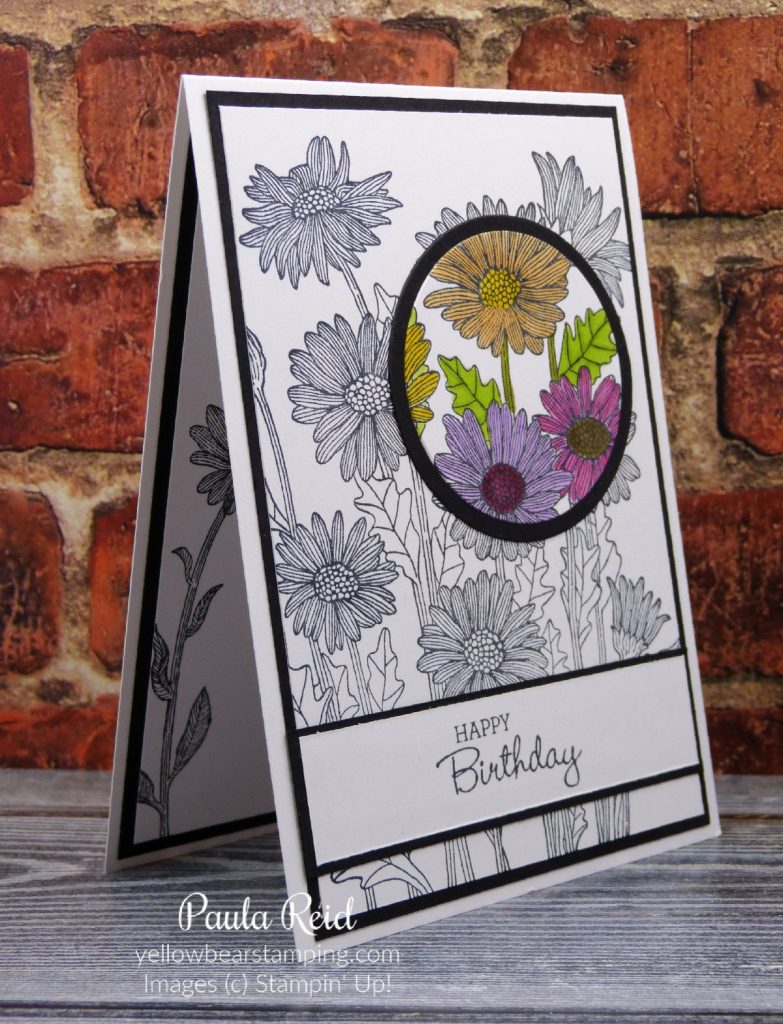
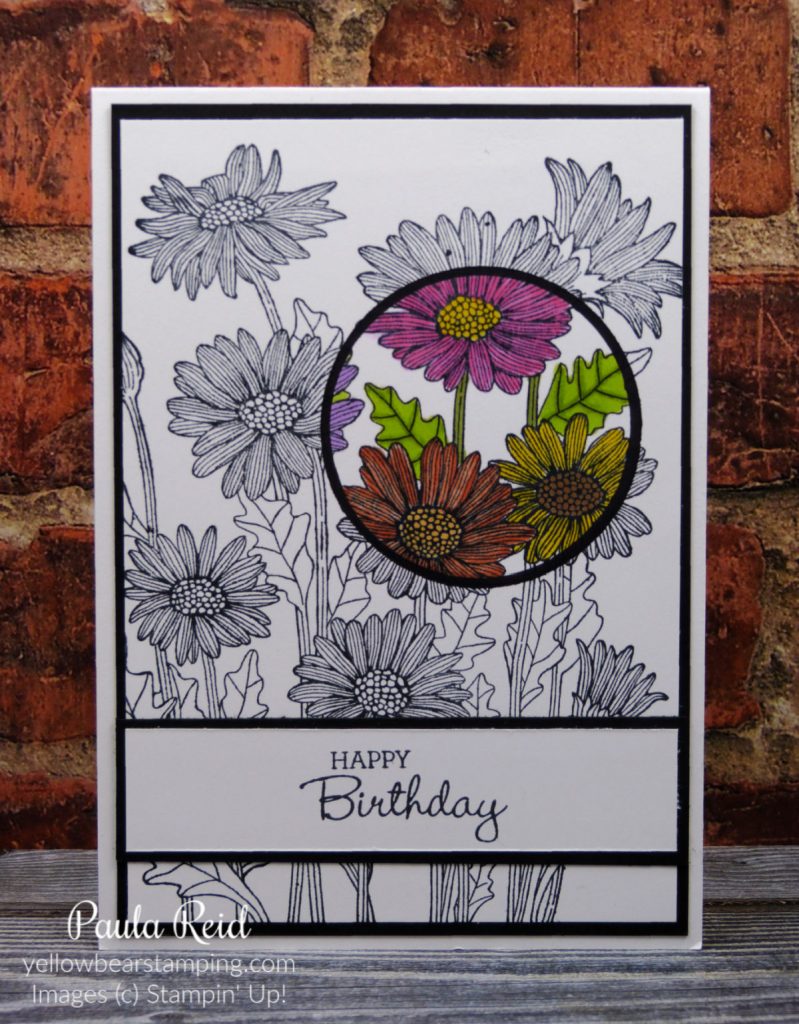
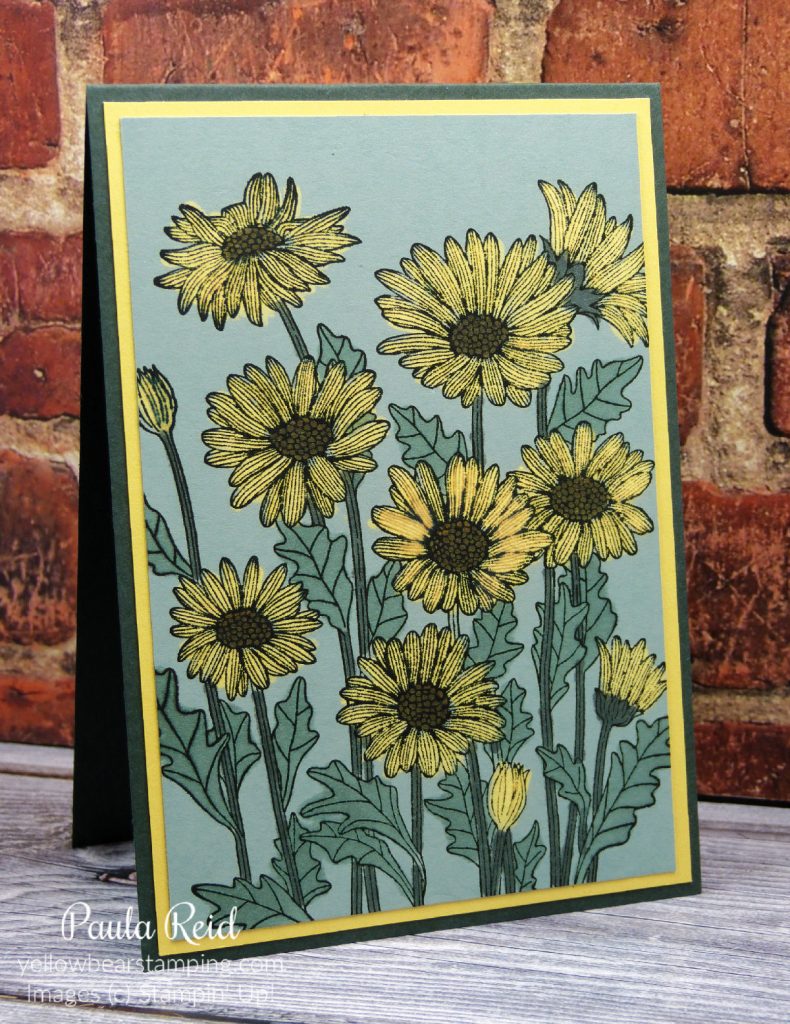
The Spotlight Technique is a great technique to use with large line art stamps. I now have the perfect stamp for this – Daisy Garden – and a new way of creating this technique thanks to a fellow demonstrator Tee-Jay.
Normally you would stamp your image, die cut part of the image out with a circle, colour it in, mat the coloured circle and adhere again over the top of where you did the original cut – still with me? Well this new way does not require any cutting but you still achieve the same look. Read on down to find out more.
As mentioned above I stamped my large image (using the Stamparatus) using Memento Black then die cut a portion of the image with a circle die from the Layering Circles Die and coloured it in with Stampin’ Blends. I then cut a Basic Black circle mat using the next size up of the circle dies and adhered these two together. Lining up your circle image adhere this on top of the ‘hole’ to give you back your full card front. Adhere it to a mat and or base and you have completed your Spotlight card.
By adding the mat it highlights the coloured in area.
And here’s the second way of doing it – can you spot the difference? For this card I drew a circle directly onto the stamped image with my Basic Black Stampin’ Write Marker and then coloured in as I did with the first card. It gives the same effect but is a single layer card – how cool is that.
On the inside of the cards I stamped the daisy image from Daisy Lane again in Memento Black and left it as an outline. The sentiment is from the new Pansy Patch set.
You could do this technique with smaller images and just repeat them on your card front and then select an area (doesn’t have to be a circle) to highlight. No end to the possibilities.
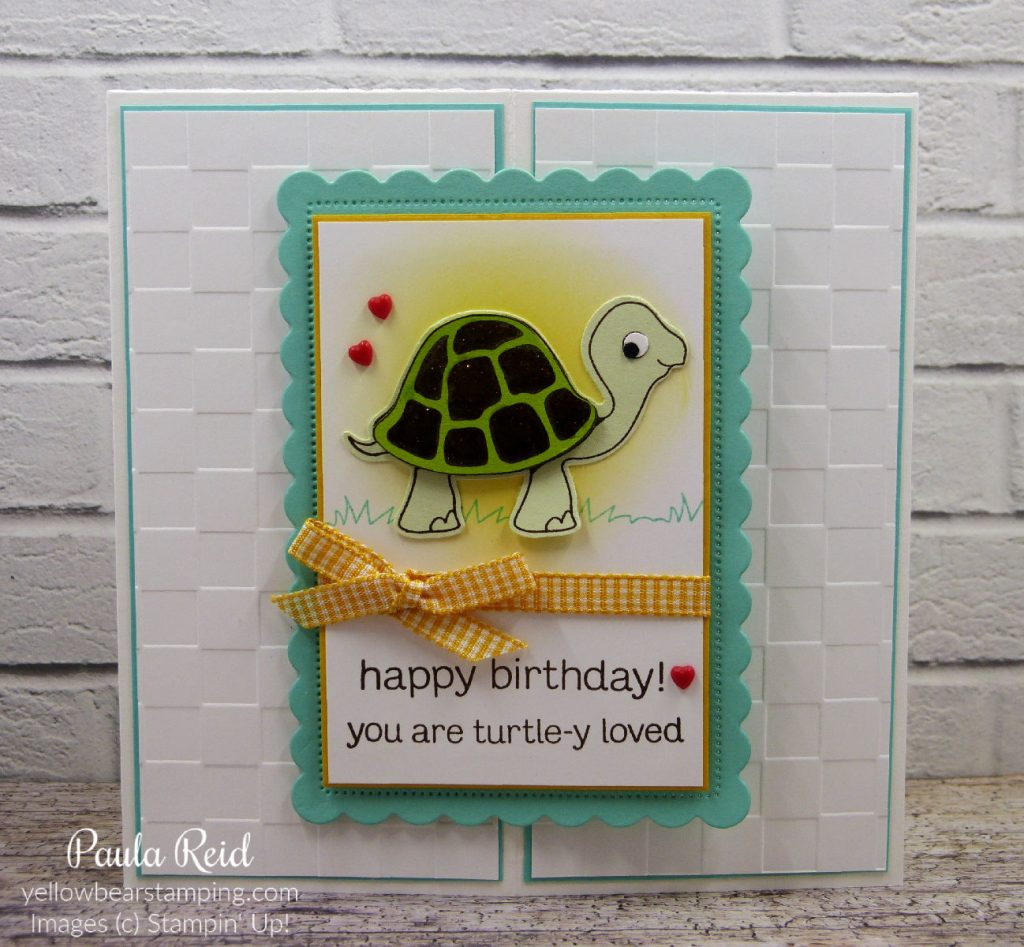
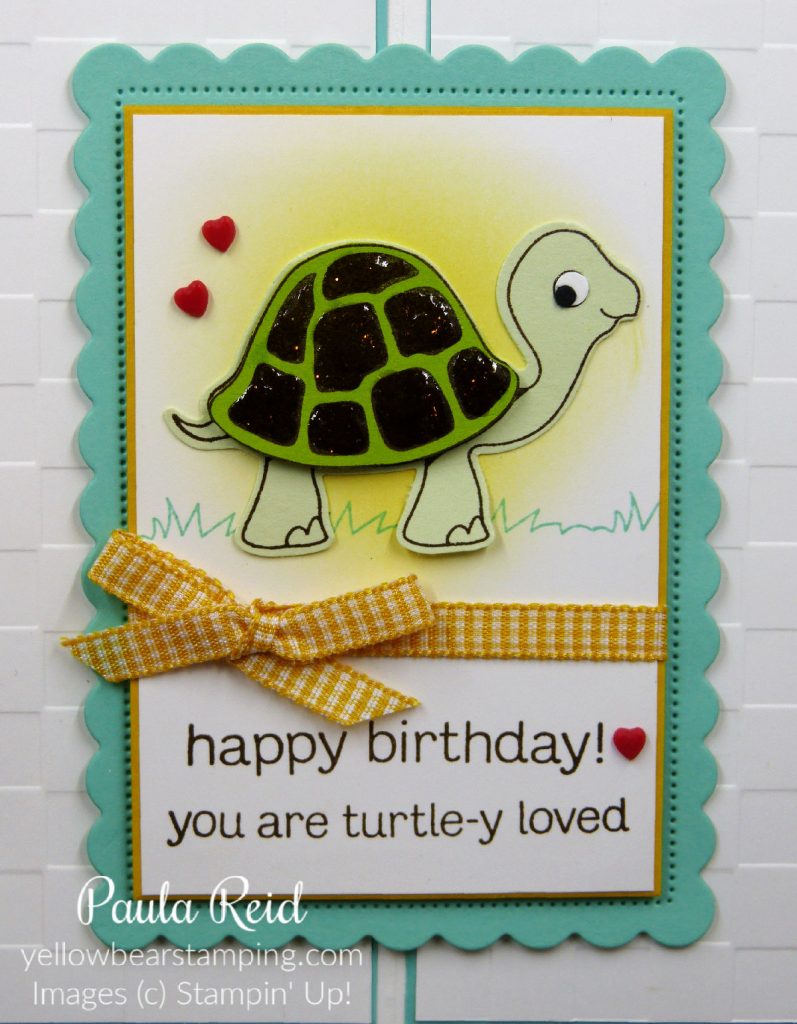
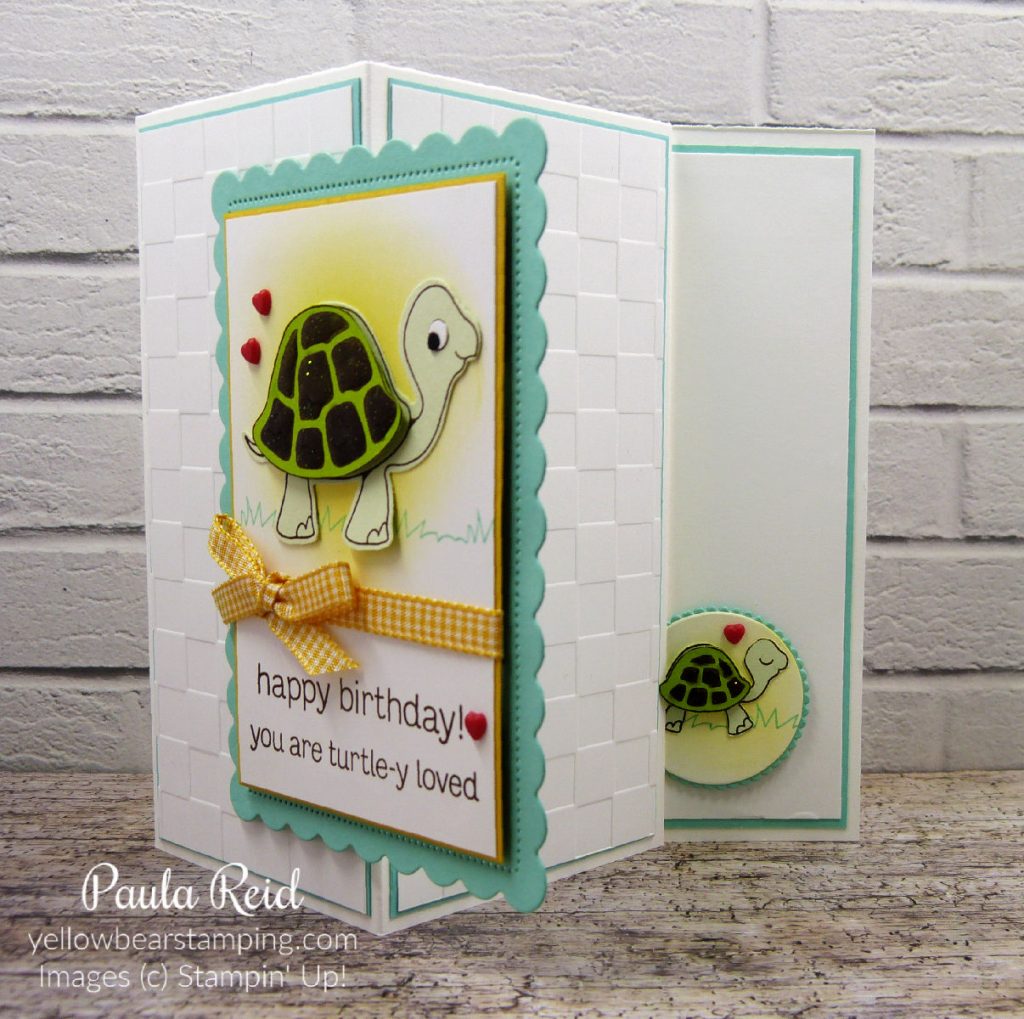
Today’s fun fold card is another one we made at last month’s team training. It’s a 5″ square card and features the cute Turtle Friends Bundle on page 56 of the Annual Catalogue.
The front of the card has been scored in half and has two panels that have been dry embossed with the Checks Embossing Folder on page 154 and then matted with Coastal Cabana.
Isn’t Mr Turtle cute? He has been stamped twice – once on Soft Sea Foam and once on Granny Apple Green. This bundle has a coordinating punch which we used on the Soft Sea Foam image. Did you notice his ‘glossy’ shell? After stamping the outline image we stamped his ‘shell’ inside the image then applied Shimmery Crystal Effects from page 128 to give his shell a 3D look and make is nice and glossy. NB: the Shimmery Crystal Effects takes a bit of time to dry so you may want to do this part of the card first.
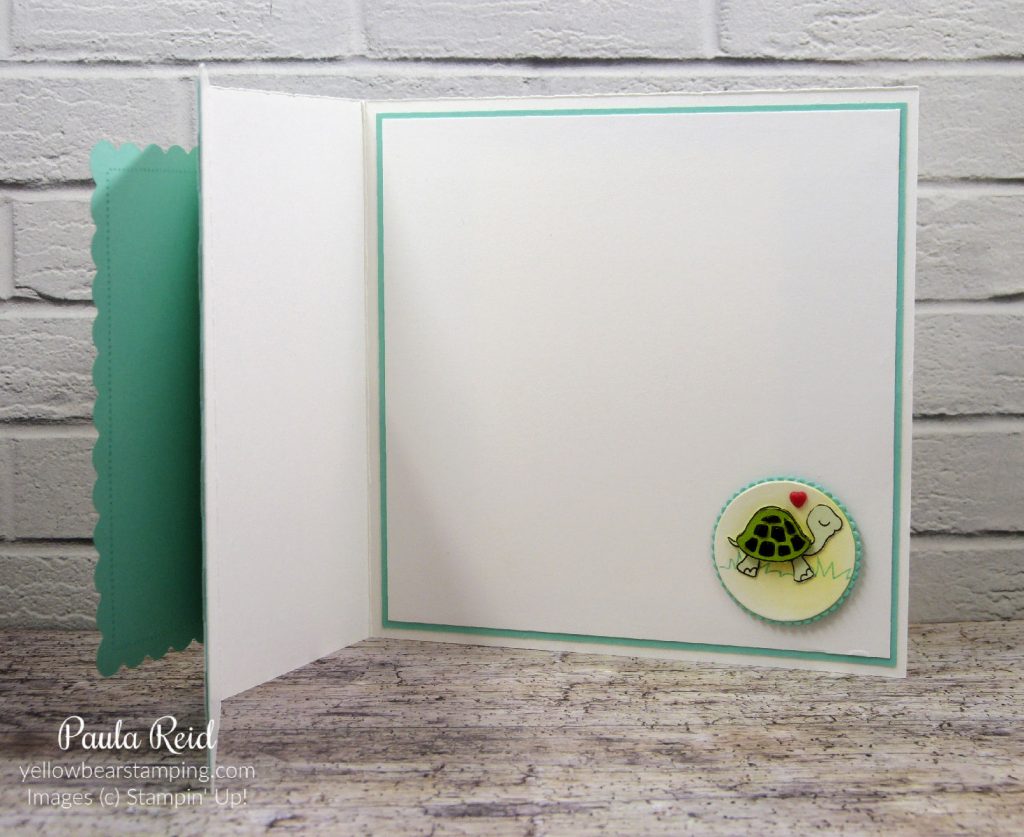
The card front folds back and tucks in behind the baby turtles ‘shell’ on the inside of the card. The front stamped panel has only been partially adhered to the card to allow the front of the card to fold back. The mat has been die cut using the new Scalloped Contours dies on page 158. These dies are part of the Color and Contour Bundle on page 98.
This bundle will be a great one to use for all ages and has a number of additional stamps to create fun cards.
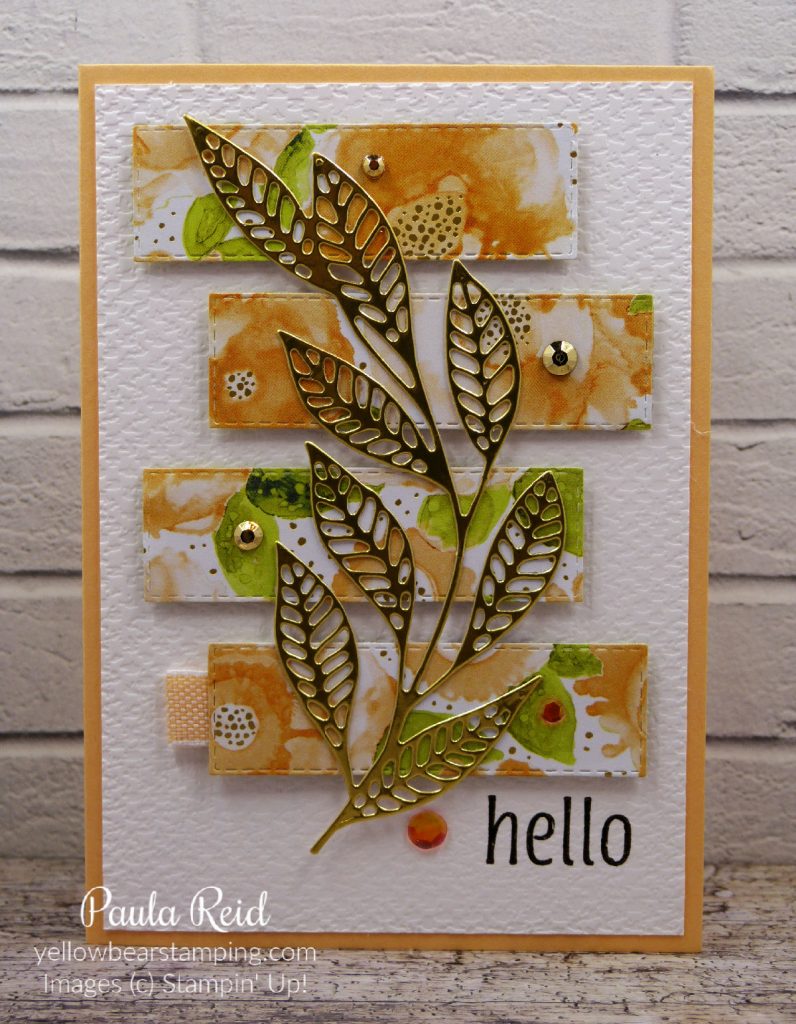
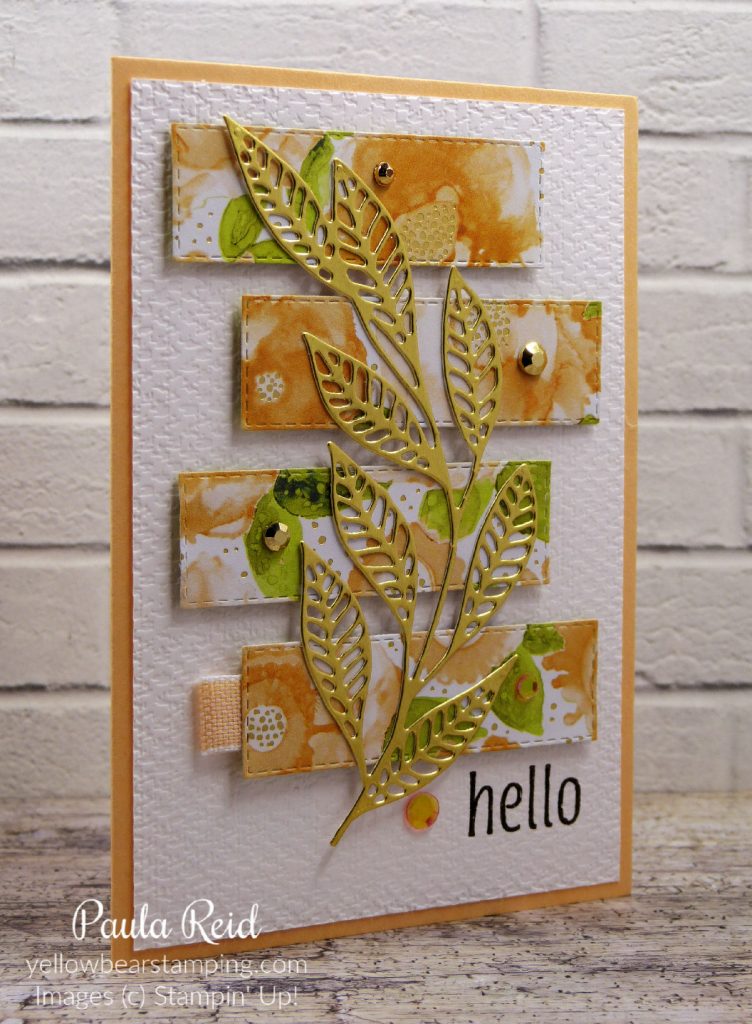
Today’s post is a quick and simple card we made at our recent training event. Even though this layout is a simple one it still has lots of texture and layers to please the eye.
The Expressions in Ink Specialty Designer Series Paper (DSP) is so gorgeous and has a lovely range of colours with hints of gold foiling. The Stitched Rectangle Dies (one of my most used sets of dies) add a bit extra to strips of DSP. These have been adhered with dimensionals to add height to our card. To add texture to your card fronts select an embossing folder (Tasteful Textile 3D Embossing Folder) and dry emboss your card front – make sure you stamp your sentiment first!
The Artistically Inked Bundle includes a stamp set and coordinating dies. Here we’ve used the large leaf die and die cut it from gold foil. Add a bit of ribbon – Pale Papaya and White 1/2″ Woven Ribbon – and a selection of ‘bling’ and your card front is complete.
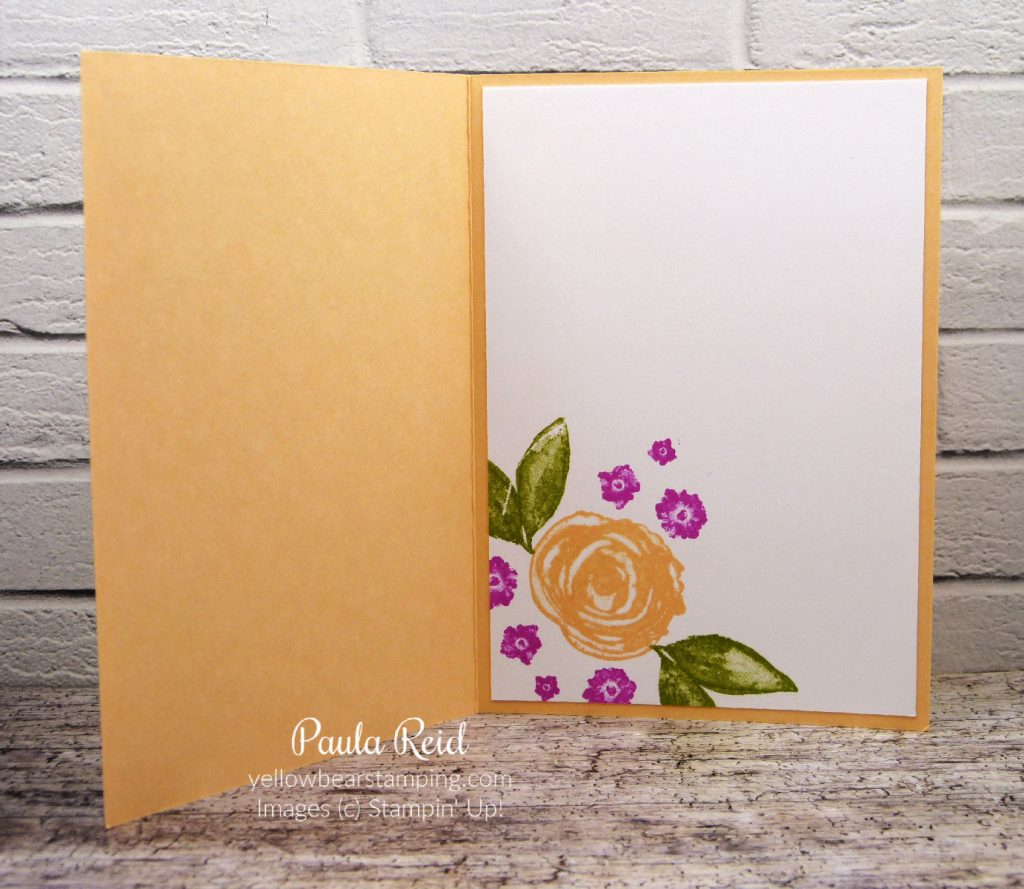
A bit of stamping and a pop of colour completes the inside. This stamp set is a ‘Distinktive’ stamp which creates different opacities in a single stamped image.
What DSP do you have in your stash that you could use to recreate this card?
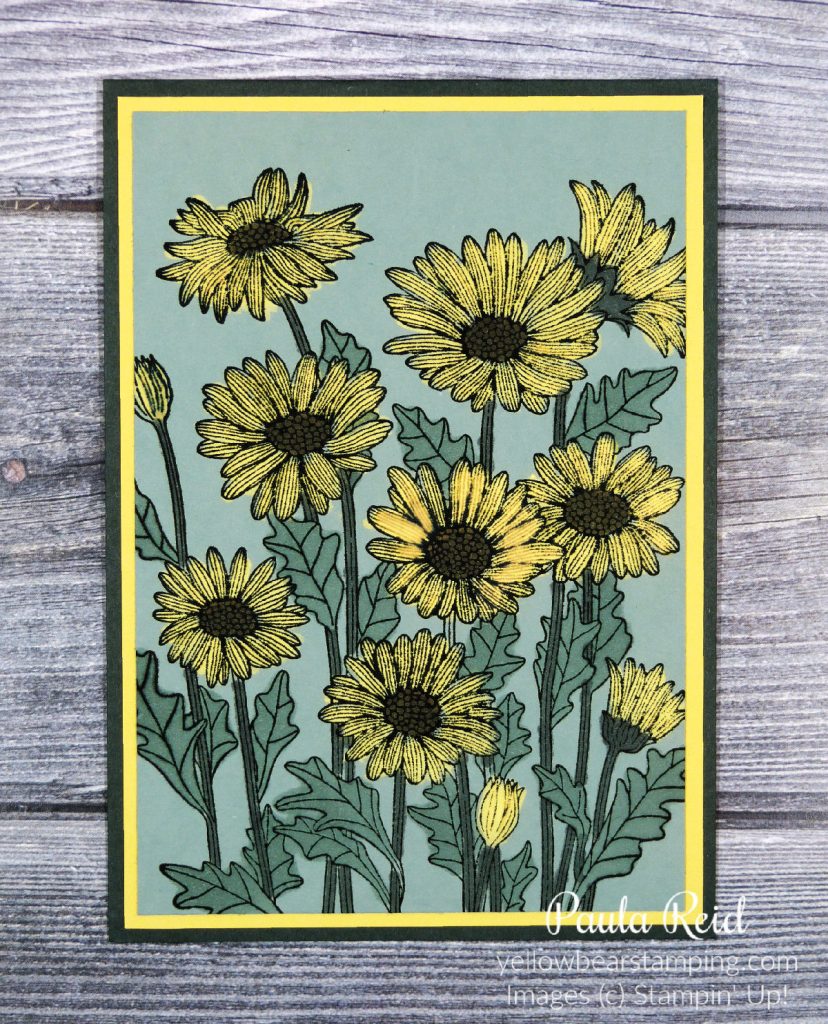
The first time I used the ‘bleach’ technique was way back in October 2011 – not sure why it’s taken me so long to use it again. This time I’ve used the bleach for ‘colouring’ my image as I would with my Stampin’ Blends or other colouring methods.
Here the bleach has stripped away the colour of the cardstock changing the daisies from Soft Succulent to more like So Saffron.
I put some bleach in a jar and then using my Blender Pen applied the bleach to the flowers. It doesn’t take long for the bleach to strip away the colour of the cardstock.
I coloured the leaves using Soft Succulent and the stems using Evening Evergreen Stampin Blends. For a big background stamp like the Daisy Garden I would recommend using the Stamparatus – it’s so much easier to handle than on a block plus if you need to restamp the image because it hasn’t stamped evenly you can just reink the stamp and know that it will stamp perfectly again to give a clear solid image. The centre of the daisies have been coloured with Soft Suede.
This stamp is perfect for this technique. I have some other techniques to share using this stamp so keep an eye out in the coming weeks.
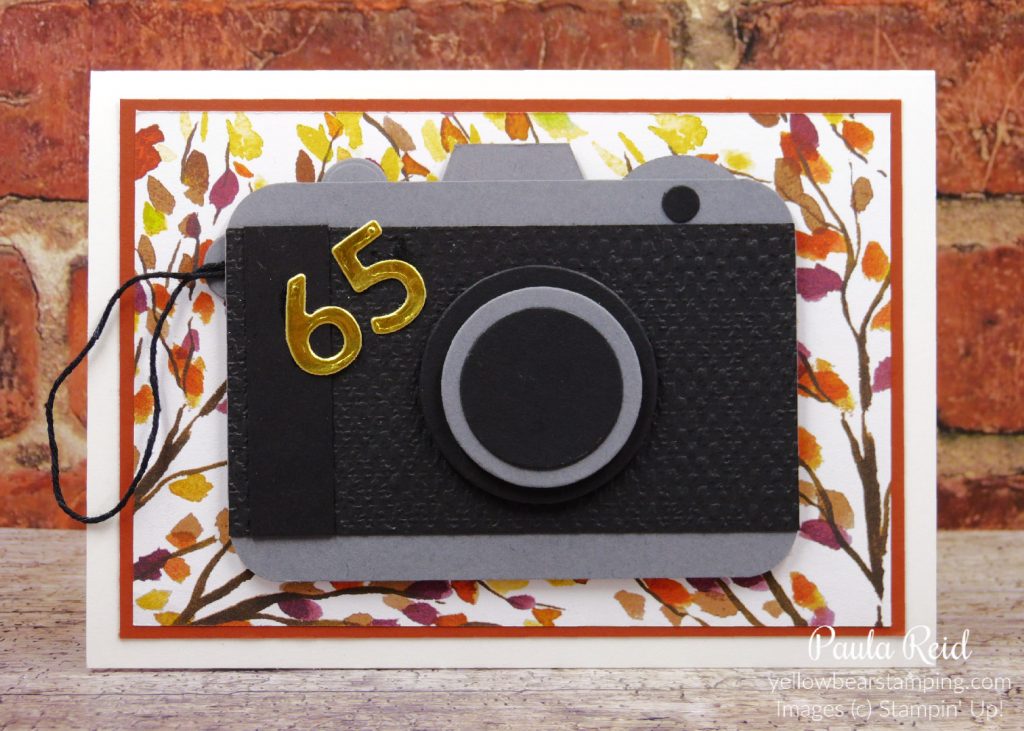
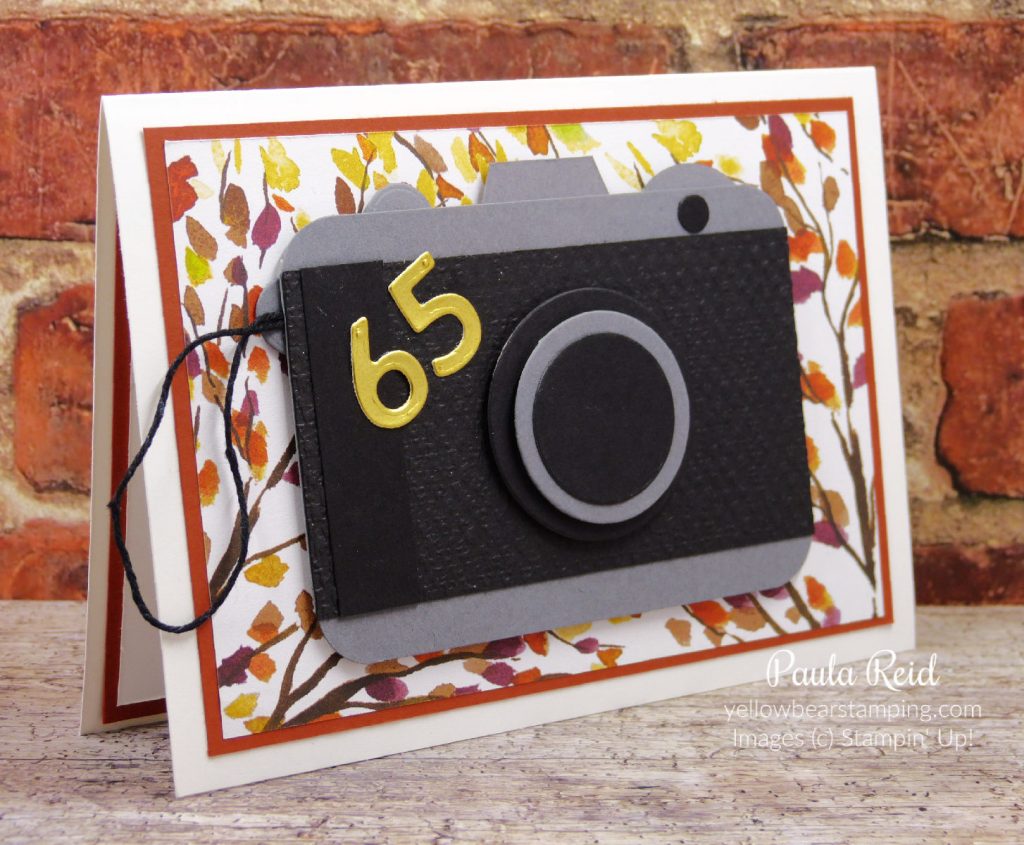
On Wednesday Phil and I celebrated our birthdays – mine was ‘just another birthday’ whereas his was a milestone one – 65. I must admit I was a bit stumped as to what to create for him for this special birthday. At the ’11th hour’ my creativity kicked in and I came up with the idea of a punch art card to represent his hobby of photography.
This is the first time I’ve made a camera – thankfully I had the ‘real McCoy’ on hand to guide me. Phil was under strict instructions not to enter the office. Part of my inspiration for this card was that last weekend we spent a long weekend at the Chateau Tongariro (I’d kept it a secret since February) and Phil had been able to take lots of photos. It’s Autumn (Fall) here in New Zealand and the colour of the trees on our travels were just so beautiful and reminded me of the Beauty of the Earth Designer Series Paper (DSP) plus Phil is a landscape photographer.
The camera ‘body’ measures 7cm x 10cm cut from Basic Gray. I found a retired Corner Rounder Punch but you could manually round this if you don’t have a punch. The Basic Black overlay measures 5.3cm x 10cm and has been dry embossed using the Tasteful Textile 3D Embossing Folder. I then added a strip of Basic Black (1.5cm x 5.3cm) for the ‘grip’. To create the camera ‘lens’ I used the three smallest Layering Circle dies. The smallest Basic Black and Basic Gray have been adhered directly together then adhered to the largest Basic Black circle with mini dimensionals and then adhered again with mini dimensionals to the ‘body’. I use the mini dimensionals a lot as they aren’t as high as the full size dimensionals so don’t make your project too high if you use them on multiple layers like I have for this card. The elements at the top have been die cut using a partial circle die on the right and the left one is the half circle die from the Baby Clothes dies. I also used this for the anchor for the hand strap.
I was really sad to see that the Pretty Perennial stamp set didn’t carry over as I love the big Happy Birthday font but glad we have this new set Biggest Wish which has a couple of birthday options.
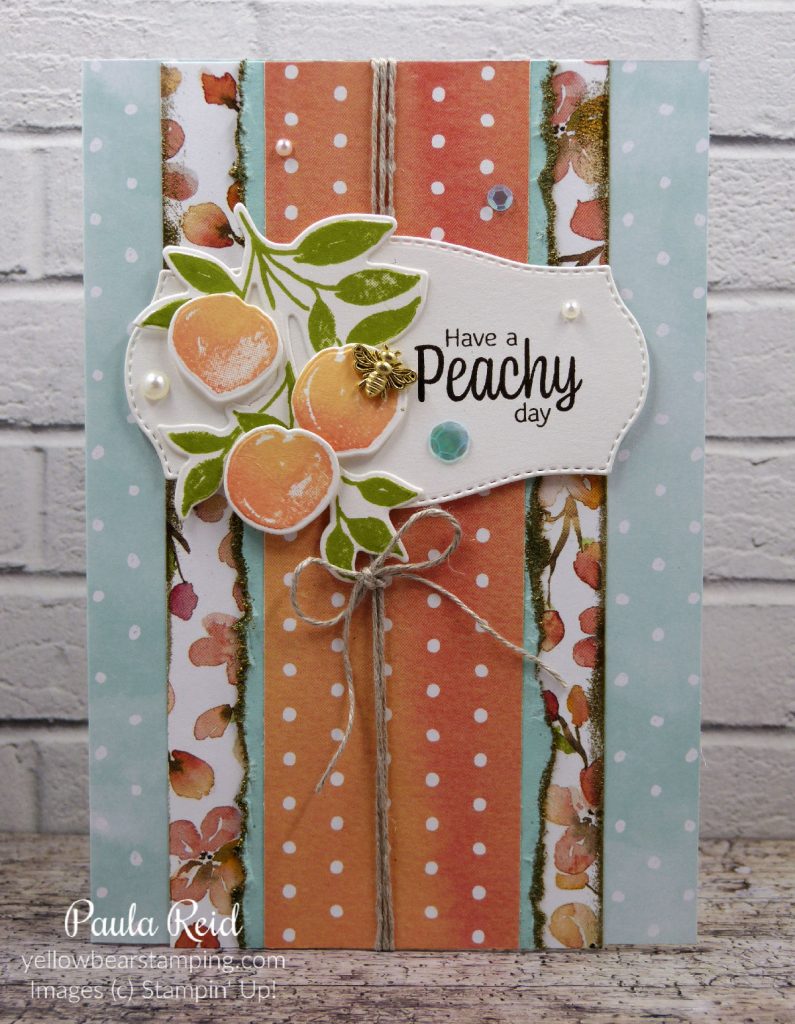
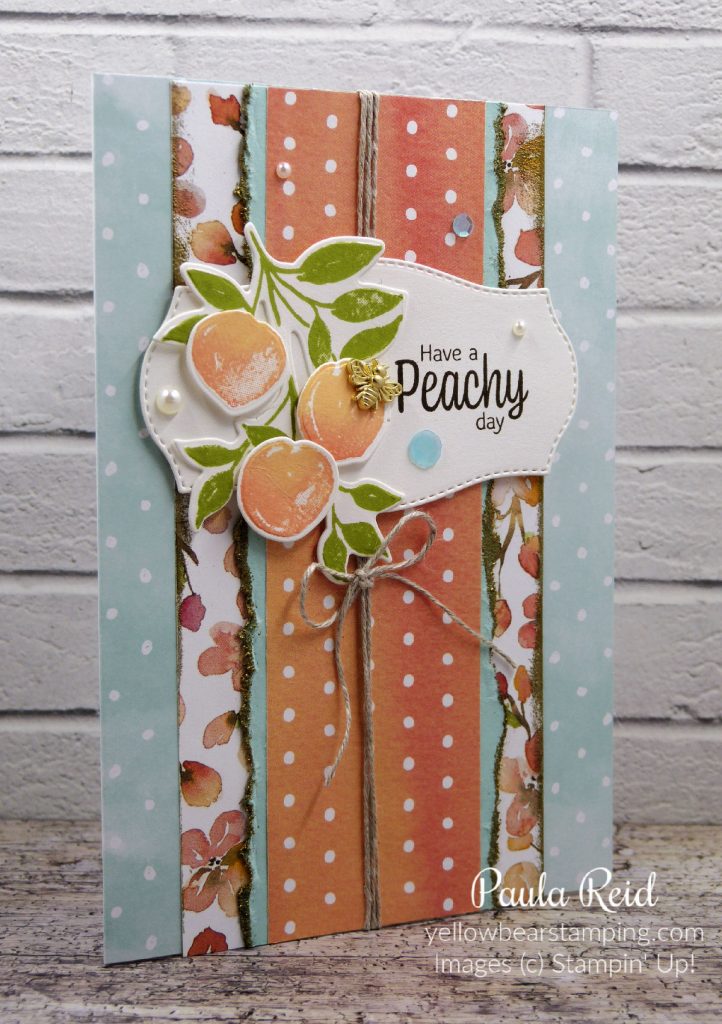
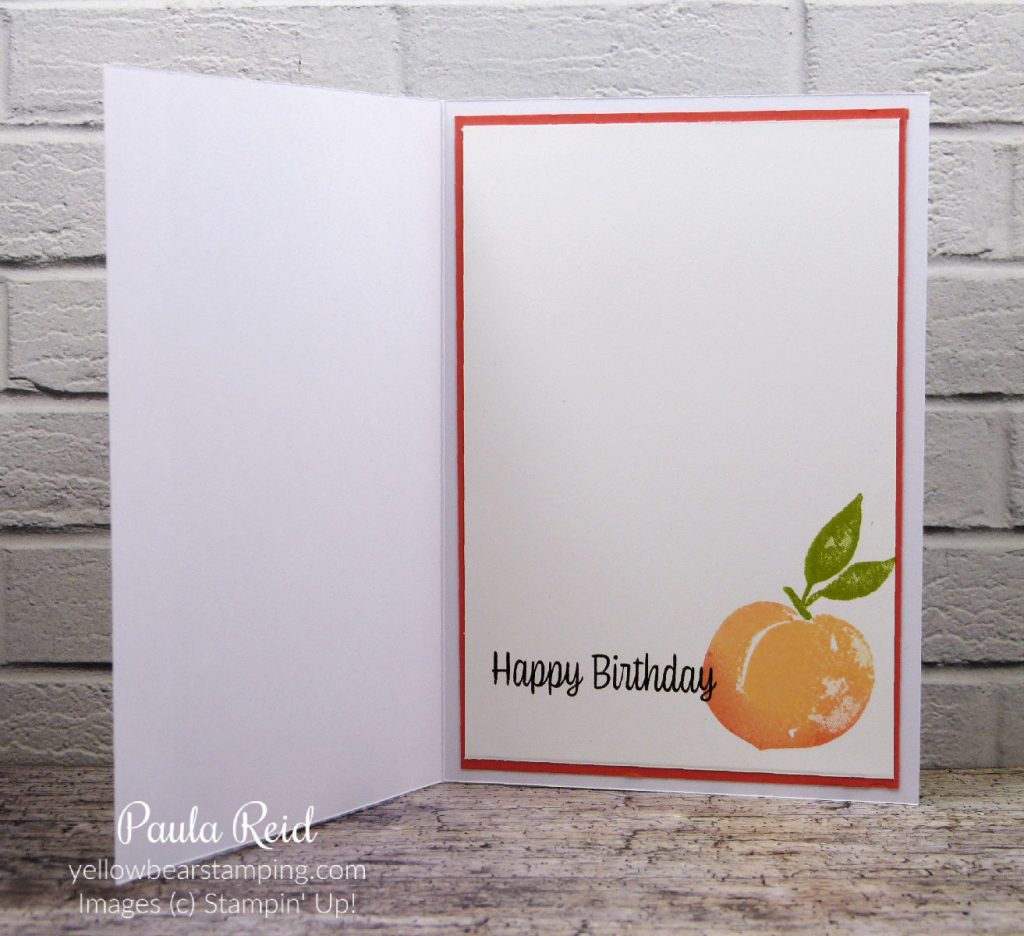
Earlier this month we had a team training day. It was great to catch up with fellow demos and create projects using new product from the 2021-2022 Annual Catalogue. The first project I’ll share uses products from the You’re A Peach Suite on page 60-61 and combines them with the Hand-Penned Memories and More Cards and Envelopes on page 127. You get 20 cards and envelopes that coordinate with the Hand-Penned Suite but can be used with other suites or stamp sets.
The card base has this lovely ‘dot’ design on the front and coordinates beautifully with the You’re A Peach Designer Series Paper (DSP). The base panel of DSP measures 3″ wide and the top layer measures 1 3/4″. In between these two layers of DSP is a strip of Pool Party Cardstock which started out at 1 1/2″. To get the ‘uneven’ edge gently tear your cardstock in half lengthwise and then adhere it behind the centre DSP strip. Did you notice the gold heat embossing on the edges of the bottom layer of DSP and the torn strips?
To achieve this look lightly ink the edges with your VersaMark ink pad then cover with gold embossing powder and heat. Before you heat you can brush off excess embossing powder if needed. This easy technique adds texture and colour to your projects.
The ‘Sweet as a Peach’ stamp set has coordinating dies and comes as a bundle (which means you save 10%) or you can buy the whole suite which includes the bundle, the You’re a Peach 12″ x 12″ DSP plus some really cute mini Jam Jars which are food safe.
I hope you’ll give this suite/bundle a second look.
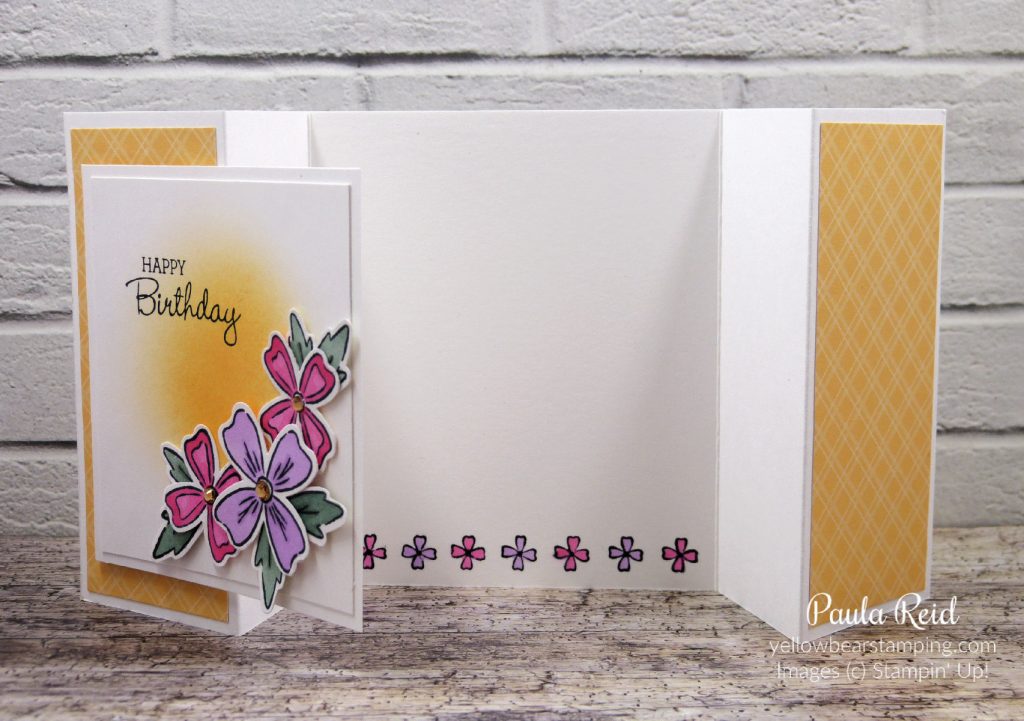
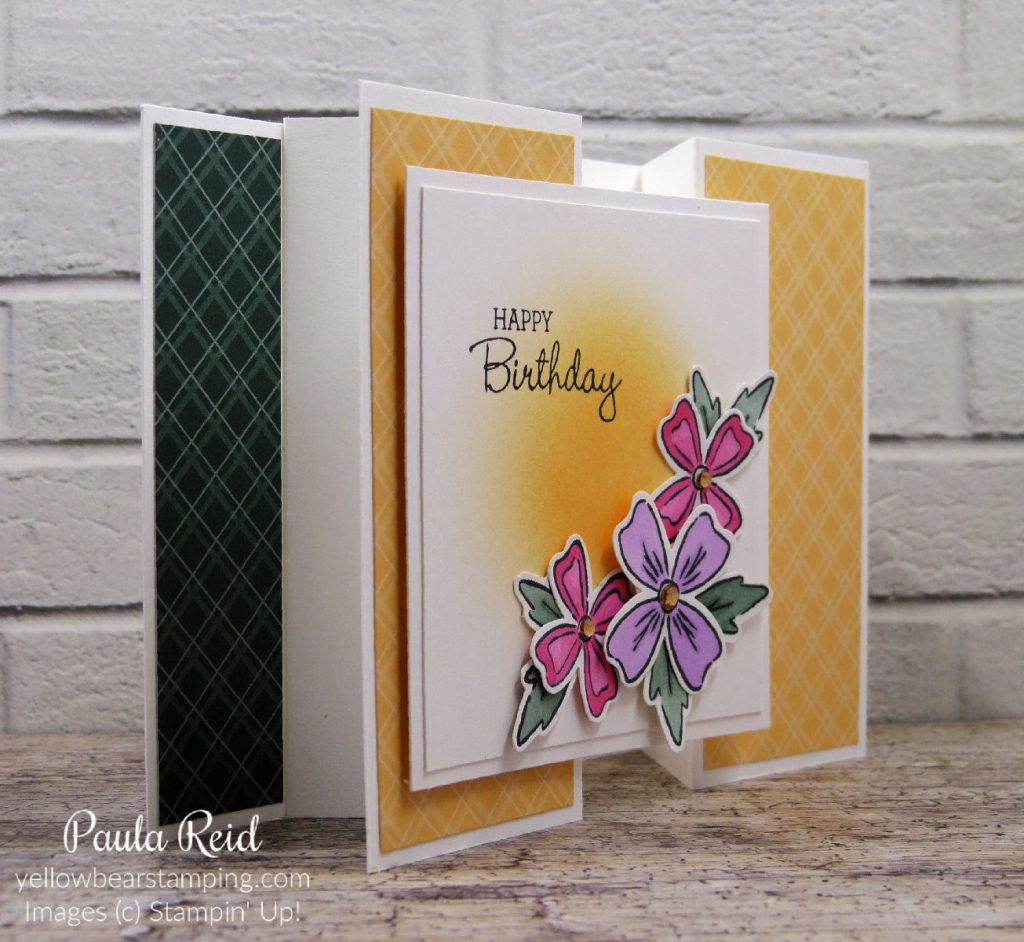
Last weekend I attended a team training (will share the projects we made next week) and saw this card on display which had been made by Helen Wigan. I love fun folds so took a few photos and measurements so I could recreate it.
I’m not sure what this card fold is called but I’ve named it a Z Fold Gate card – you’ll be able to see why in the photos below.
All the new In Colors have been used on this card – Evening Evergreen and Pale Papaya for the 6″ x 6″ Designer Series Paper (DSP), Fresh Freesia and Polished Pink for the flowers and Soft Succulent for the leaves. Using a Blending Brush and Pale Papaya ink I ‘sponged’ and area in the centre before stamping the sentiment and adhering the flowers.
The flowers and leaves are from the Flowers of Friendship Bundle which includes the stamp set and a punch. The sentiment is from the Pansy Patch. I’ve used Thick Basic White for my card base and Basic White for the front panels and stamping the flowers.
The card is in two pieces – the back bit is a normal sized card front – 10.5cm x 14.8cm. The ‘Z fold’ part which is adhered to the base measures 10.5cm x 28cm and is scored at 5, 9.5, 18.5 and 23 cm then folded in a Mountain, Valley, Valley, Mountain formation. The panels on the front are a 8cm square and then a mat of 8.5cm square.
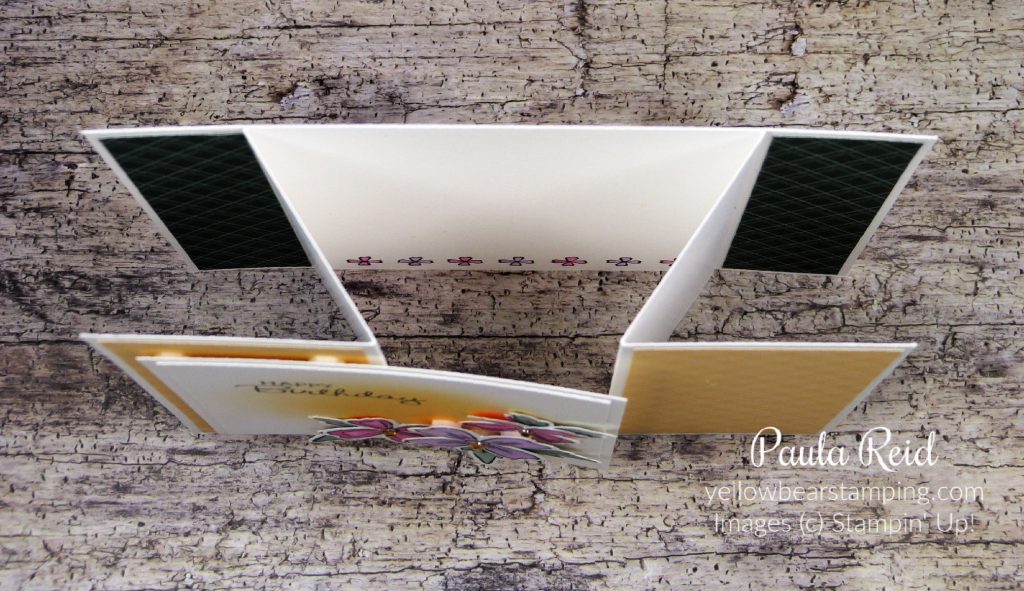
From this view you can see how the card is assembled. I adhered my DSP panels to the base and then adhered the fold out piece. The DSP panels meausre – 4.7cm x 10.2cm (2) for the back and 2.2cm x 10.2cm (2) for the front.
This design is a great way to use your DSP and any number of stamp sets for the front.
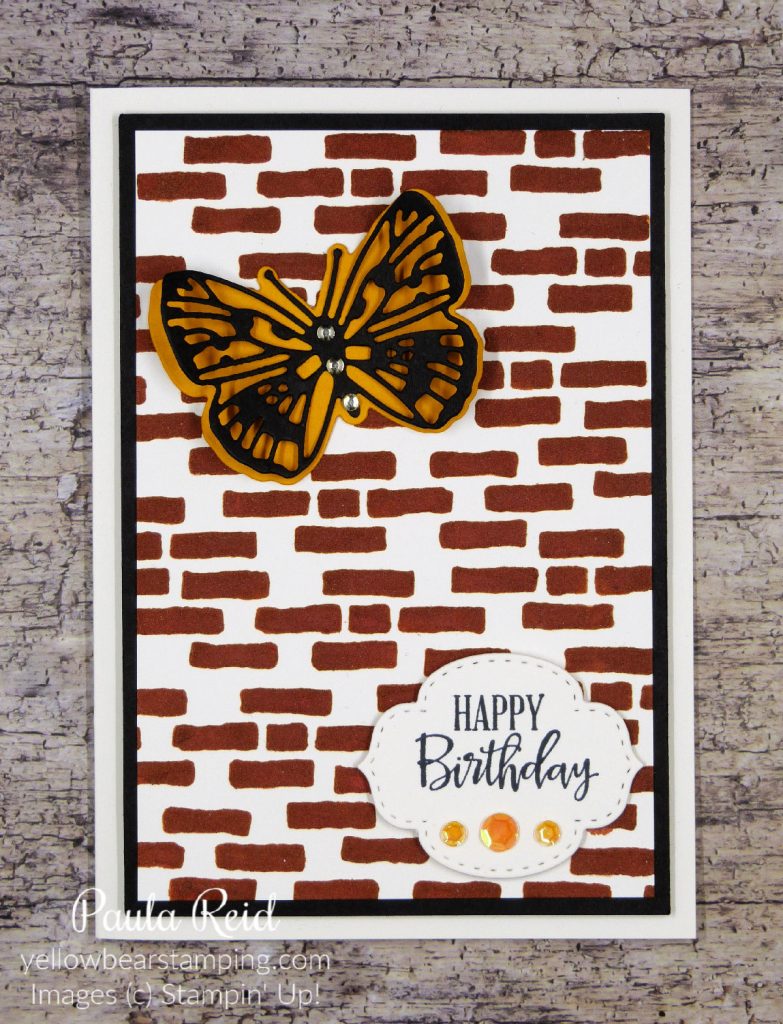
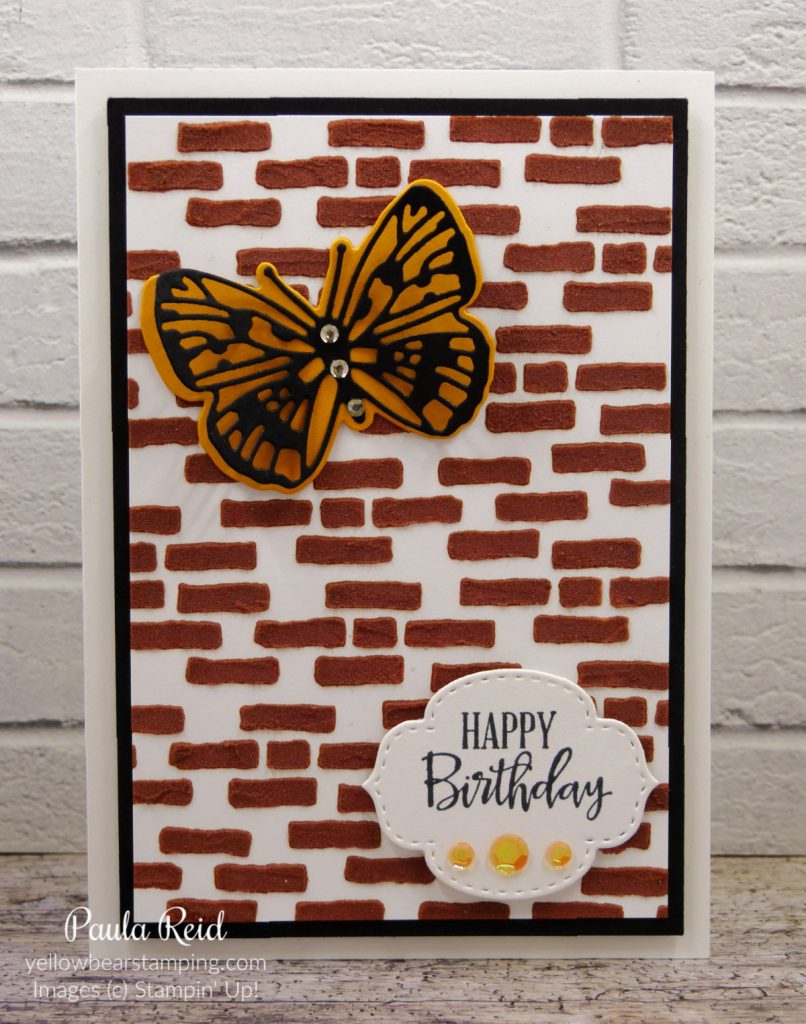
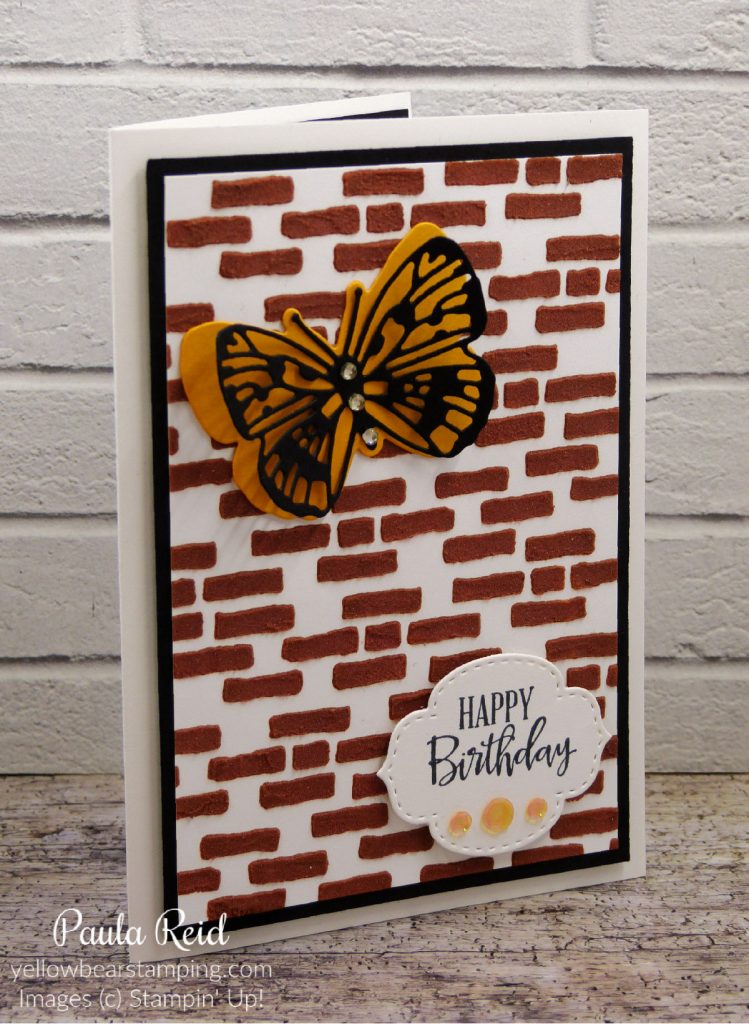
Last Tuesday I shared a project that required masking using a Post-It Note and today I have another project using a different masking technique. For this technique you can create your own mask as I’ve done or use a Decorative Mask as shown on page 128 of the Annual Catalogue. I’ve combined my mask with Embossing Paste but you could also use ink and a Blending Brush.
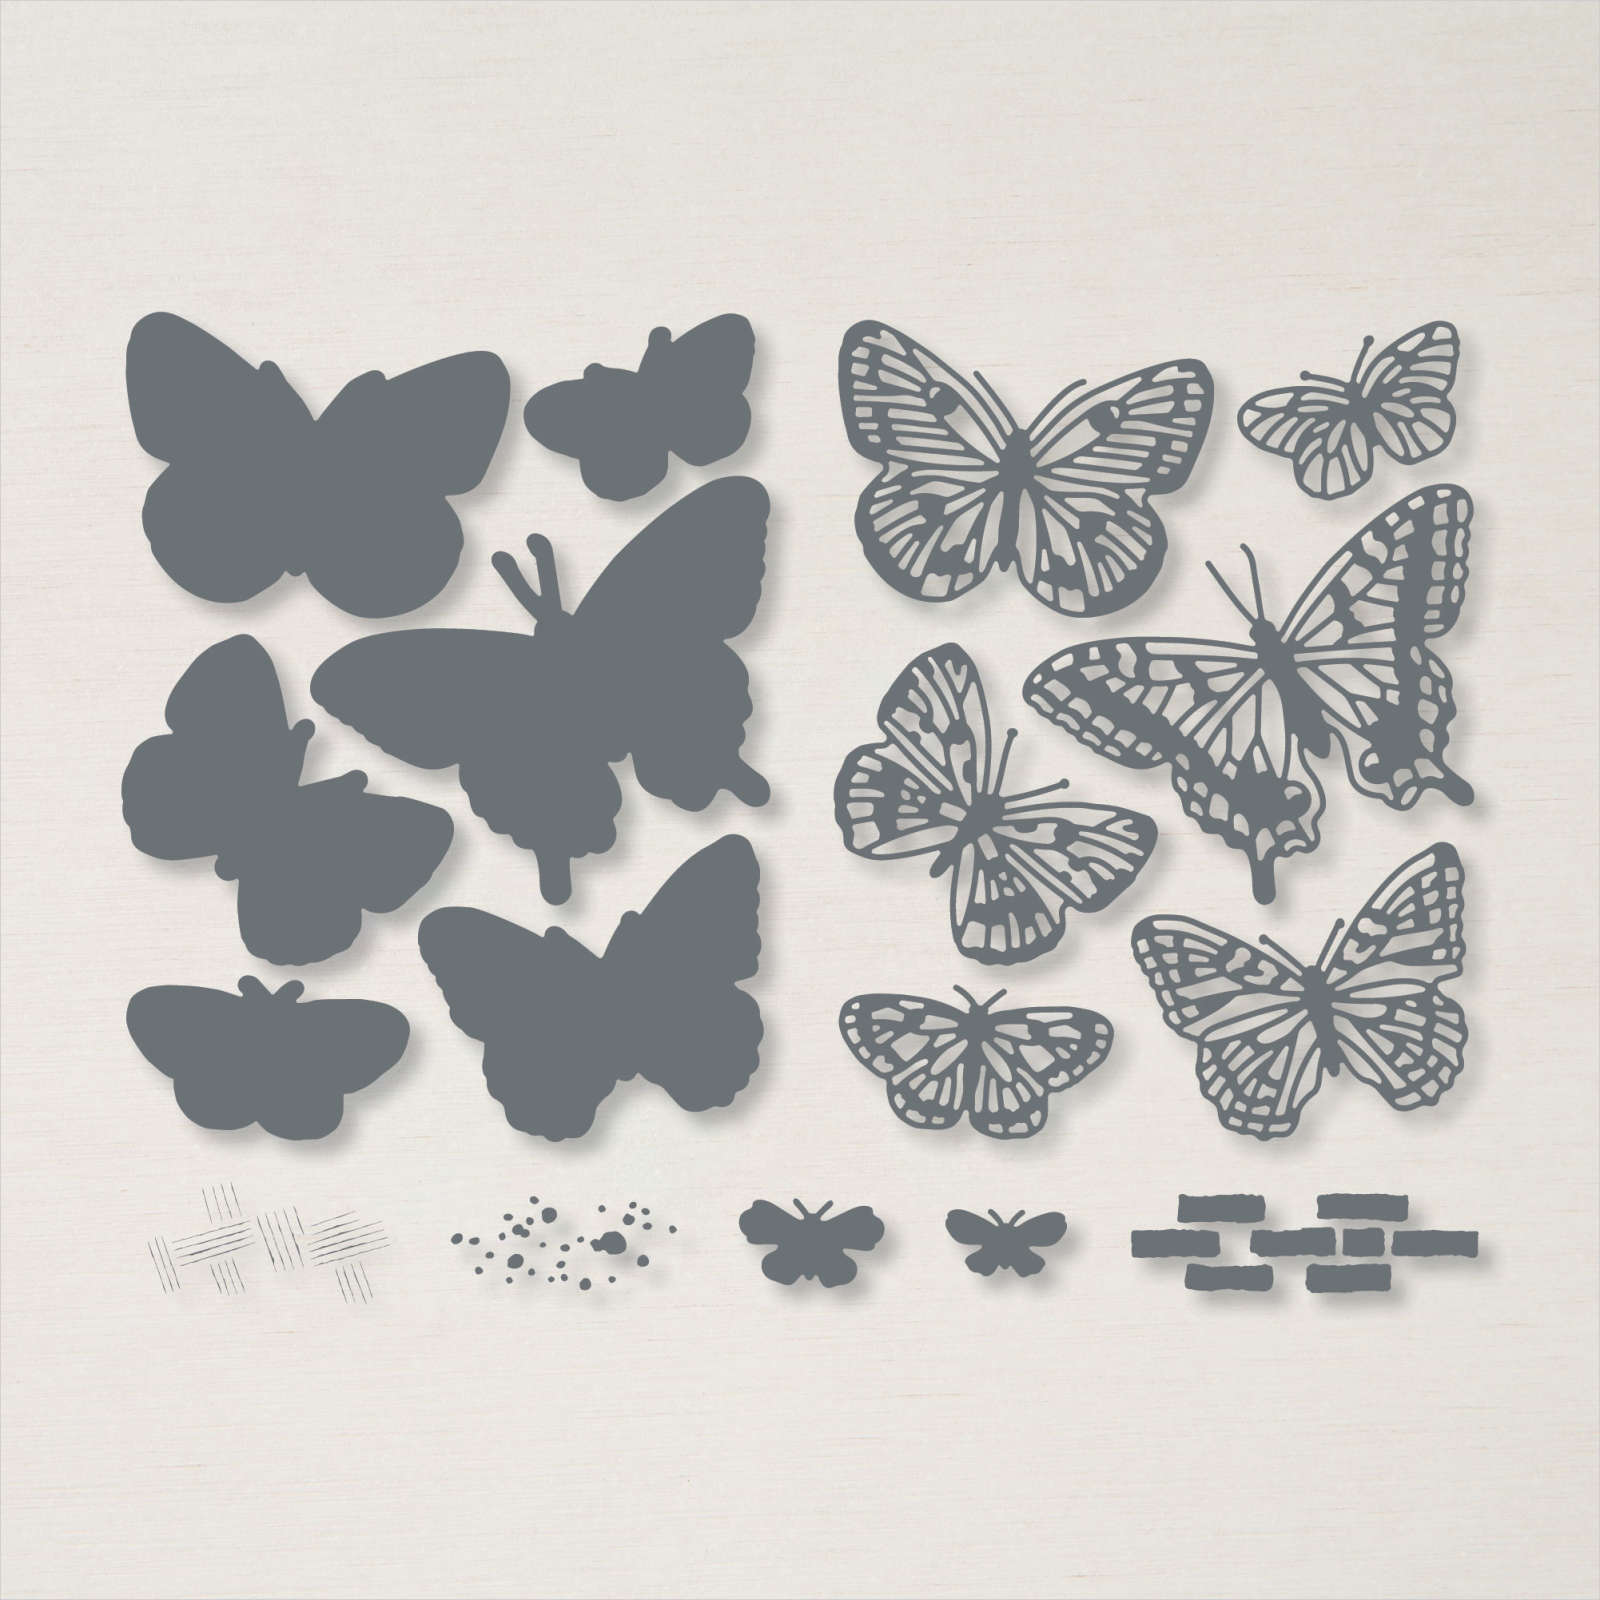
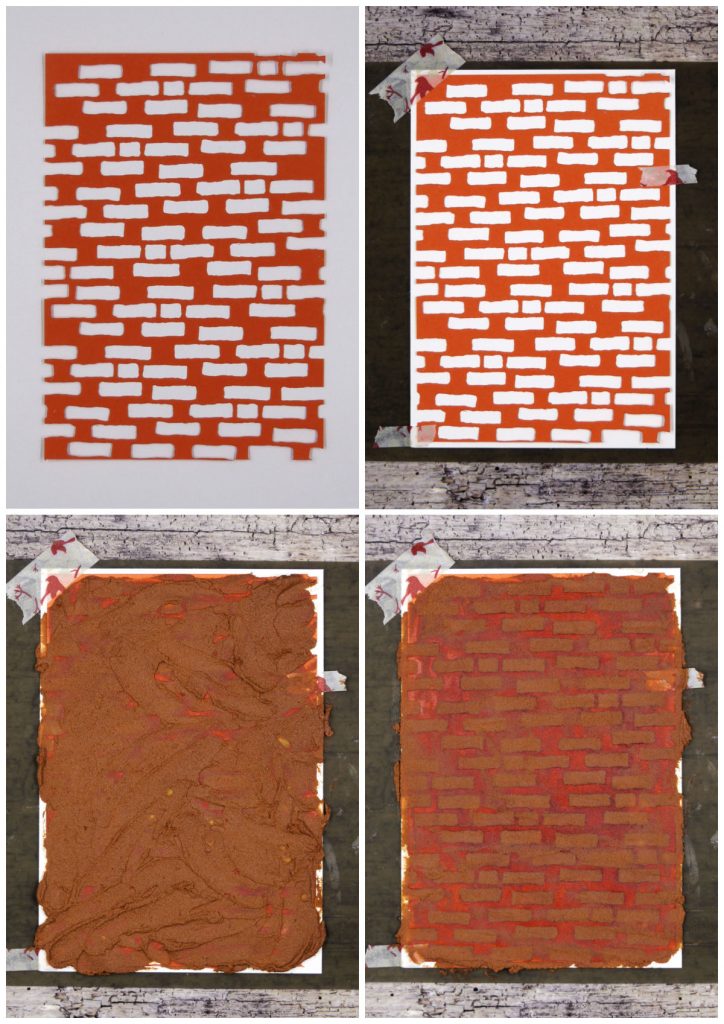
To create my mask I used the ‘bricks’ die (bottom right) from the Brilliant Wings dies on page 158 of the Annual Catalogue.
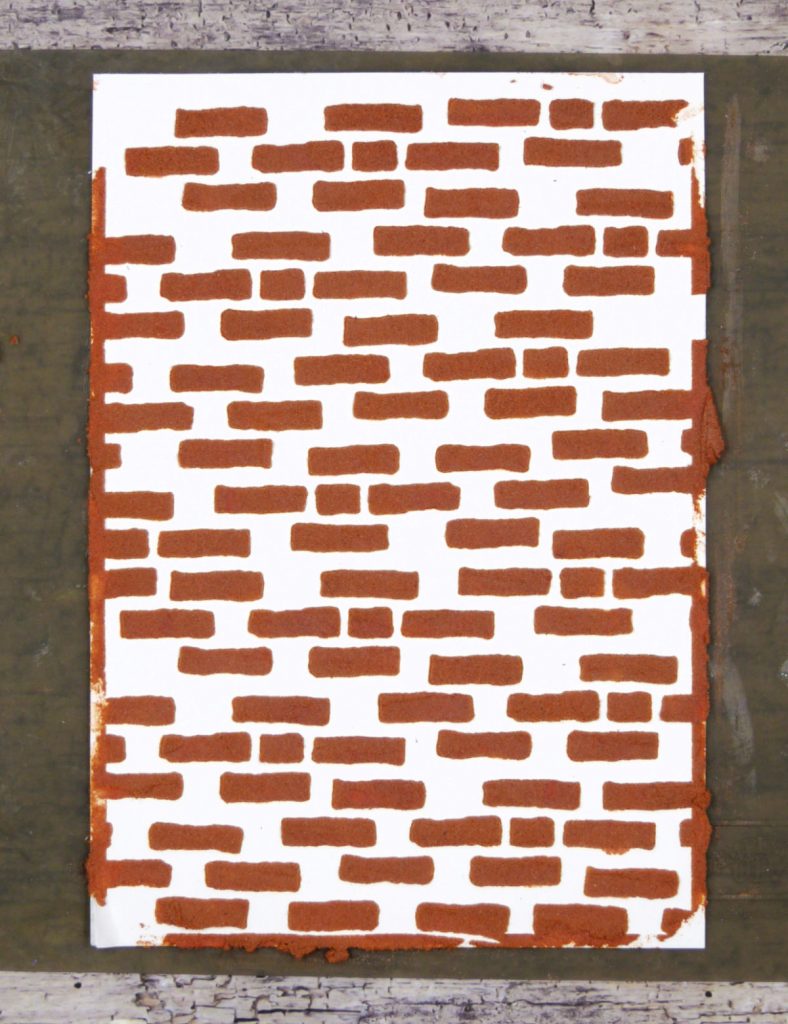
Using a scrap piece of cardstock (10cm x 14.3cm) I die cut the ‘bricks’ to create my mask. I found it’s best to place your silicone craft sheet down first then your cardstock and then the mask. I used some washi tape to hold it all in place. Embossing paste is white but with a few drops of ink refill you can create all sorts of colours. To achieve my ‘brick’ colour I put some Embossing Paste in a separate dish then added one drop of Crumb Cake, two drops of Cajun Craze, one drop of Early Espresso and the one more drop of Cajun Craze – make sure you mix in-between adding new colours. Once you get your colour mix to the shade you want, spread the paste on with a palette knife making sure you get a good coverage across the indentations of the mask. Wipe off the excess and remove the mask.
I let mine dry a bit before I trimmed it to the size I wanted for my card front.
Now it’s time to decorate – I added it to a Basic Black mat and then a Thick Basic White base.
The base of the Butterfly is Mango Melody with a Basic Black overlay. My sentiment is from one of my favourite sets – Peaceful Moments. I hunted through my dies for a suitable label and decided upon this one from Stitched So Sweetly. The sequins are from the Artistry Blooms Adhesive-Backed Sequins which carried over from last years catalogue.
There are a number of dies that you could use to create you own masks – have a look through your ‘stash’ and have fun creating.
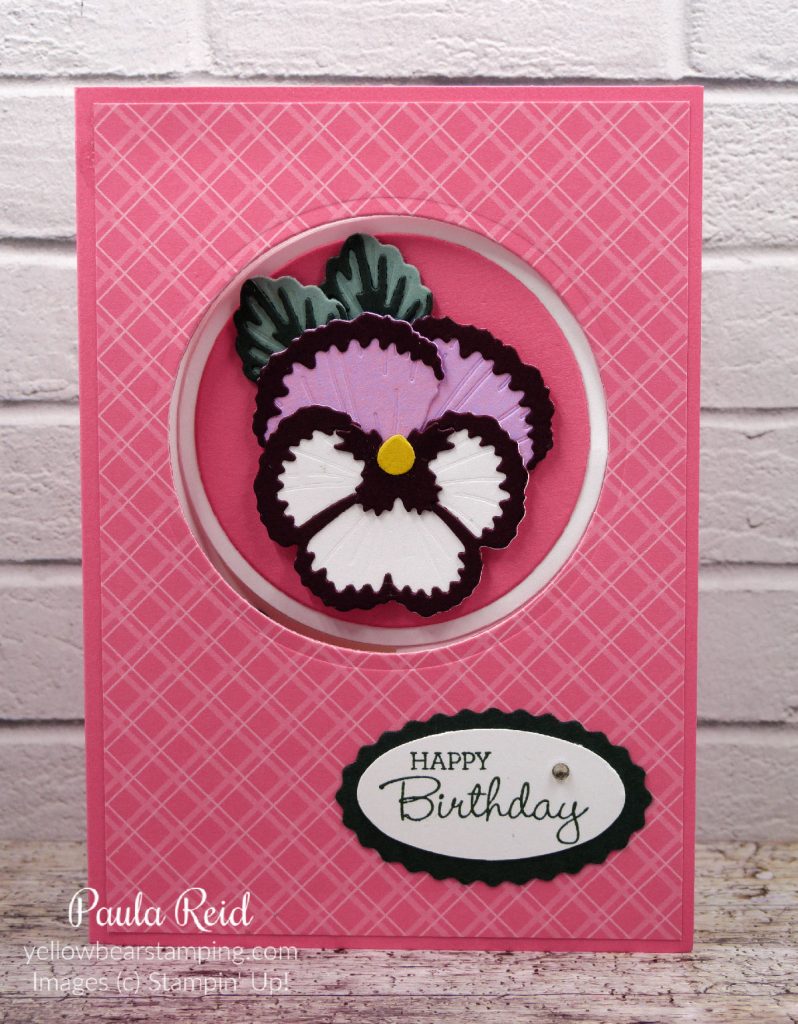
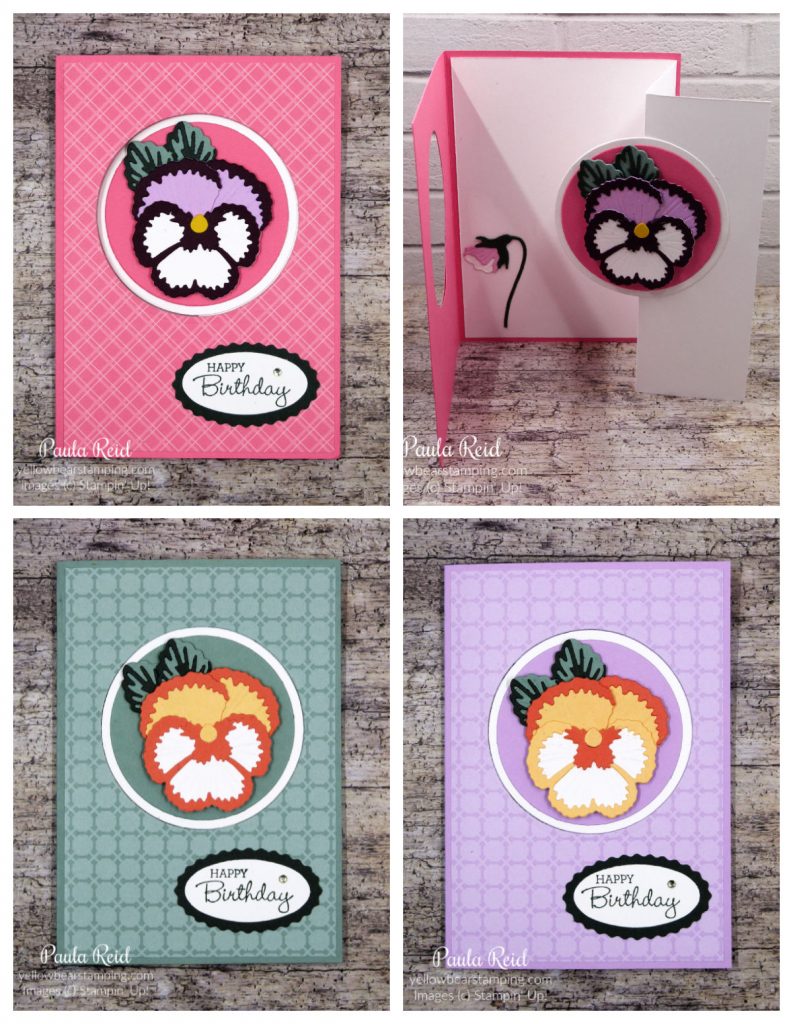
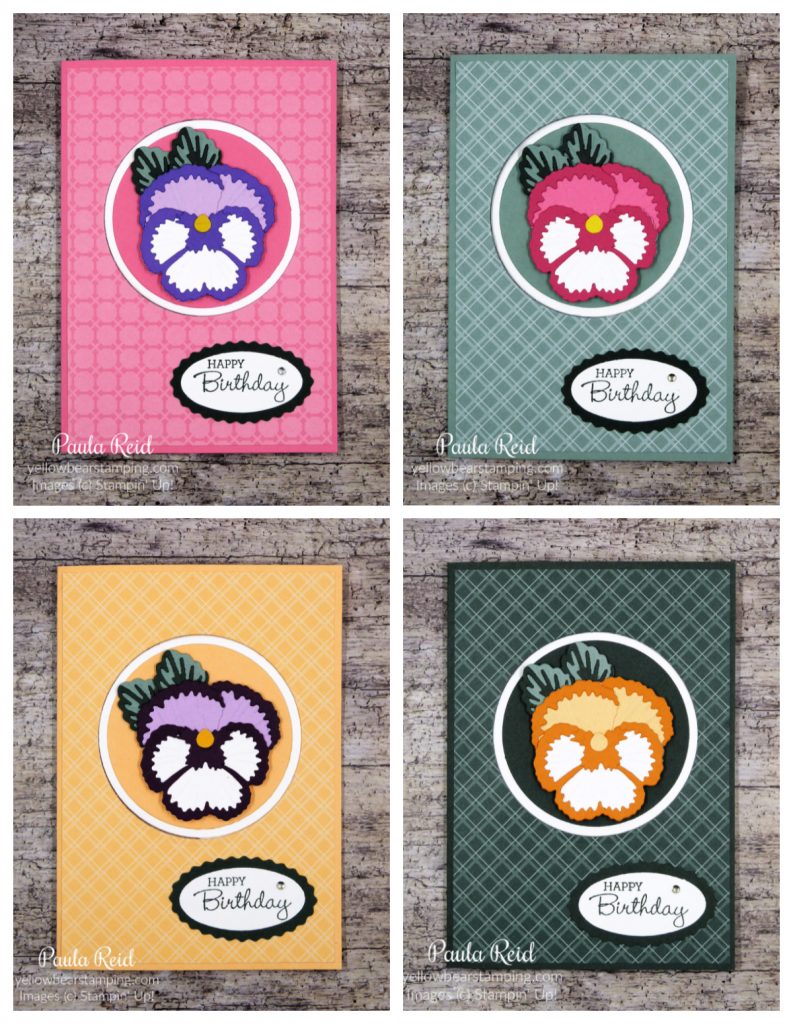
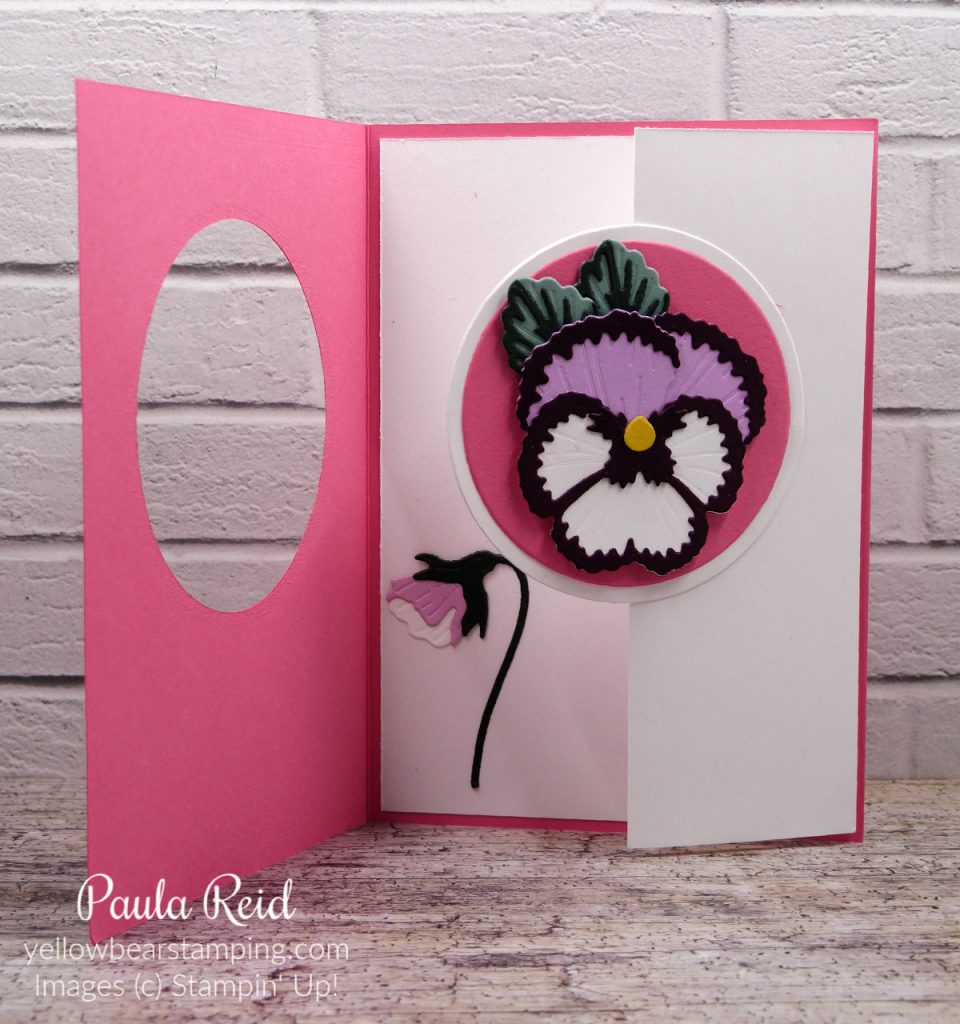
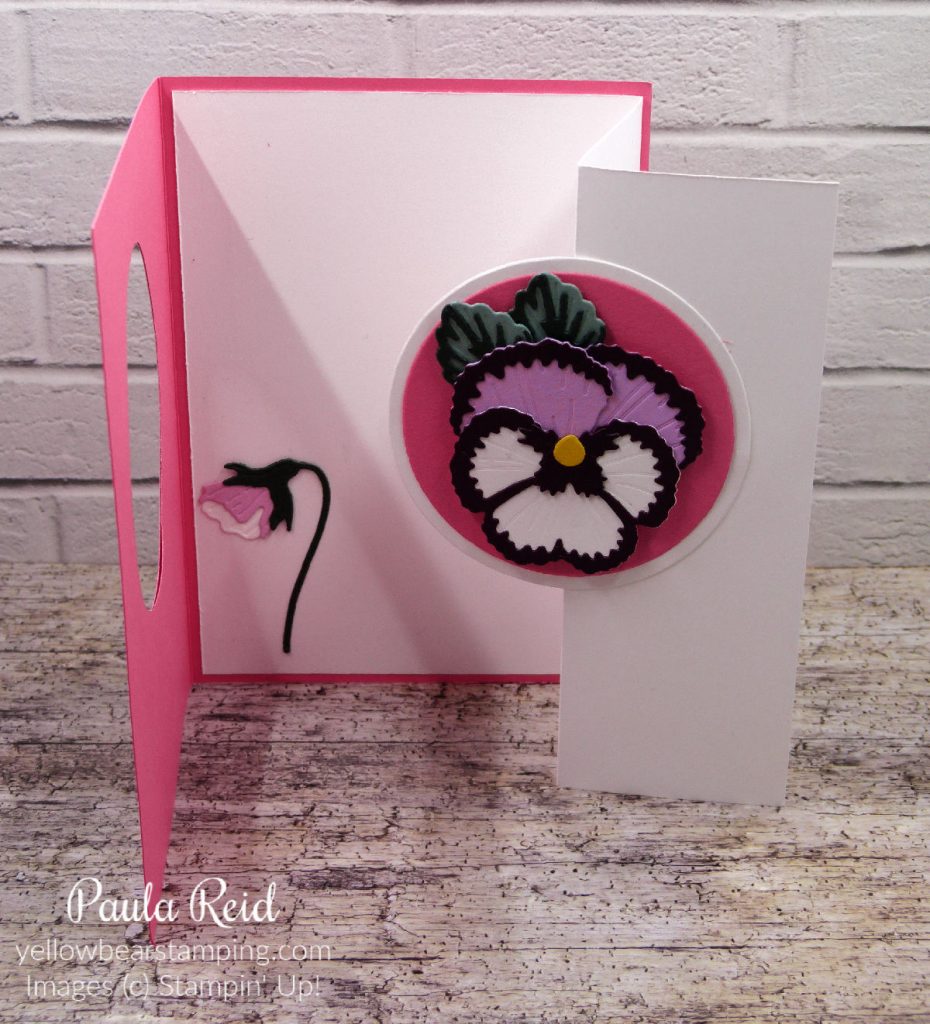
You may have seen the term ‘CASE’ and wondered what it meant. CASE (in stamping terms) means Copy And Share Everything. Today’s fun fold card has been CASE’d from a US demo Susan Campfield so this design is not my idea.
I’ve used the new Pansy Patch Bundle (which is part of the Pansy Petals Suite from page 28-29) and the new 2021-2023 In Colors. The only stamping is for the senitment. And yes there was a lot of die cutting for these 7 cards but so worth it. I’m sure you’ll fall in love with the Pansy Patch Suite too. These cards were made for my direct team swap.
The first card colour combo is Fresh Freesia and Blackberry Bliss with a Bumblebee centre. The bottom cards are a mix of Pale Papaya and Calypso Coral with a Pale Papaya centre. The leaves are Soft Succulent for the base and Evening Evergreen for the overlay.
Working from left to right on the top we have Fresh Freesia and Gorgeous Grape with a Bumblebee centre. Next up we have Polished Pink for the petal and Melon Mambo for the edge and overlay. The centre is Daffodil Delight. On the bottom row we have Fresh Freesia and Blackberry Bliss with a Bumblebee centre and last but not least we have Pale Papaya and Pumpkin Pie with a Pale Papaya centre. The sentiment is from the Pansy Patch stamp set and has been stamped in Evening Evergreen using the Double Oval Punch. This is a great punch – you get the oval and the scalloped oval all in one punch.
And here’s the inside of the card using the ‘bud’ dies.
And finally a view from the top so you can see how the inside ‘Z fold’ works. This was a fun card to create and allows you to put any number of images, stamps or sentiments on the cut out section.
I love how the new In Colours work so well together – I haven’t got a favourite yet but I’m sure I will soon. Do you have a favourite?
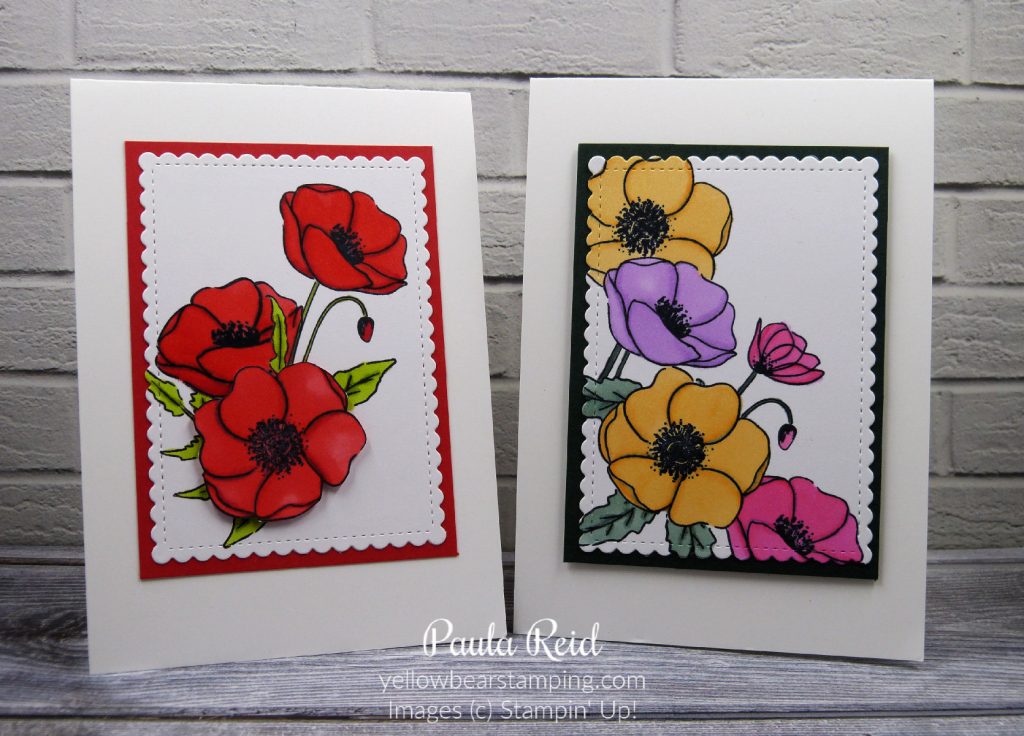
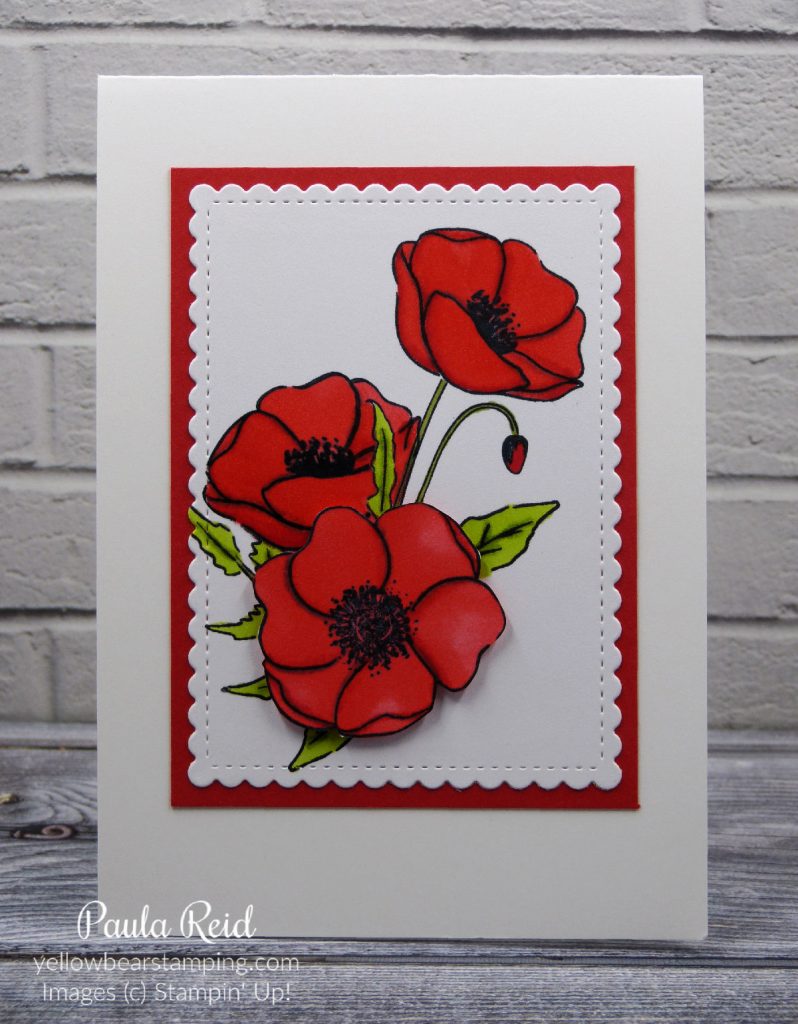
Last Tuesday’s card included some masking so this week I though I’d do a card that had more masking and give you a quick step by step tutorial on how I do my masking.
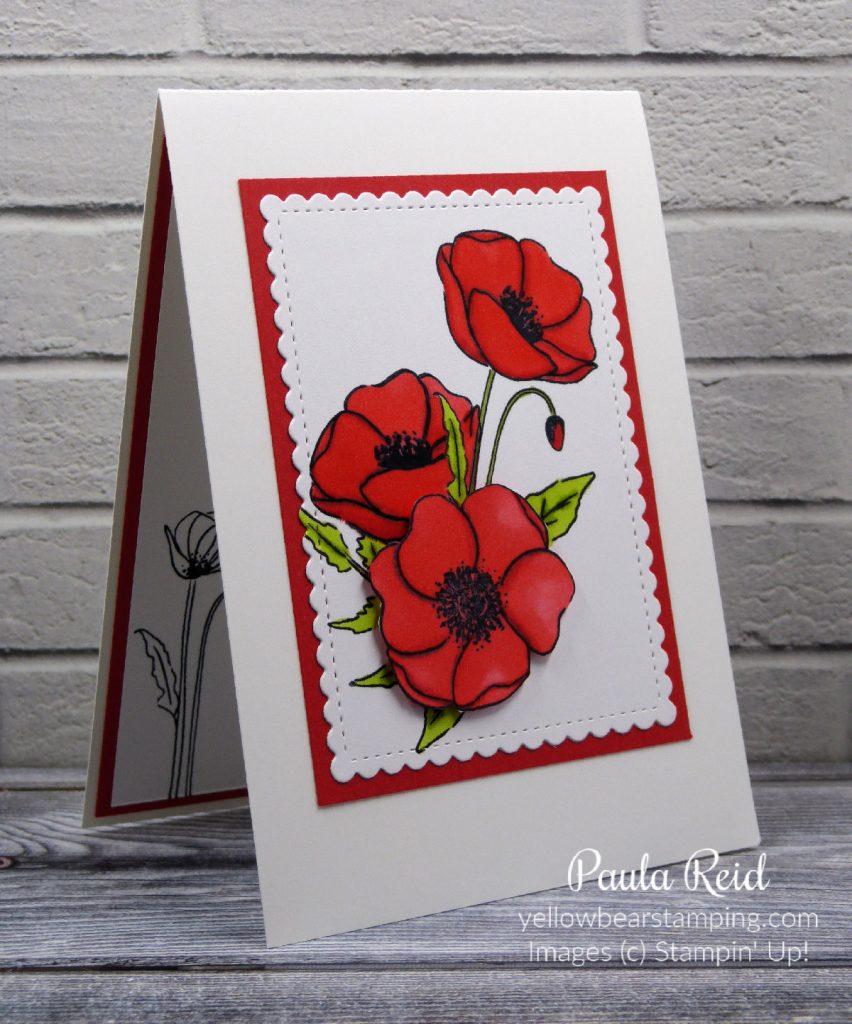
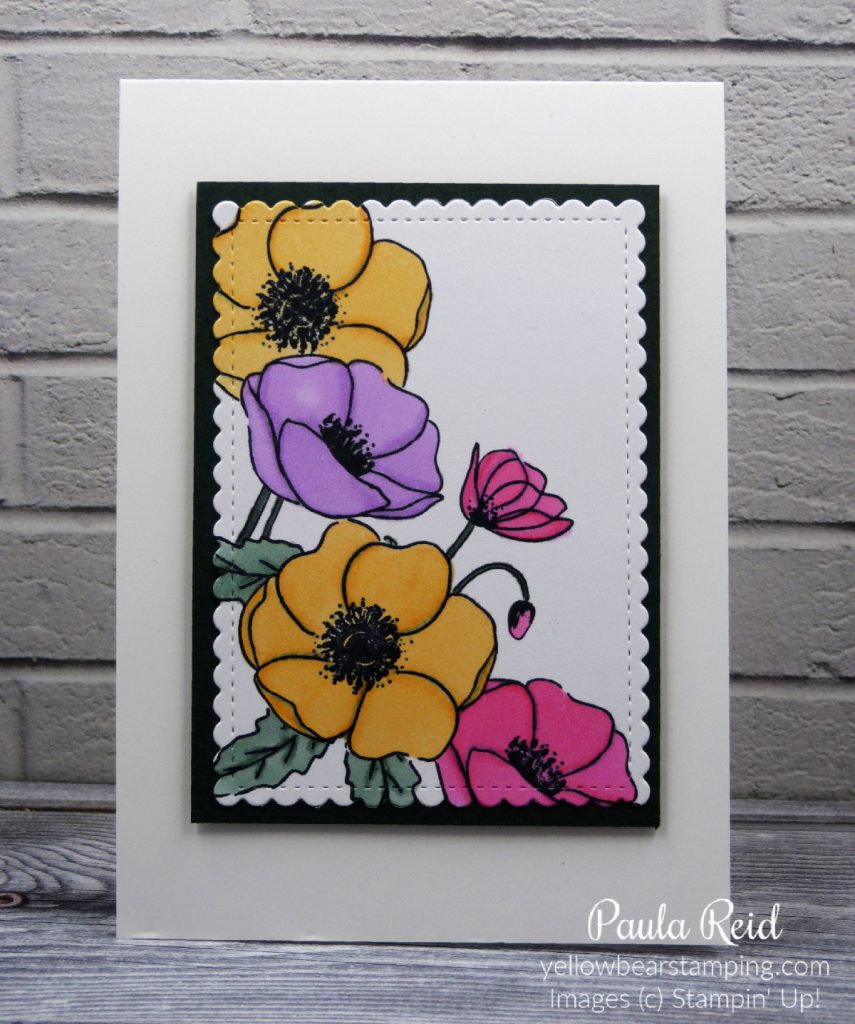
I got a bit carried away with my masking so ended up making two cards – one I used for the tutorial and one to show off the new 2021-2023 In Colours. I’ve used the Painted Poppies for these cards. The ‘poppy’ in the top right has been created by combining two stamps to create a ‘new’ image using the masking technique.
Don’t these images just pop off the page? I couldn’t decide if I wanted sentiments on the front so left them blank for the time being.
I die cut the largest Scalloped Rectangle from the Stitched So Sweetly dies and it has been matted on Poppy Parade and adhered directly to a Thick Basic White base. And now for the instructions:
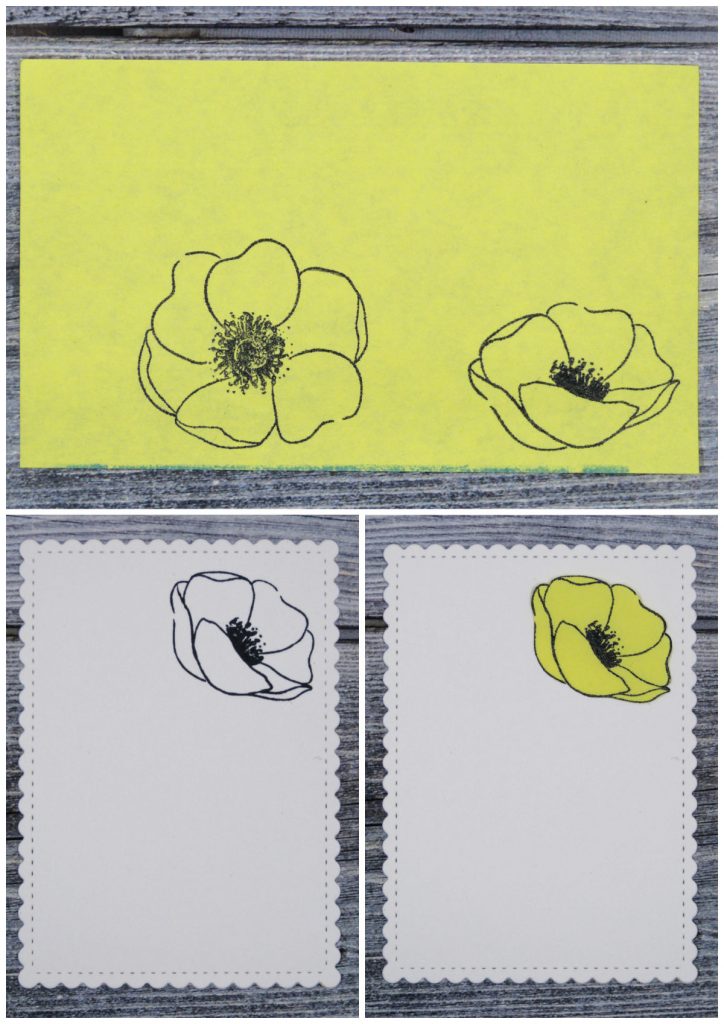
To create your mask stamp your image on a Post-It Note then ‘fussy cut’ it out. Stamp your image again on to your cardstock and then place your mask on top of the stamped image. This is so that when you stamp the next image it won’t stamp over the top of the original image. I only want the stem to be used.
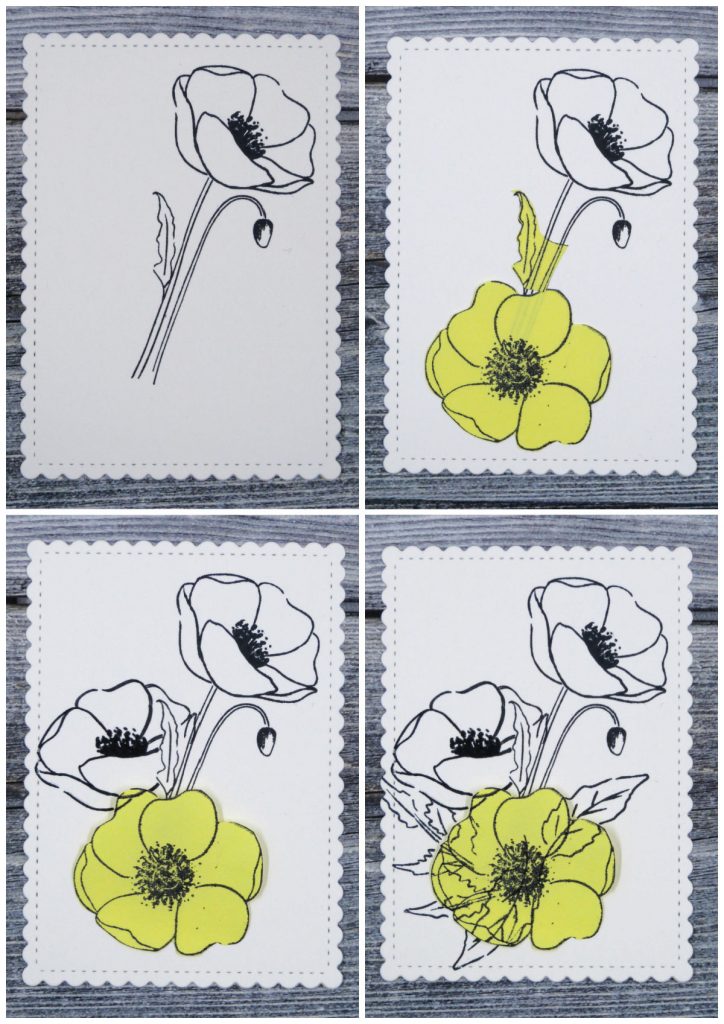
You can see that the flower now has a stem. My next ‘mask’ isn’t actually covering any stamped image but is a ‘place holder’ for where my raised flower will be placed. I can now stamp another image that will appear behind the leaf and will be slightly under my raised flower. Keeping my place holder flower on the cardstock the final addition is the leaves. I forgot to take a photo showing it before colouring in.
You can just see a sneak of the inside of the card where I left the image uncoloured. It looks great against the white and Poppy Parade mat. The leaves are Granny Apple Green.
My second card shows off the new 2021-2023 In Colours – Pale Papaya, Polished Pink, Fresh Freesia, ,Soft Succulent and Evening Evergreen. I really love these colours and they go so well together. I used the same method of masking to create this card. Sometimes you need to create a couple of ‘masks’ to cover all the images
For the inside of this card I coloured my poppy in with the Polished Pink and the mat is Evening Evergreen. This card shows that the Painted Poppies stamp -combined with different colours – is actually a very versatile set. I hope this has given you some inspiration to try different colours.
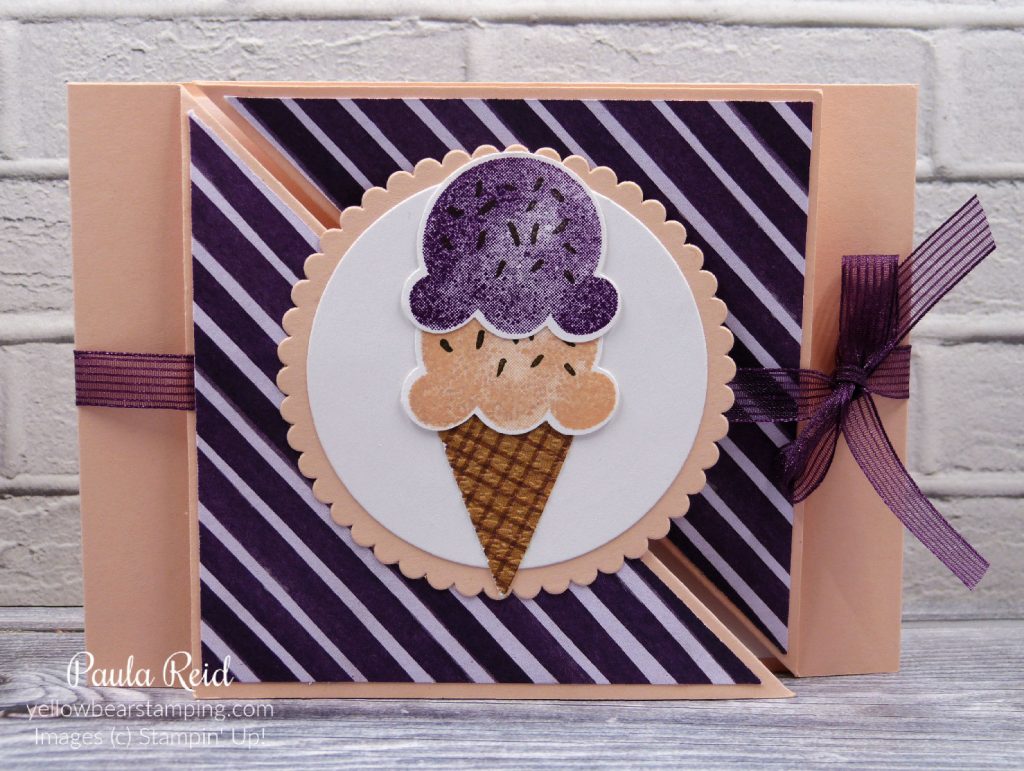
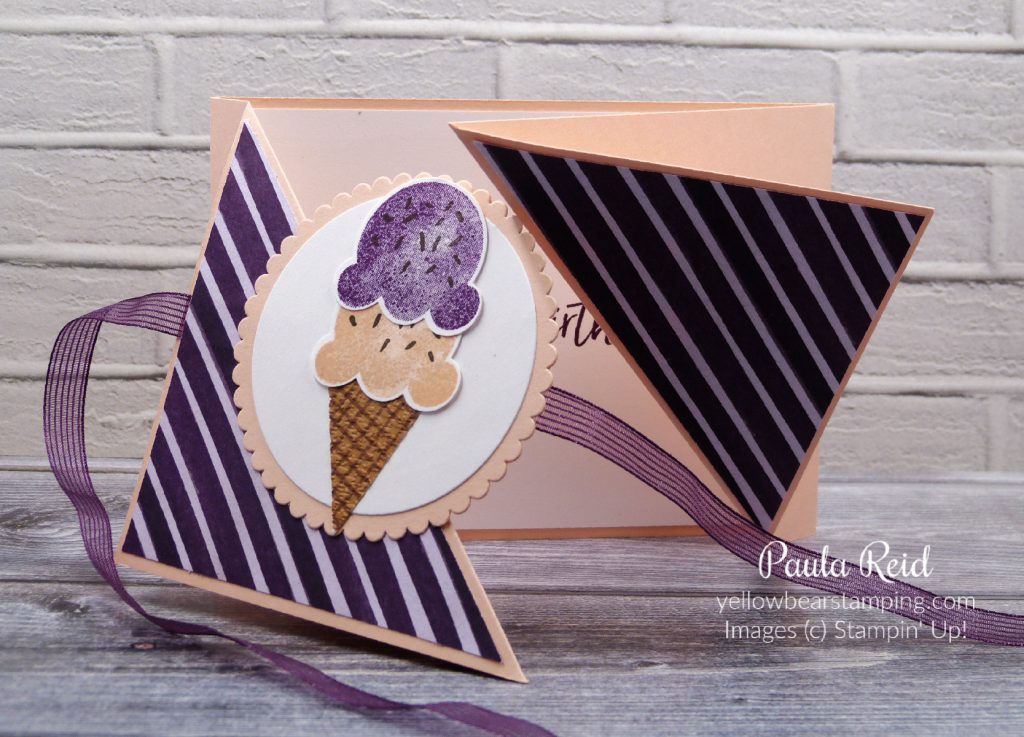
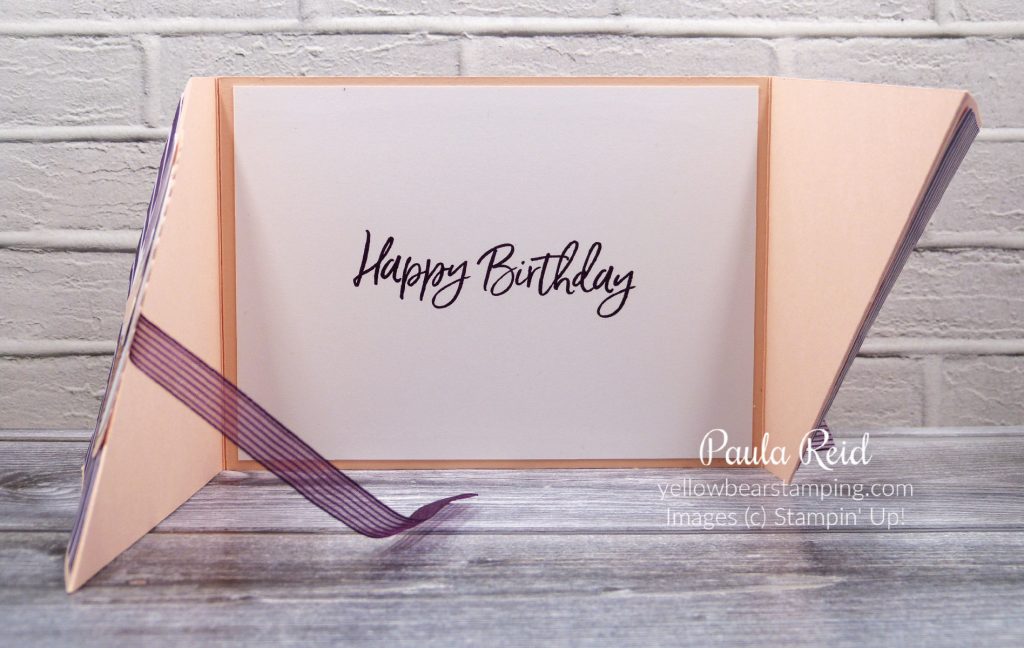
I was first shown this fold of card by another demo -Kristine McNickle – last year. We made it in a portrait orientation but for today’s card I’ve swapped it around to be a landscape card.
It uses a whole sheet of A4 cardstock for the base – 21cm x 27cm – cut in half lengthwise to give you two pieces 10.5cm x 27cm. To create the folds score at 14.5cm and then with the smaller section on the left of the score line measure in 10.5cm from the top left and make a pencil mark. Repeat on second piece. Place the cardstock in your trimmer lining the pencil mark and the bottom left hand corner in the cutting groove – and score between the two. Fold the diagonal score line in a mountain fold and the centre fold in a valley fold.
To adhere the two pieces start with them on top of each other then rotate the top one 180 degrees to the right. Now adhere the two bases together and you have your card ready for decoration. I used the Ice Cream Corner Designer Series Paper (DSP) measuring 9.5cm x 9.5cm and then cut on the diagonal. A tip I learnt the hard way – adhere your ribbon to the card base before adhering the left hand side DSP. The final step for the front is your image or sentiment. Using Rich Razzleberry and Petal Pink I stamped and punched my ice cream scoops and adhere to the cone which has been punched from the DSP. My background is the largest Scalloped Circle with the second largest circle from the Layering Circles Dies.
I love the font and size of the sentiments in this set – so glad the Sweet Ice Cream Bundle has carried over to the 2021-2022 Annual Catalogue which means I have more time to create with this set.
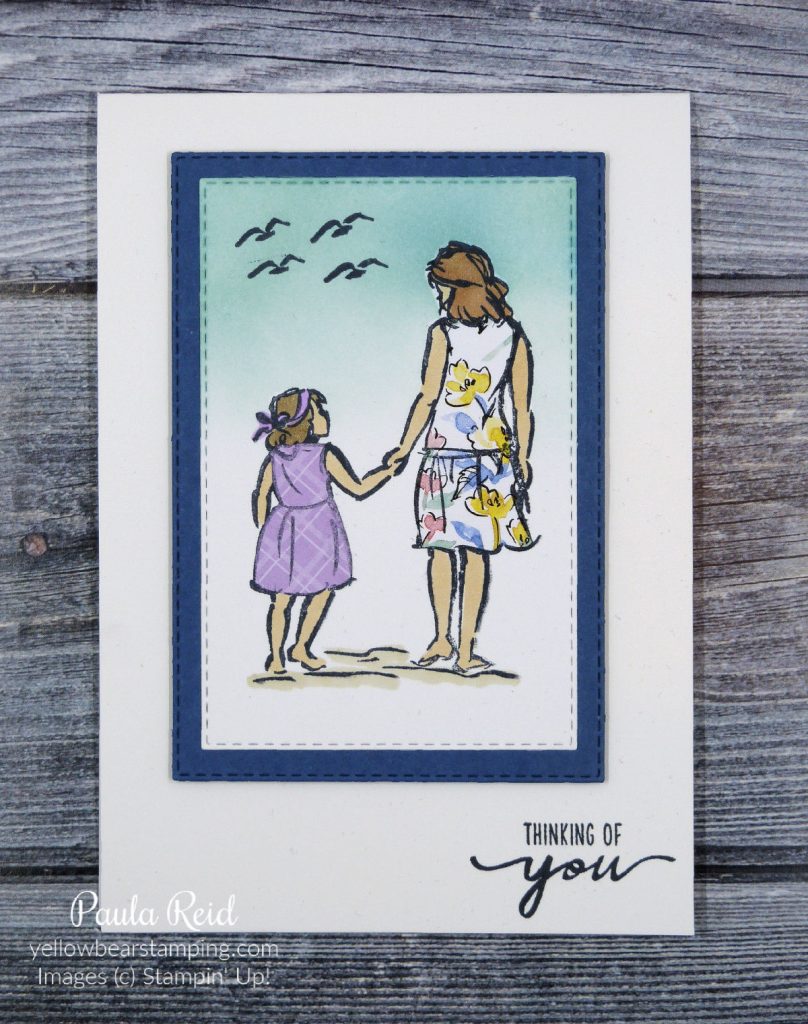
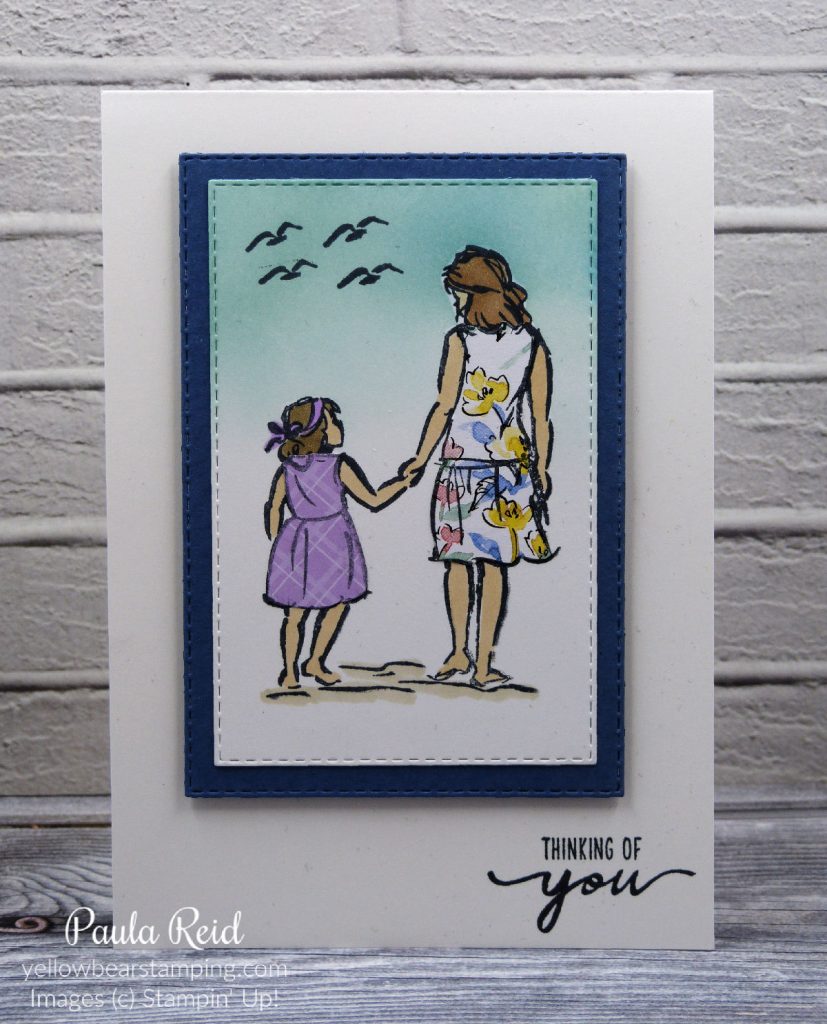
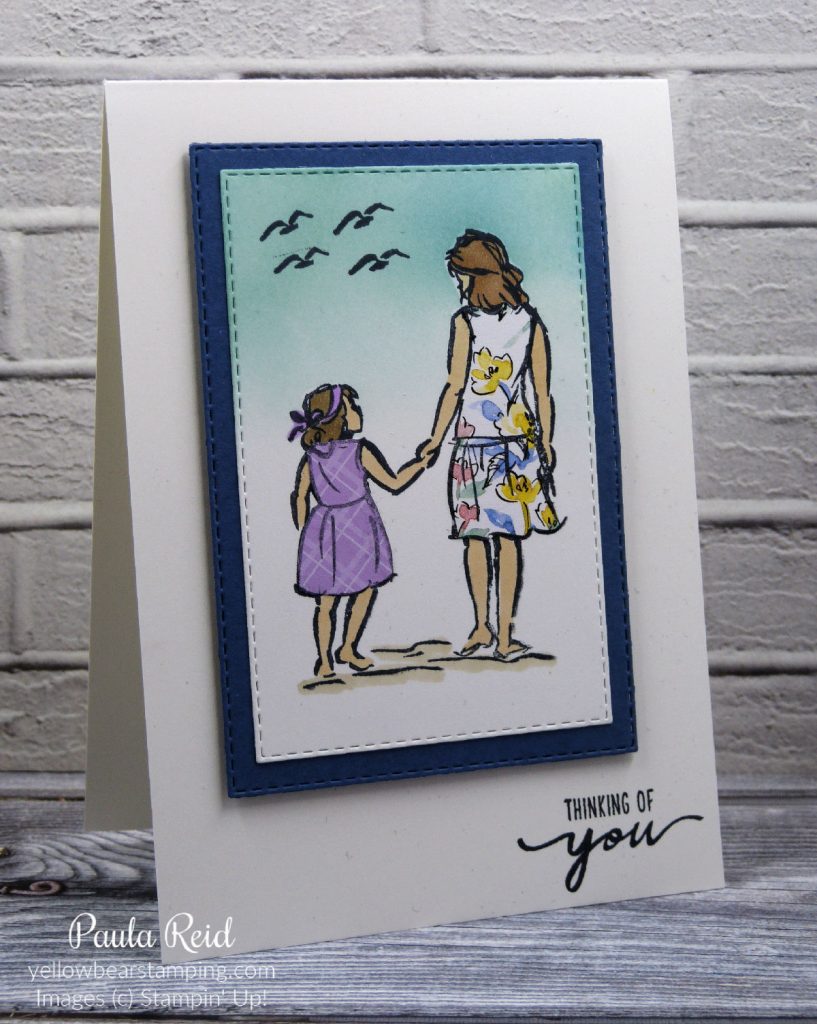
I’m enjoying bringing you a technique every Tuesday – it’s making me revisit techniques I’ve haven’t done for ages plus using new products for techniques. Today I have the Paper Piecing technique. This works with line art stamps and is another way to ‘colour’ your image. Using a Designer Series Paper (DSP) with a small print/design is the best way to go.
The Beautiful Moments set is perfect for this technique. I also combined a bit of masking technique for the sky.
I’ve used two new papers from the 2021-2022 Annual Catalogue that went live today. The little girl’s dress is Fresh Freesia from the 2021-2023 In Colour 6″ x 6″ papers. This pack of paper consists of 40 sheets – 4 each of 2 double sided designs in the 5 new In Colours – Evening Evergreen, Fresh Freesia, Pale Papaya, Polished Pink and Soft Succulent. The adult’s dress is from the Hand-Penned 12″ x 12″ paper – 2 each of 6 double sided designs. This pack has beautiful pastel floral tones on one side and a design on the other.
You only need a small piece of DSP for each dress. Cut your DSP to just a bit bigger than the individual image you’re wanting to use. Ink up your image and stamp onto the DSP. Grab your paper snips (I keep a pair just for paper) and fussy cut the image out. Stamp your full image on your desired cardstock and adhere the DSP to create the outfit/covering for your image. For my project I did the masking before I adhered the DSP dresses. I created a mask using a Post-It note and then applied ink for the sky with a Blending Brush. I’ve just realised I haven’t shared a masking technique yet so will do that for next week’s technique. You can check here and here for some previous cards I’ve done with masking.
Take a look through your DSP stash and see if you’ve got a design that would work well for this technique.
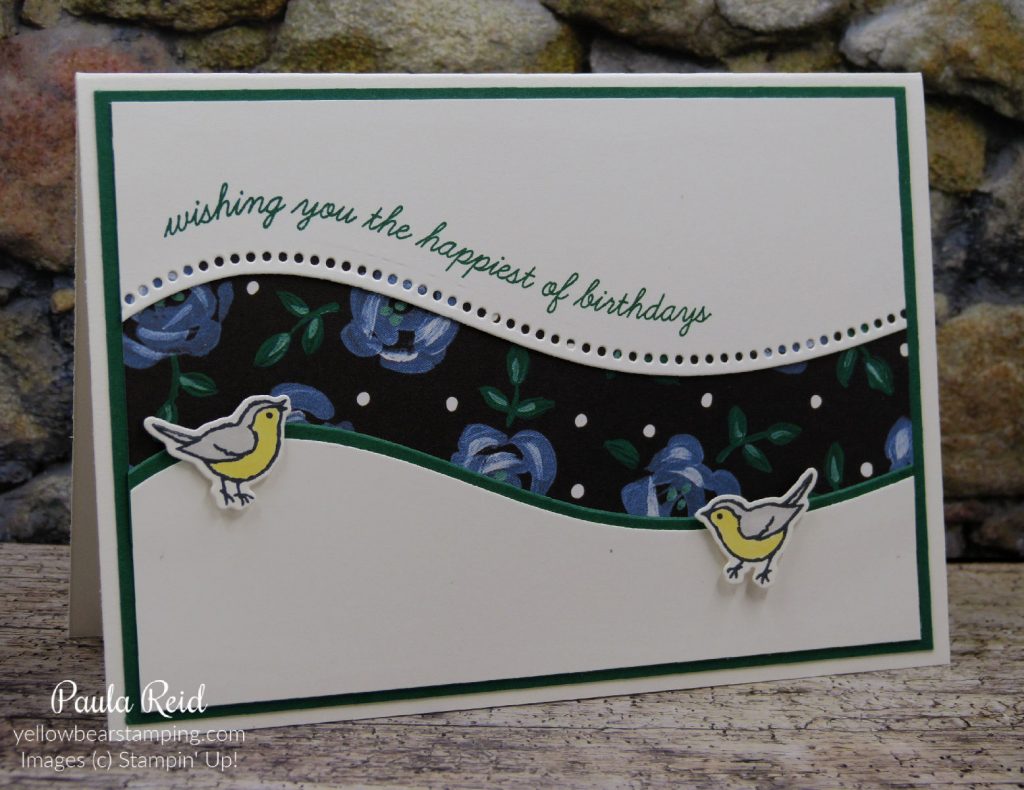
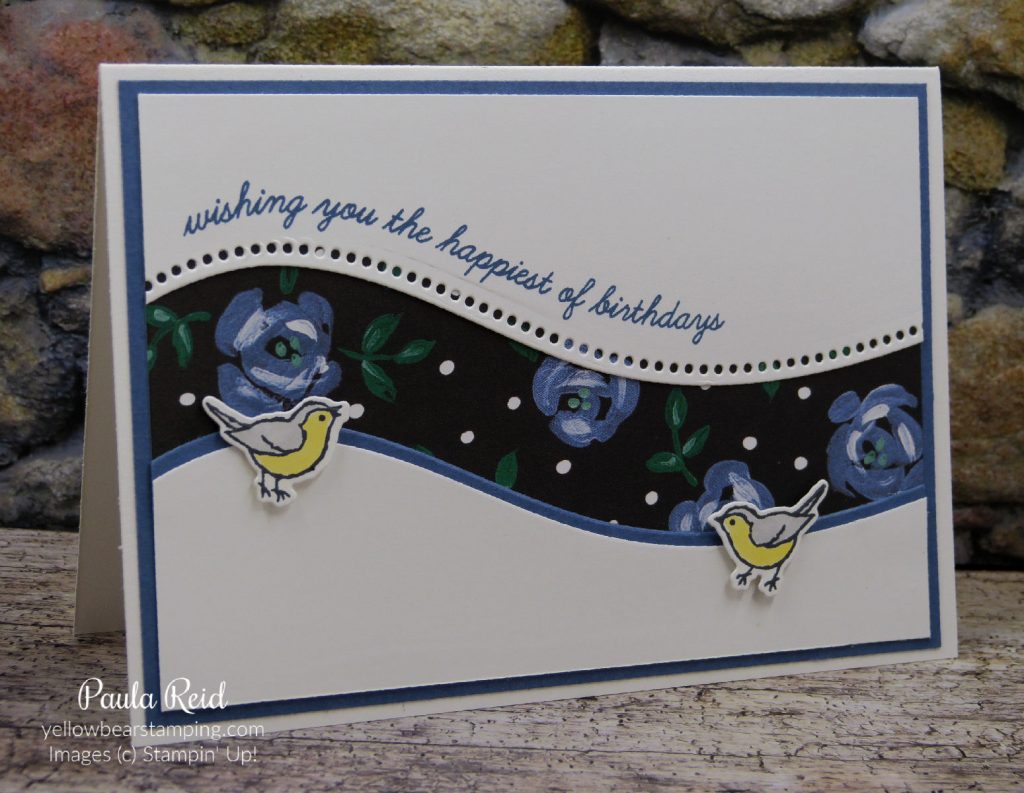
I got so carried away crafting in the weekend that I forgot to post my other ‘Quite Curvy’ creations. Better late than never.
I created this card for a team swap earlier this year. Swaps are a great way to get samples of other products that I don’t have that I can then share with you. How a swap works is that we get into groups of 10 and we each make a card except we don’t just make one of it we make 10. And then we swap our card with the other 9 group members and end up with 10 different cards.
For my swap I used the Quite Curvy Bundle and the Flowers & Field Designer Series Paper (DSP) that was part of the Sale-A-Bration brochure. I decided to make 5 using Shaded Spruce for my mat and 5 using Midnight Muse.
To get my ‘curvy’ cut I started out with a piece of Basic White measuring 7cm x 13.8cm. Position the die so that you are happy with the ‘split’ making sure you have enough room for your sentiment and anything else you want on the front then die cut.
Once die cut I stamped my sentiment to follow the curve of the cut. With this set being Photopolymer it allows a bit of flexibility so that you can mould the words to match the curve.
For the lower section I added a mat (Shaded Spruce or Midnight Muse). This was a bit tricky to cut making sure it matched the Basic White section but I worked out a way – especially as I was making 10 of these. I also numbered the back of the card so my top and bottom pieces matched.
The little birds are also included in this bundle – it’s great having a ‘left’ and ‘right’ facing bird. They were coloured in with Stampin’ Blends and adhered with dimensionals.
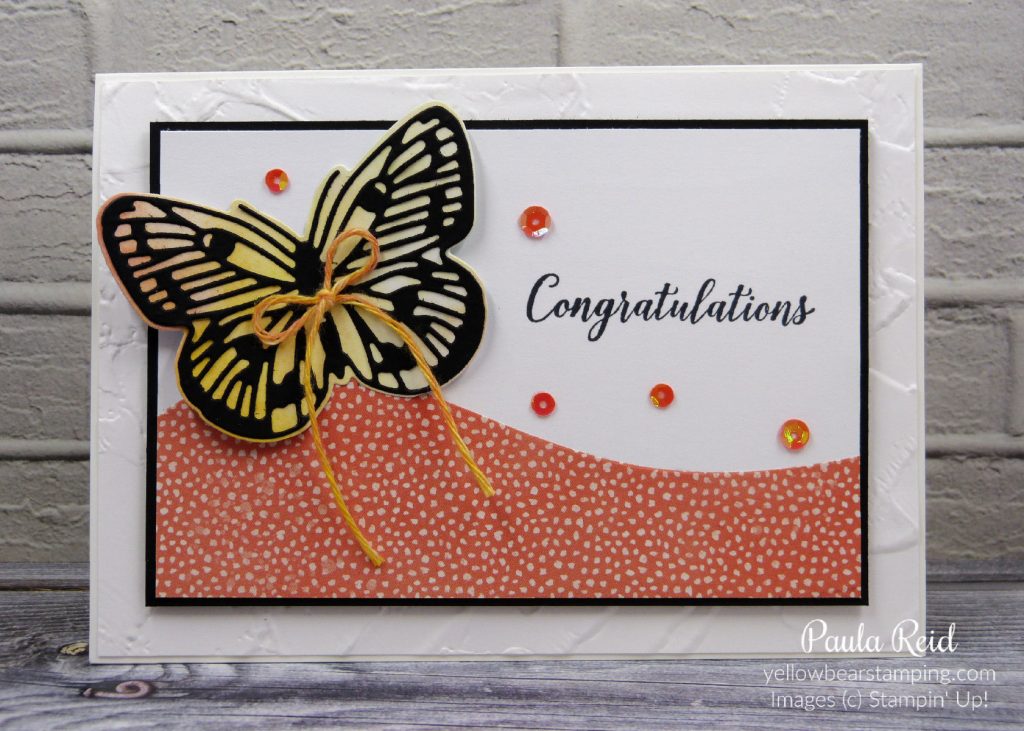
I have one other card I made to share. This time I just used the lower section of the die cut which was cut from DSP and used one of the intricate Butterflies (from the Butterfly Brilliance Bundle) on top of a solid die cut from DSP.
This card has a few layers – the card base of Thick Basic White, a mat of Basic White which has been dry embossed with the Painted Texture 3D Embossing Folder (10.3cm x 14.5cm), Basic Black mat (8.5cm x 12.7cm), Basic White (8.2cm x 12.4cm) and finally the DSP (4.5cm x 12.4cm) adhered to the Basic White. The Basic Black is adhered to the embossed layer with dimensionals. Did you know that the Mini Dimensionals aren’t as high as the bigger Dimensionals? I used the Mini for this card as it already had a bit of height with all the layers. My Baker’s Twine started our life being white but by colouring it with a mix of Stampin’ Blends I was able to create my own colour Baker’s Twine.
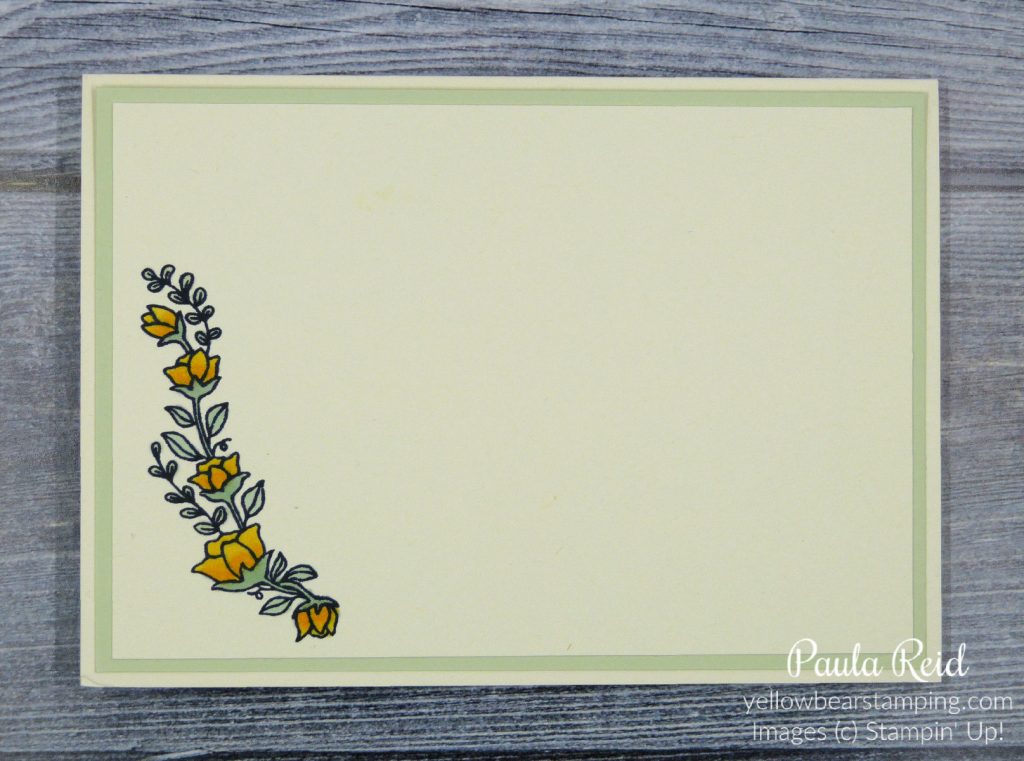
For the inside I stamped the flower image from Dragonfly Garden bundle on page 23 of the new Annual Catalogue.
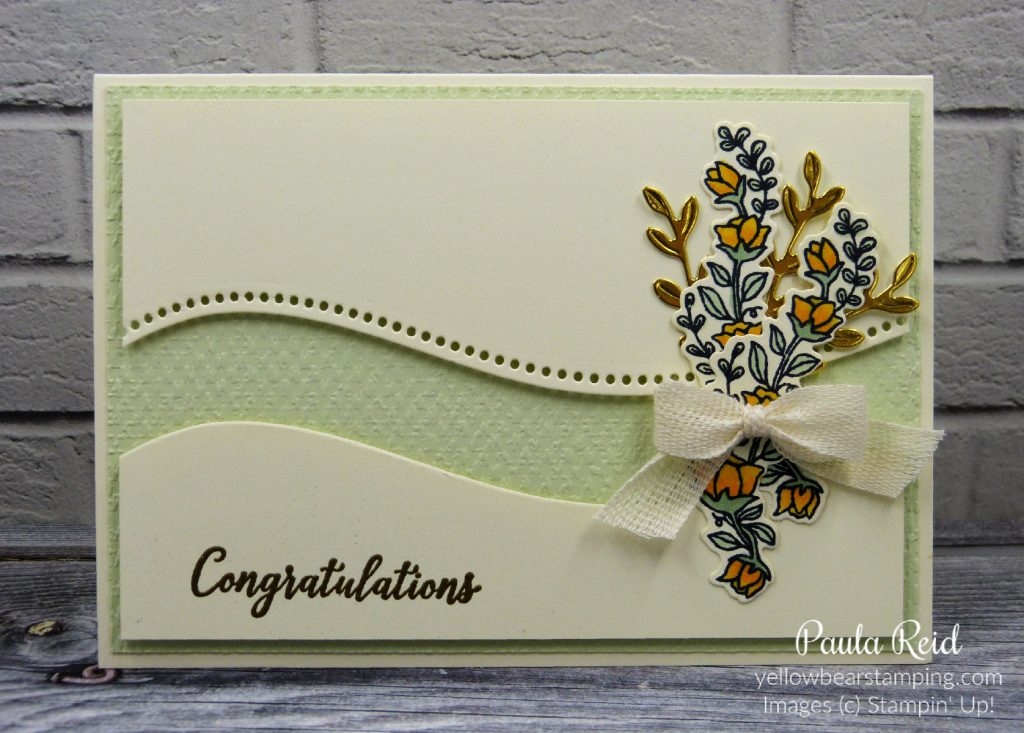
Today’s cards are a bit more involved in their creation so I’ve titled this post ‘Fancy Friday’. All four cards use the Quite Curvy Bundle which is available until 30 June 2021. I was originally going to make just one card but got carried away and made four designs with this one set. I had a great afternoon playing and creating them.
A colour I haven’t used much is Soft Sea Foam so I’ve featured it in my first two cards. The mat has been dry embossed using the Tasteful Textures 3D Embossing Folder. The flower image features on all the cards either die cut or stamped directly onto the card front. For this card I used Mint Macaron, Mango Melody and Soft Sea Foam Stampin’ Blends to colour in my image. Two stamped images have been layered with three Gold Foil sprigs. The top layer measured 3″ x 13.8cm and was die cut to create the two pieces which have been adhered with dimensionals. The ribbon (used on all the cards) is the Forever Greenery Vanilla Ribbon. The sentiment is from Happy Thoughts and has been heat embossed in gold.
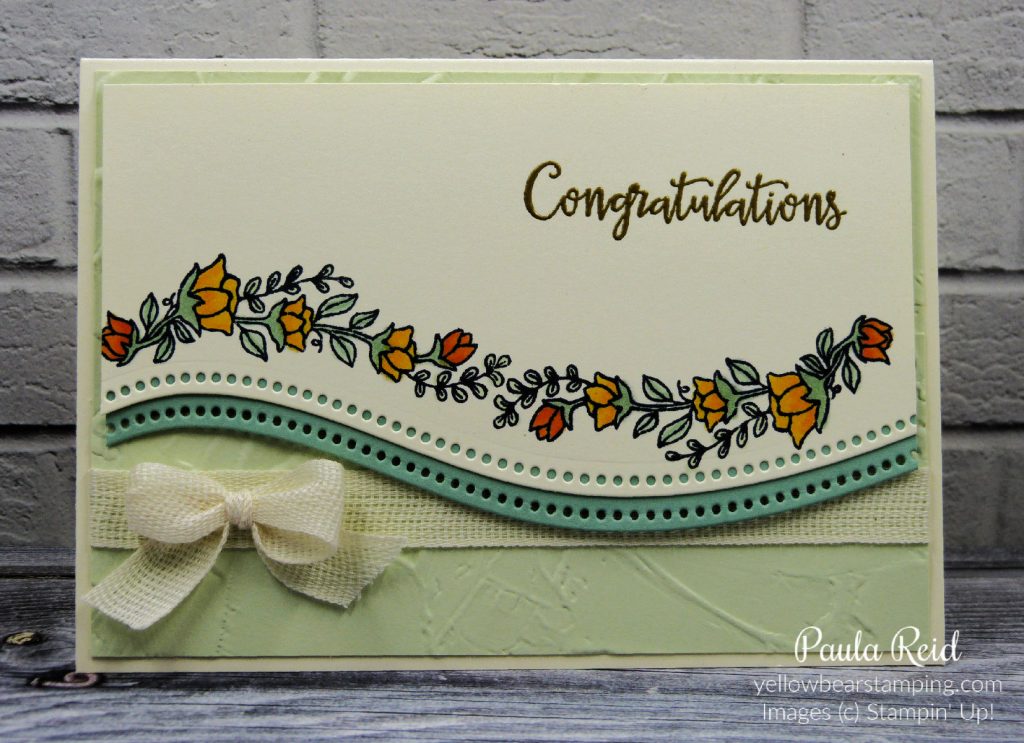
When I use Thick Very Vanilla or Thick Basic White for my card base I like to add a coloured mat and then a Very Vanilla or Basic White smaller mat for the inside – it gives a nice finish to your card. This card was inspired by Jennifer Hamlin.
This mat has been dry embossed using the Painted Texture 3D Embossing Folder and has an additional mat of Mint Macaron. When I have an outline image and sentiment stamped directly to the card front I always stamp the sentiment before I start colouring in – you don’t want to have spent ages colouring and then muck up your card with a crooked sentiment. The sentiment is from Peaceful Moments and the colours are Mint Macaron, Soft Sea Foam, Mango Melody and Pumpkin Pie. This card was inspired by Lou Kitzelman.
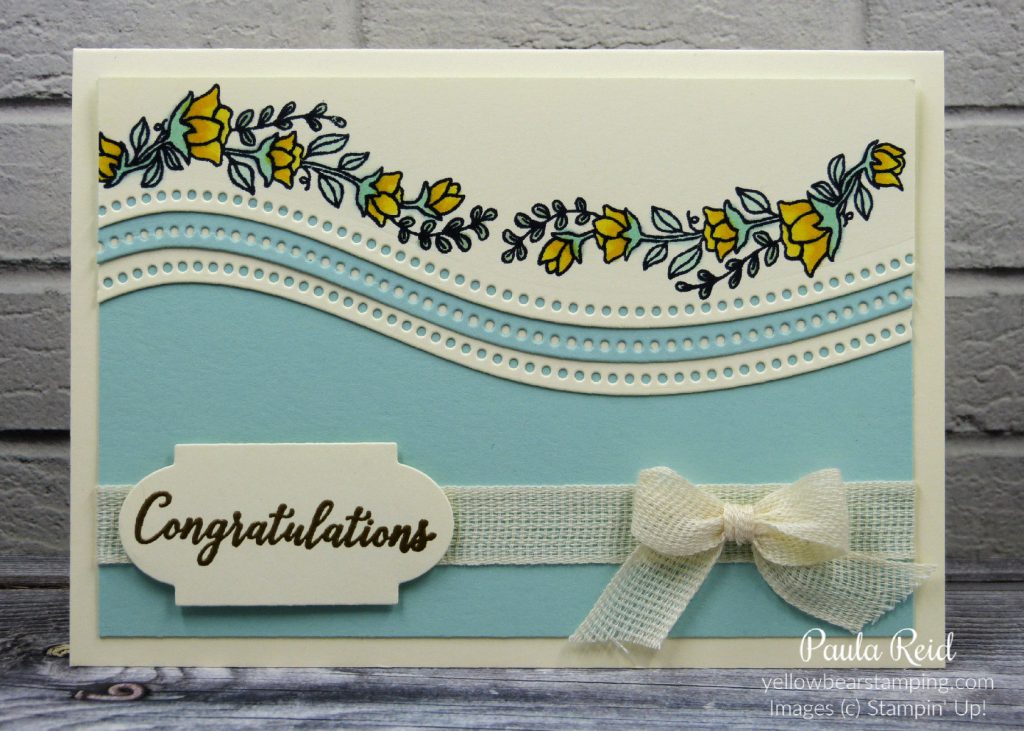
I decided on a colour change for this card and went with Pool Party – no dry embossing on this one just plain cardstock. This one has a few more layers as I wanted a mat behind the top stamped layer then realised I would be having Pool Party against Pool Party so added another layer of Very Vanilla. The sentiment is from Happy Thoughts and has been heat embossed in Gold then die cut using one of the labels from the Perfect Parcels dies. I only used two colours for this image – Pool Party and Daffodil Delight.
For my last card I used Mint Macaron for my mat – again dry embossed with the Tasteful Textures 3D Embossing Folder. I stamped and die cut two flower images then added them along the edge of my die cut top layer. By alternating the direction of the cut out I was able to follow the outline of the die cut edge. My sentiment is from Happy Thoughts and has been die cut from the Layering Oval dies and the mat is die cut from Gold Foil using the Scallop die from the same set. The colours for this card are Mint Macaron, Mango Melody and Pumpkin Pie.
I hope you’ve enjoyed see some different ways to use these dies. I had fun making them. I’ll have some other creations using this bundle to share with you over the weekend so keep an eye out for my next post.
If you would like to purchase this bundle please contact me to place your order or you can order via my online store.