Timeless Tropical Gate Fold Card

By | May 13, 2020

Hi there

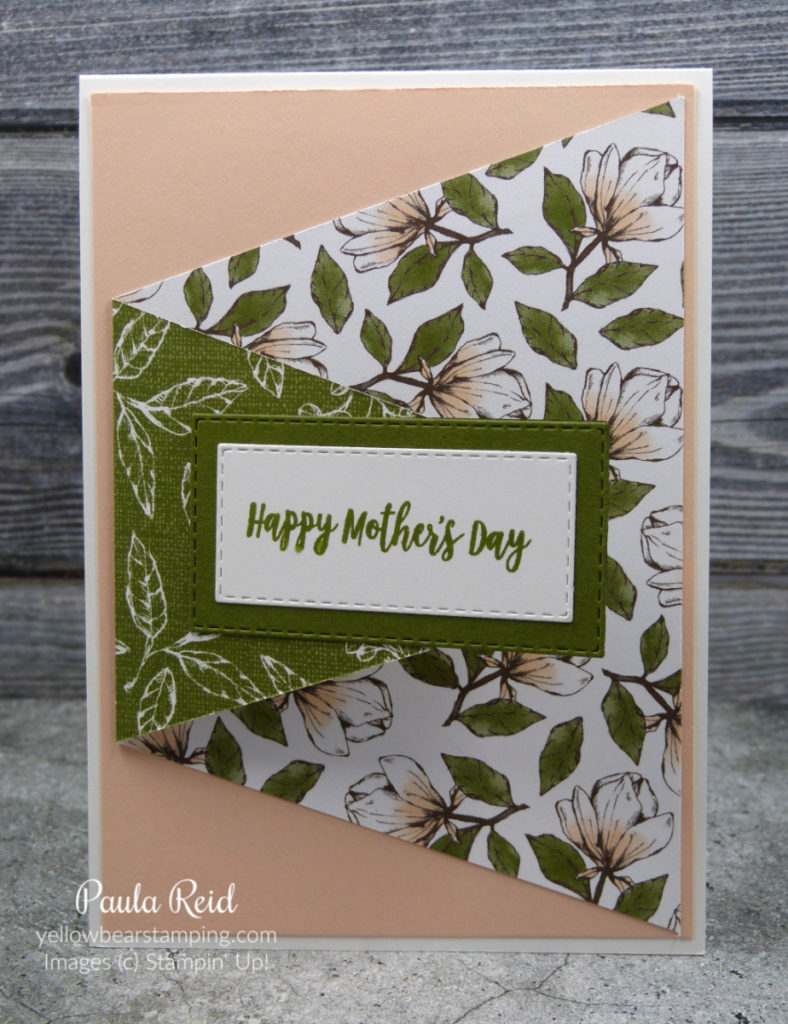
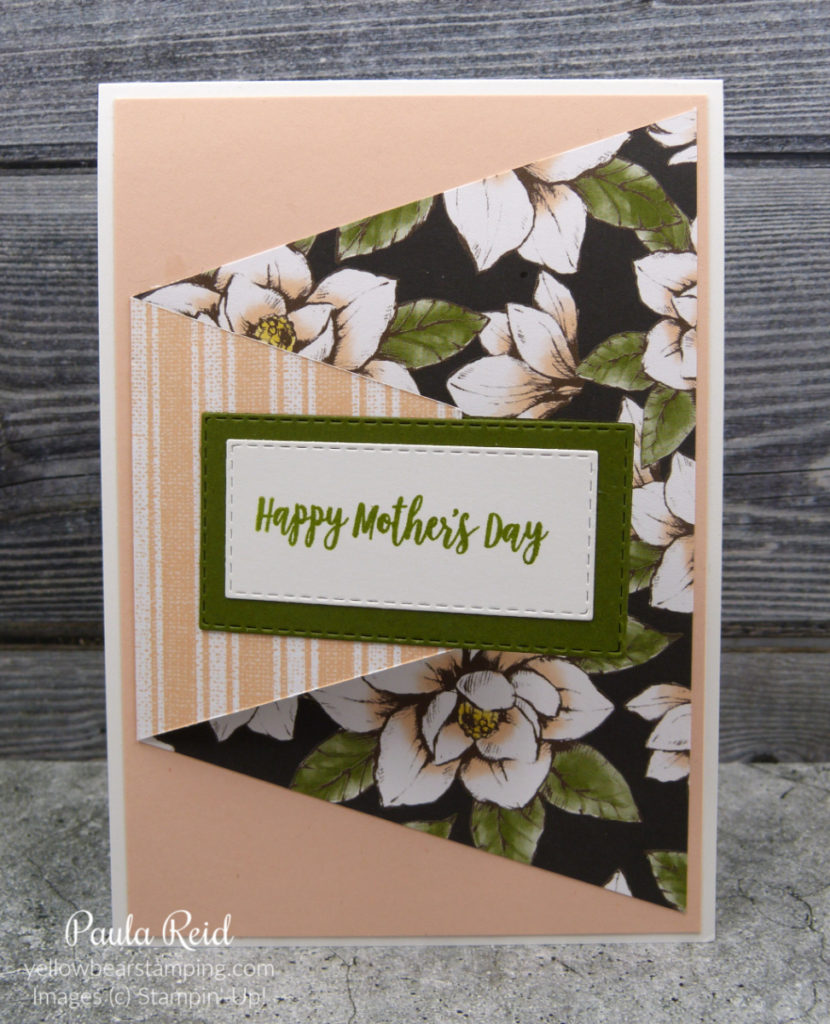
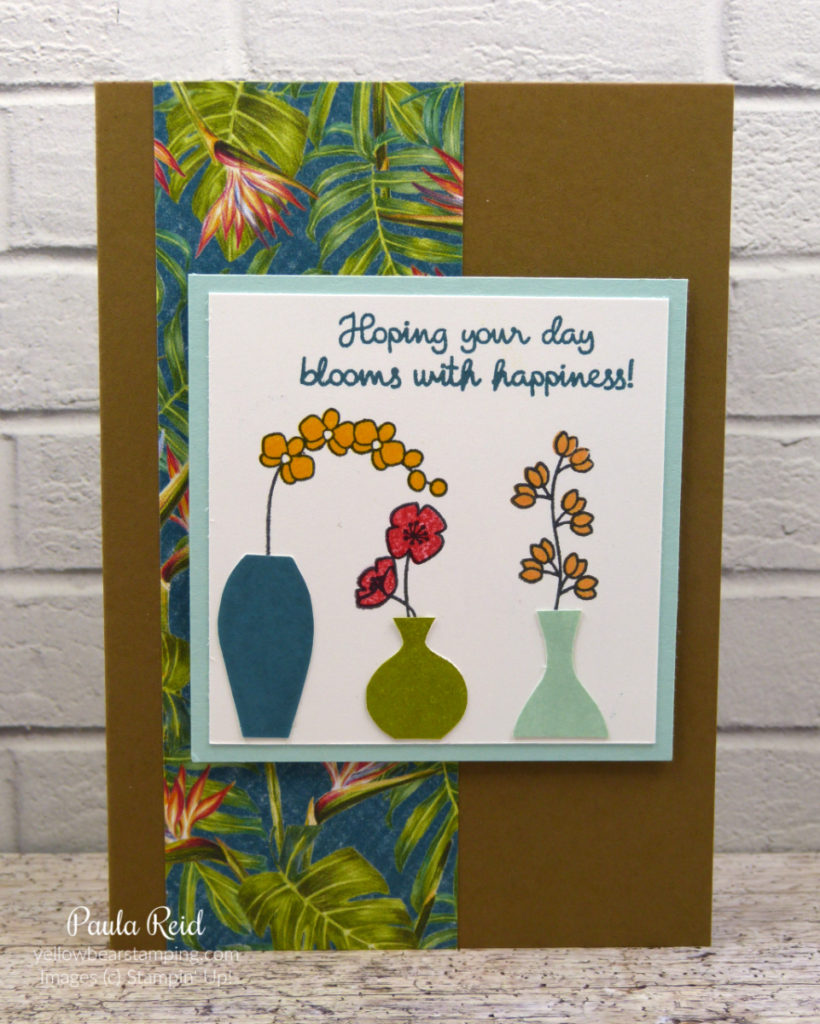
Today’s card features the Tropical Oasis Suite from page 38-40 of the Mini Catalogue. I don’t own this suite but was fortunate to spend some time with one of my team members who did.

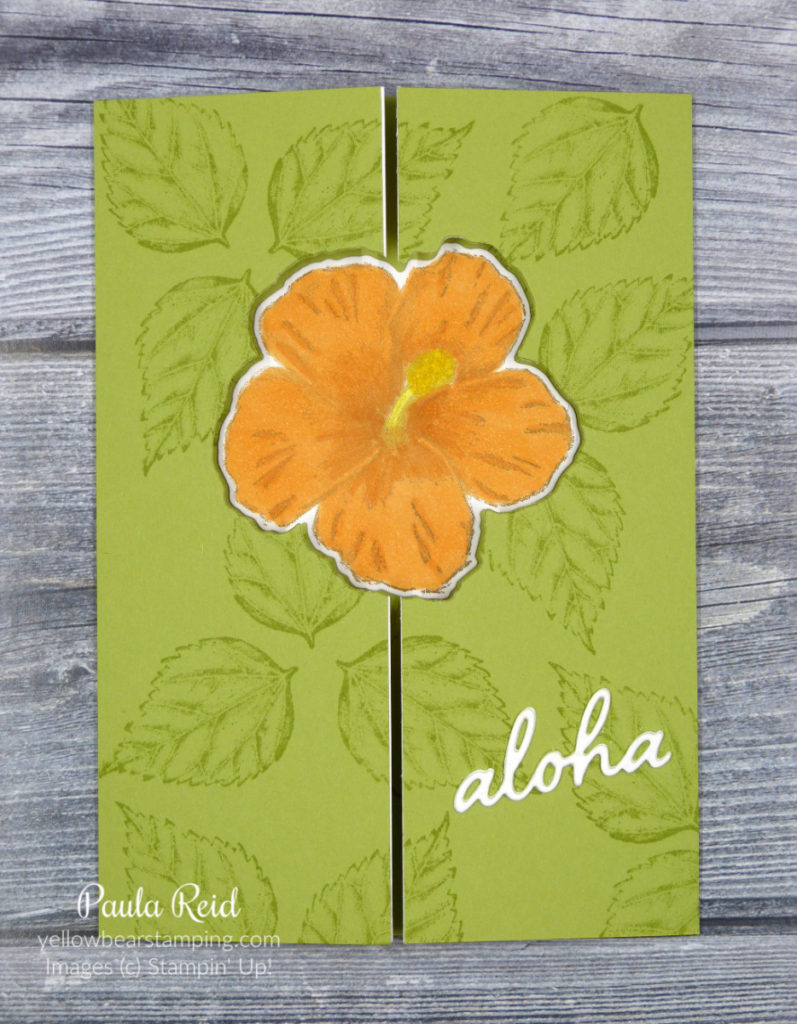
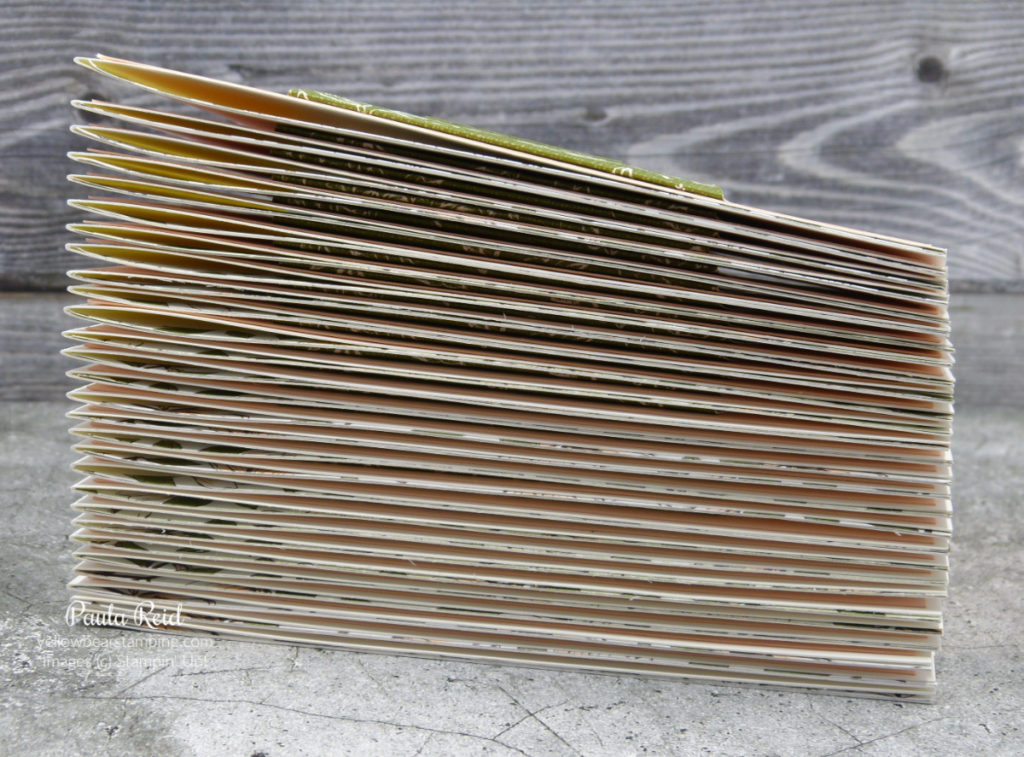
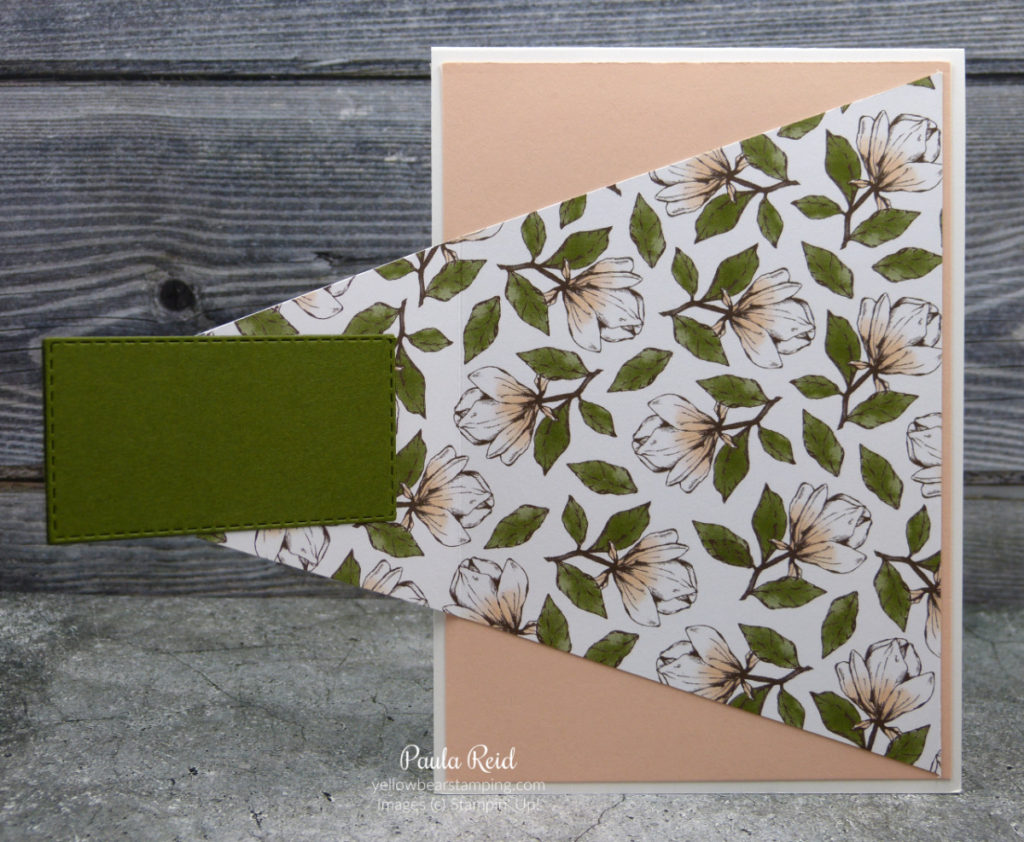
This is a Gate Fold card with a difference.

When it’s opened up it looks like somebodies had a bite of the cardstock 🙂

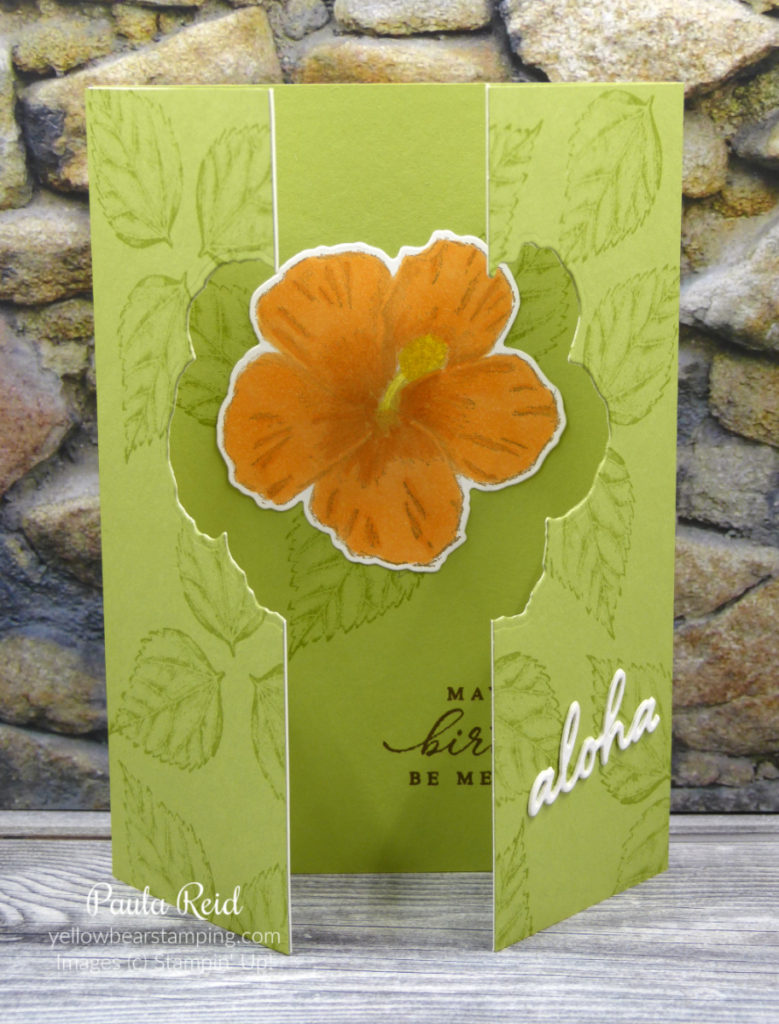
To create the die cut in the card front stamp the leaf image in Pear Pizzazz on a piece of cardstock measuring 10.5cm x 14.8cm. I stamped mine in groups of 3 but you can do whatever design you want. Cut the cardstock in half and attach to your Whisper White card base. Close the card front and place the hibiscus die in the centre towards the top. Secure it with washi tape on one side only. Open the card up (you will have part of the die hanging over the edge of the card base) and run it through your die cutting machine. Do not remove the die. Close your card again and tape the die to the other uncut side of the card. Now you can remove the tape from the original side that has been cut. Run you card through the die machine and (hopefully) you will a fully cut hibiscus from the card front.

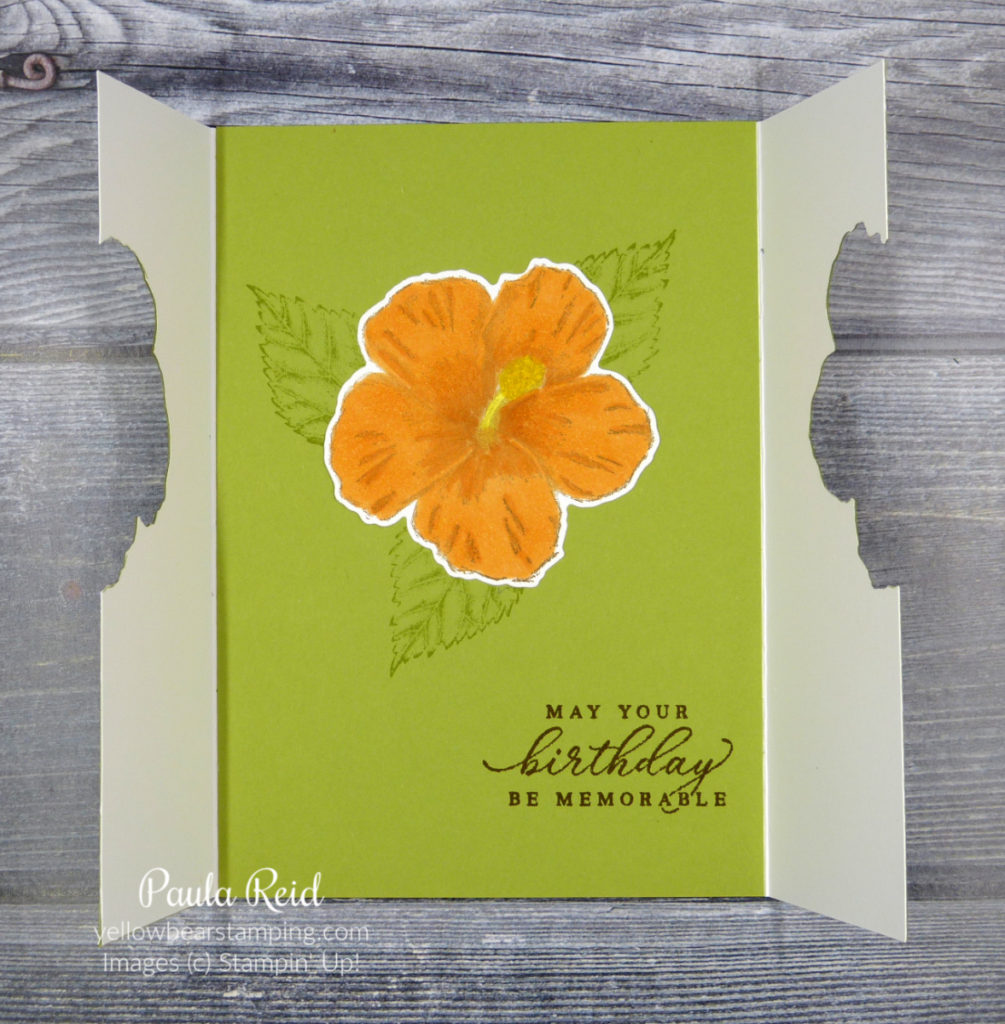
Stamp the hibiscus image on a piece of Whisper White, colour it in (I used Pumpkin Pie and Daffodil Delight Stampin Blends) and die cut it out. I closed the card front and in pencil drew the outline on the Pear Pizzazz inside then stamped my leaf images (don’t forget to rub out the pencil). To adhere the hibiscus I closed the card and placed the stamped image into the cutout onto the Pear Pizzazz inside. You could replicate this card with a number of images – all you need is for a stamp to have a coordinating die.

Well that’s all for tonight. I have one more card to share from the Timeless Tropical suite so check back soon.

Until then …

Magnolia Lane Pendant Fold Mother’s Day Cards

By | May 10, 2020

Hi there

Happy Mother’s Day to all the wonderful Mum’s, Aunt’s, Grandmother’s and those women who have had an impact on our lives – I hope you’ve all had a lovely day. Mother’s Day 2020 is definitely one we won’t be forgetting in a hurry. In previous years I’ve created a little something to give to the women at Church but as we aren’t meeting at the moment I decided to make cards and post them out.

I ended up using two difference paper designs from the Magnolia Lane paper pack.

The card base is Thick Whisper White with a Petal Pink mat. The Sentiment if from Dressed to Impress (which is carrying over to the 2020-2021 AC) and has been stamped in Mossy Meadow. I did all my die cutting first – 35 of the Whisper White and 70 of the Mossy Meadow :). As I was making 35 of these cards I used my Stamparatus and had the sentiments stamped in no time at all.

And here’s the ‘flap’ opened so you get to see the full paper design.

The DSP measures 5 1/2″ x 6″ – I used one of the cut off potions on the inside of the card as seen below.

And here’s the little gift bag I made to go with my Mum’s card using the All Dressed Up dies – it’s filled with Toblerone chocolate – she’ll have to wait a bit for her really present 🙂

And here’s the card and gift together – Mum loved it.

Well that’s it for Mother’s Day 2020 – I hope you’ve had a lovely day. Until next time …

Music from the Heart – Happy Birthday Music card

By | May 8, 2020

Hi there

I’ve really enjoyed using the Million Dollar stamp set inspired by Dawn Olchefske called Music from the Heart. When I first saw this set in the Mini Catalogue I knew of a number of people that would be receiving a card using this set – one is a work colleague who had a birthday last month. Even though her chosen instrument is a harp and the images are of pianos or guitars I decided to ‘stamp’ the music to Happy Birthday.

Thanks to Mr Google for providing the sheet music for Happy Birthday. After stamping the ‘score’ lines and using the single music note away I stamped to create the music so my recipient could play ‘Happy Birthday’ on her harp :). Using the journaling pen I added the final touches to my score.

The mat is Bermuda Bay and the sentiment – from Well Wishes – is also Bermuda Bay.

My colleague sent me a video clip of her playing the harp using the music from the card – Happy Birthday 🙂

Until next time …

Rooted in Nature – Sympathy Card

By | May 6, 2020

Hi there

I find sympathy cards one of the hardest to create and even more so when they need to be masculine based. Since we’ve been in lockdown I’ve needed to create two sympathy cards for male colleagues who have lost family members (thankfully not due to COVID-19).

Rooted in Nature

I CASE’d this layout from a card by Jacque Williams. I made a few changes to accommodate my sentiment and products I had. That’s the great thing with CASEing – it gives you a start for personalising or you can copy it exactly.

I don’t normally make multiples of cards but I loved the layout and it was quicker to do two than have to try and find another design :).

The card base is Thick Very Vanilla with a Early Espresso mat and a Very Vanilla front. The circle was partially cut using the Stitched Shapes from Crumb Cake with an Early Espresso mat.

To colour my tree I used a mix of ink pads and marker. To start I stamped the greenery with Pear Pizzaz then using a dauber inked with Mossy Meadow ‘daubered’ around the edge of the stamp. Before stamping I applied the Early Espresso Marker to the trunk of the tree. Give it a little ‘huff’ and stamp.

This stamp set has a coordinating die set – Nature’s Roots – which includes cutting and embossing only dies. The ‘tree’ is cut using a die and then in the corner I used one of the emboss only dies.

Emboss only die

Here’s a close up of the embossed leaf. There are three dies of this style in the set. To create this effect you need to use the embossing mats. I love this subtle addition to the card which still keeps it masculine.

This is a set that I haven’t used that much so I’m glad it’s carrying over to the new catalogue. I will definitely get it inked up a bit more.

Until the next time …

Painted Poppies – Masking Technique

By | May 4, 2020

Hi there

I had a very productive weekend crafting and hope to share some of my projects with you over the coming week.

Now that we are in Alert Level 3 Stampin’ Up! has commenced shipping again – yay – so if you are in need of supplies please let me know as I will be placing an order tomorrow evening.

Today’s project is one I created for one of my card classes and haven’t got round to sharing. It uses the lovely Painted Poppies set which is carrying over to the 2020-2021 Annual Catalogue and the masking technique.

The card base is Poppy Parade with a mat of Basic Black and then the card front is Shimmery White. I used Shimmery White as it’s a bit softer in tone and also better for colouring in with a Blender Pen. The stems have been coloured in with Old Olive ink and a Blender Pen. Poppy Parade ink was used for the unopened poppy.

The outline images are stamped first in Memento Black and then with Poppy Parade. We used a ‘mask’ for the bottom Poppies stamping the left one first, applying the mask then stamping the right one. When it came to stamping the stem image we needed two masks to cover the top and bottom right Poppies. The stem image actually has a flower attached but by using the masking technique you can use just the stem.

And here’s the inside of the card where you can see the full stamped image of the flower with the stem. The masking technique allows you to get two images from the one set.

Until next time …

Beautiful Moments – Jotta Pads

By | April 30, 2020

Hi there

It’s hard to believe we’re at the end of April and that means one third of 2020 has just whizzed past – what a year it’s been so far. I hope you are all doing well in your ‘bubbles’ and staying safe.

Today’s post features the Million Dollar stamp set inspired by Jacque Williams (so happy this set will be carrying over to the 2020-2021 Annual Catalogue).

Beautiful Moments

I ended up using all the stamps in the set on these three covered jotta pads. There’s a great shop called Geoff’s Emporium here in Auckland and they sell jotta pads (12 pads for $1) – I ended up covering and decorating 90 of these for staff at Christmas. I made sure I went back and got my own supply for decorating. This set is perfect for creating your own scene and there are lots of ways to colour in the images. Here I’ve used my Watercolour Pencils.

I’ve used the ‘Masking Technique’ to create this scene so that the ‘mother and daughter’ are in the forefront on the beach and ‘Rangitoto’ is in the background. Post-It Notes are your best friend for creating a project like this.

I must admit this scene took a few attempts to get it looking right and balanced. Don’t be afraid if you have to turn your cardstock over and start again (and again in my case). The birds and butterflies really finish the scene off.

I really love this set but I think this is my favourite image of the set. The images have been stamped with Memento Black and then a range of Watercolour Pencils have been used to colour in these images. The frames are cut using the biggest die from the Stitched So Sweetly Dies on page 20 of the Mini Catalogue.

Leave me a comment and let me know which scene is your favourite.

Until next time …

CASEing – Copy And Share Everything

By | April 26, 2020

Hi there

I’m sure you’ve all heard the term CASEing a card – Copy And Share Everything. Well today’s projects are a CASE based on the card below from a US demo – Julie Davison.

Card by Julie Davison

I really liked this card but I didn’t have any of the products she’d used so I checked out my stamps to see what I could use instead and came up with four sets – Daisy Lane, Floral Essence, Timeless Tulips and Varied Vases. That’s the good thing with CASEing – you don’t have to use exactly the same products to get the same effect – use what you have on your shelf.

Daisy Lane

The card bases for the first three cards is Crumb Cake with mats measuring 3 1/4″ and the Whisper White measures 3″.

My first card features the Daisy Lane set (page 23 AC). My card recipe is: flowers stamped in Rococo Rose and Petal Pink (‘fussy’ cut), leaves stamped with Mint Macaron, sentiment stamped with Rococo Rose, Rococo Rose mat, DSP – 2 1/4″ strip of Perennial Essence DSP, 2019-2021 In Color Faceted Dots, 1/4″ Mint Macaron Textile Ribbon and 7/16 Natural Trim Ribbon (retired)

Floral Essence

This card features the Floral Essence stamp (page 108 AC). My card recipe is: flowers stamped in Lovely Lipstick and Blackberry Bliss with Pineapple Punch centers (‘fussy’ cut), leaves stamped with Old Olive and coloured in with Old Olive Stampin’ Blend, sentiment stamped with Blackberry Bliss, Blackberry Bliss mat, DSP – 2 1/4″ strip of Perennial Essence DSP, Blackberry Bliss Faceted Dots (retired), 3/8″ Magnolia Lane Line Ribbon.

Timeless Tulips

This one features the Timeless Tulips set (page 43 Mini Catalogue). My card recipe is: flowers stamped in Rococo Rose then lightly ‘daubered’ around the edge with Merry Merlot and ‘fussy’ cut, leaves stamped with Mint Macaron, sentiment from Butterfly Gala (page 46 AC) stamped with Rococo Rose, Soft Suede mat, DSP – 2 1/4″ strip of Lily Impressions DSP (Sale-A-Bration retired), 3/8″ Magnolia Lane Line Ribbon.

Varied Vases

For this final card featuring the Varied Cases set (page 60 AC) I decided to change the orientation and card base colour to Soft Suede – the DSP seemed to go better with this than Crumb Cake. My card recipe is: L to R – Mango Melody flowers/Pretty Peacock vase, Real Red flowers/Old Olive vase, Grapefruit Grove flowers/Pool Party vase – the vases have been punched out with the Vases Builder Punch, sentiment stamped with Pretty Peacock, Pool Party mat, DSP – 2″ strip of Tropical Oasis DSP.

I hope these cards have shown how you too can ‘CASE’ a card you like with the supplies you have. I’d love to see your creations.

Until next time …

Last Chance Product List – now out

By | April 23, 2020

Hi there

It’s that time of the year again when we bid a sad farewell to the retiring stamps, papers and products. BUT we won’t be sad for long as the new 2020-2021 Annual Catalogue is just around the corner.

The best way to shop at the moment is via my online shop. Click here for Annual Catalogue retiring list and here for the Mini Catalogue retiring list. If you would like an Excel version of this please email me and I’ll send one to you.

Please note that things marked with an asterix may be reconfiguring or just not available as a discounted bundle in the new book; please check the legend at the bottom of each retiring list. 

Please remember these items are all ‘while stocks last’ so be in quick if there is anything you wish to purchase. If you have any questions please do not hesitate to contact me.

The Gangs All Meer – Farewell Card

By | April 21, 2020

Hi there

Here in New Zealand we have one more week in Alert Level 4 then move to Alert Level 3. There’s not much difference between levels but it will allow for online shopping so hopefully that means we can place crafting orders again – will keep you posted on that.

Today’s post uses one of the Sale-A-Bration sets – The Gang’s All Meer. This was the perfect set to use for a farewell card for one of our staff members.

The Gang’s All Meer

I decided to make them all multi coloured to add a bit of fun to the card. The images were stamped in Memento Black then coloured in with a range of Stampin’ Blends.

To create my scene I used the Masking Technique. First up I stamped the images on the left and right. I then stamped the image on two Post It Notes and ‘fussy’ cut them out. Once cut I placed them over my left and right images – this protects the already stamped images. I then reinked my image and stamped it in the middle. I also stamped the solo ‘Meer’ while the Post It Notes were in place. Some of the inked image gets stamped directly to the card front and some gets stamped on the Post It Notes. Remove the Post It Notes and your image in the middle gives the scene a 3D look.

The sentiment on the front of the card comes from the The Gang’s All Meer with the inside sentiment coming from the ‘Welcome to the Team’.

This has been a really great set to have and perfect for work cards.

Well that’s all for now. Until next time …

Well Dressed Country Club

By | April 17, 2020

Hi there

One of the downsides of being in lockdown and working from home is that the days of the week don’t seem to mean anything anymore. Instead of Monday, Tuesday, Wednesday etc they’ve now become yesterday, today and tomorrow 🙂

Today’s post features some off cuts I had from the Country Club DSP – page 47 of the Mini Catalogue – and the second release Sale-A-Bration stamp set ‘Well Dressed’.

Well Dressed
Well Dressed

The males in my family aren’t into golf so I’m glad there’s an alternative design on the other side of the paper.

I CASE’d the layout for these cards from the Sale-A-Bration brochure – page 6. Why reinvent the wheel when we’re given great layouts and designs by the Stampin’ Up! design team. As I was making multiple cards I kept the stamping the same colour. All images were stamped with Basic Gray.

The images were stamped on scraps of Whisper White then die cut using the Rectangle Stitched Dies. The placement of the images were swapped around with some based portrait and others landscape. I tied the colours from the DSP to coordinate with the card bases – Garden Green, Night of Navy and Basic Gray. For a ‘pop’ of colour I stamped the sentiment in Memento Black on Poppy Parade and Crushed Curry then punched them out with the retired Oval Punch. The sentiment is from the Dressed to Impress set.

I hope to get some crafting in this weekend – so check back soon to see what I create.

Until then …

Country Club DSP Shirt Cards

By | April 14, 2020

Hi there

I hope you all had a restful Easter weekend. Here in New Zealand we had a ‘staycation’ weekend as we are still in our lockdown. That means no ‘Sunday drives’, no shopping (other than for groceries), no going out with family or friends just staying in our ‘bubble’. So that’s what we did – I ended up reading three books 🙂

We had a number of birthdays again this month at work – mainly guys – so here are the cards I created.

Country Club DSP
Country Club DSP
Country Club DSP

The Country Club DSP on page 47 of the Mini Catalogue has golf themed designs on one side and on the other a range of argyle and stripped designs. The argyle and stips were perfect to create ‘shirt’ cards – all you need is a piece of DSP that means 4″ by 6″, a couple of folds and you have made a shirt.

For this card I’ve used Terracotta Tile as my base and dry embossed the front using the Stone 3D Embossing Folder from Sale-A-Bration. The ‘buttons’ are some retired brads I found I still had :).

This one is adhered to a Call Me Clover base that has been embossed with my ‘go to’ folder – Subtle. This has got to be my most used embossing folder – love it. Do you own this one? If not I would recommend you add it to your next shopping list.

You all know yellow is my favourite colour – I couldn’t resist pairing this stripped shirt with a Pineapple Punch base. This time I’ve used the Brick and Mortar 3D Embossing Folder. Have you noticed the simple sentiment stamp that I’ve used for all these cards? It’s from the Label Me Bold set on page 36 of the Mini Catalogue. Once stamped in the coordinating colour on scrap card stock I punched it out using the Classic Label punch and trimmed off the ends – perfect.

Check back tomorrow to see some other masculine cards I made with this DSP.

Stay safe until next time …

Hello Accented Blooms

By | April 8, 2020

Hi there

I’ve been having fun lately creating cards that require colouring in – mainly using my Stampin’ Blends. I find colouring very relaxing and a great way to unwind – I think we all need a bit of that at the moment. I hope these cards will brighten your day.

Today’s share uses a stamp set that hasn’t seen ink for some time – I’m not sure why as I really love this set.

Accented Blooms with Basic Gray

This was the first card I made with a Basic Gray mat. The colours used are Lovely Lipstick, Pumpkin Pie, Blackberry Bliss and Seaside Spray. The centres of the flowers are Daffodil Delight. The ‘hello’ has been stamped in Basic Gray.

After completing this card I thought ‘why stop’ so made another two but in different colours.

Accented Blooms with Daffodil Delight

And of course we have to have a ‘yellow’ card now don’t we :). This one uses Rococo Rose (loving this colour), Pumpkin Pie, Daffodil Delight, Seaside Spray and Blackberry Bliss. The flowers are colours using Mossy Meadow and Old Olive.

Accented Blooms with Rococo Rose

And finally a Rococo Rose version. This one has Daffodil Delight, Pumpkin Pie, Blackberry Bliss, Rococo Rose and Seaside Spray. The leaves are the same colours as above.

Well that’s all for tonight. I hope you and your families are doing well and staying safe in your ‘bubble’.

Until next time …

Ornate Style Triptic Card – 2019-2021 In Colors

By | April 5, 2020

Hi there

We have now had our second weekend in ‘Lockdown’. It’s amazing what jobs end up getting done when you can’t go anywhere. Last weekend was some spring cleaning and this weekend window washing :). I have also been able to enjoy some crafting.

On Saturday morning we were meant to have Team Training but with everything cancelled we had a Facebook Live session instead. Our Make and Take was based on a card design from one of the Artisan Design Team featuring the newly released Ornate Garden Suite.

Ornate Style Triptic Card

I wasn’t sure what to call this card so I’ve named it a Triptic Card. I don’t normally go for the ‘off centre’ look but thought I’d give it a go as that is how our sample was done. I don’t have all the products from the Ornate Garden so instead of the Ornate Layers Dies I went with the Rectangle Stitched Dies and the Subtle Embossing Folder instead of the Ornate Floral 3D Embossing Folder. I had so much fun making this card that I made four others in similar designs – keep reading to see my samples.

The Crumb Cake mat is the largest die and the Whisper White mat is the second largest die which has been embossed using the Subtle Embossing Folder. The three flower images have been stamped in Memento Ink (stamped off to give a lighter outline) on the smallest rectangle die and are adhered with mini dimensionals. My sentiment is from the Butterfly Gala set and has been heat embossed with white embossing powder – this is also adhered with our black mini dimensionals.

My flowers have been coloured in with Stampin’ Blends – Rococo Rose, Pretty Peacock and Purple Posy. The leaves are light and dark Granny Apple Green. The Woven Threads Sequins add the finishing touch.

As mentioned before I had so much fun making this card that I kept on going and made another four cards:

Ornate Style

A change in colours to Rococo Rose, Calypso Coral and Seaside Spray. I wanted my mats a bit bigger than the Rectangle Stitched Dies so I made my own using the Stitched Shapes Dies – and kept the mats straight.

Lovely Ladybug

This set was a ‘hostess only’ set during Sale-A-Bration but I couldn’t resist creating with it. I stamped the images on scrap cardstock, coloured in with Poppy Parade, Basic Black, Smoky Slate, Petal Pink and Daffodil Delight Stampin’ Blends. The images have then been die cut and adhered to the rectangles. The Whisper White mat has been embossed with the Brick & Mortar 3D folder. I went with Black Bakers Twine as I’d run out of Linen Thread although I don’t think Linen Thread would have looked right.

Varied Vases

I then started looking at what other stamp sets would fit into this design and with a slight change in ‘block’ size I came up with this. The vases have been stamped on Watercolour Paper and coloured in with Blueberry Bushel ink and an Aqua Painter. The vases have been ‘fussy cut’ to the outline. The flower images have been stamped in Memento directly to the Rectangle Stitched die cut (measures 1″ x 2 3/8″) then coloured in with Lovely Lipstick, light and dark Pumpkin Pie and Daffodil Delight. The leaves have been coloured in with Call Me Clover and then trimmed back to the outline as well.

My final design has been stamped using the Sponge Dauber ‘two tone’ technique .

Timeless Tulips

To get the two tone effect on the flower ink up the image with Mango Melody then ink your Sponge Dauber with Poppy Parade. Lightly apply ink around the edge of the stamp then stamp onto your cardstock – remember to clean your stamp after stamping each image so as not to cross contaminate your ink colours. The stems of the tulips are stamped in Pear Pizzazz directly to the card base with the Rectangle Stitched Die adhered over the stem with mini dimensionals.

Well I hope you’ve enjoyed these samples of my take on a great layout. What stamp sets do you have that could be used for one of these designs?

Until next time …

Ornate Garden Suite – Early Release

By | April 1, 2020

Hi there

First – an update about ordering and shipping during the lockdown here in New Zealand. Further to the request by the Prime Minister that business ship only essential goods into the country Stampin’ Up! has decided to hold all shipments to New Zealand for at least the next three weeks. All orders received by 11:59pm on Thursday 2 April will ship as normal. Any orders received after this time will be processed, packed and stored in the distribution centre until shipping to New Zealand resumes. So if you are in desperate need of any supplies (continue reading this post as you may want to add the Ornate Garden Suite to your shopping list) the best way to do this is via my online store so that the order gets shipped directly to you. I will keep you posted as to when shipping resumes.

As of today Stampin’ Up! have given us an early release of an upcoming Suite – Ornate Garden Suite – from the 2020-2021 Annual Catalogue. As a demonstrator I was able to preorder the products from this suite – and so I bought the Ornate Style stamp set and the Ornate Garden Specialty Designer Series Paper. I probably don’t really need any more paper but this paper is gorgeous – it has gold foil designs on some of the sheets. Check out my Promotions page for more details on this Suite.

As we are in lockdown I’m trying to send out cards to staff members to cheer them up. My first set of cards out the door features the Ornate Style stamp – but not in the colours used in this suite.

Ornate Style

I’ve used my Stampin’ Blends to colour these images – it was very relaxing after a days work.

I love that this is a large image and is pretty much all you need on the card – along with the sentiment.

And here’s a close up. I was really pleased with my colouring on this one. The main flowers are a mix of Blackberry Bliss and Rich Razzleberry and the smaller flowers are Daffodil Delight.

And here it is in a different colour combination. Lovely Lipstick for the small flowers, Rococo Rose for the back flower and Flirty Flamingo for the front flower. The sentiment is from Butterfly Gala and stamped in Lovely Lipstick. The card base for both cards is also Lovely Lipstick.

I’ve used the light and dark blends of two different greens for the leaves – Dark Mossy Meadow, Dark Old Olive, Light Mossy Meadow and then Light Old Olive. I was really pleased with the variation of colour – thanks Alisa Tilsner for your colouring tips.

Well that’s all for now – don’t forget if you need any supplies to last you through the lockdown hop on over to my online store and place your order before tomorrow night.

Until next time …

Best Dressed Fancy Fold Card and Matchbox Gift Box

By | March 30, 2020

Hi there

I hope you are all well and staying safe in your ‘bubble’. I’ve had a full on two weeks ‘work wise’. On Monday 16 March our company made the decision to get all Auckland based staff to be working from home by the end of the week. It was a huge task as we have 90+ staff so you can imagine the number of computers and monitors we had to relocate to peoples homes. Our IT team and staff were amazing and by Saturday afternoon everybody was set up to WFH (working from home). Since then it’s been full on getting things in place – making sure staff have everything they need for meetings, WFH and also the emotional side of things. I’m very proud to be working for such a caring company.

I had to tidy and rearrange my craft space so that I could have an office by day and a craft space by night – so far it’s working well and I seem to have more space to craft in :). My ‘in person’ classes are on hold for now but I’m working on holding on-line classes or doing a Facebook Live session – so watch this space. If you require crafting supplies you can still place an order via my online store and have it delivered direct to your door. Stampin’ Up! are still able to pick orders and send to New Zealand. I’ll keep you posted if this changes over the coming weeks. And now for a project I created using the Best Dressed 6″ x 6″ DSP from page 55 of the Mini Catalogue.

I love this Fancy Fold card and it’s an easy one to create. I used a piece of 6″ x 6″ DSP for the card and then used the off cuts for the inside and the box.

You can just see one of the off cuts here on the inside of the card. The sentiment in the front is from the Peaceful Moments stamp set. This has got to be my ‘go to’ sentiment set at the moment. If you don’t own this set you need to add it to your shopping list – you won’t regret it :).

At the time of making this card I didn’t own the stamp set or coordinating dies so left the inside flap blank – I also didn’t want to distract from the cool paper. Love the design and colours used in this paper pack.

And here’s the full view of the inside. Even though this piece has been rotated from the original 6″ x 6″ it doesn’t matter as the design on the paper has the bags in multiple orientations. The colour combo I’ve used for this card and box is Purple Posy and Blackberry Bliss. The inside sentiment is also from the Peaceful Moments set.

And here is the full gift – card and 3D Matchbox containing some chocolates :). The sentiment on the box is from the Label Me Bold set on page 36 of the Mini Catalogue – don’t overlook this set as the sentiments and images are perfect for all types of projects. The sentiments fit perfectly inside the Classic Label Punch. The embellishments on the card front are the Purple Posy Faceted Dots (page 178 of the AC).

Don’t forget we only have until tomorrow to get our FREE Sale-A-Bration gifts when we place an order of NZ$110 or more.

I will try and be more consistent with my blogging now that I’m set up at home and life can get back to our new ‘normal’.

Please message me if you would be interested in joining an on-line class and I will endeavour to get something set up.

Until next time …